Description
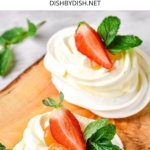
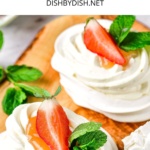
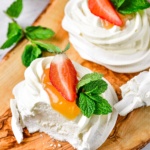
Crispy on the outside, soft and pillowy inside, these mini pavlova nests are filled with sweet cream and lemon curd, and topped with fresh strawberries and mint leaves. This gluten-free pavlova recipe is easier to prepare than it looks, and makes the perfect holiday dessert for Thanksgiving, Christmas, Easter or whenever you want something sweet. Totally dairy-free too.
Ingredients
For the Gluten-Free Pavlova Meringue:
- 2 egg whites
- 1/8 teaspoon cream of tartar
- 6 tablespoon superfine caster sugar
- 1 teaspoon cornstarch
For the Filling:
- 2/3 cup dairy-free whipping cream (very cold)
- 3 tablespoons superfine caster sugar
- 1 teaspoon vanilla extract
For Garnishing:
- 2 tablespoons lemon curd
- Fresh berries and mint leaves
Instructions
- Preheat: Preheat the oven to 260F (125C).
- Beat Egg Whites with Cream of Tartar: Pour the egg whites into the bowl, add cream of tartar and start whisking until foam appears on the surface.
- Add Sugar and Cornstarch: Add powdered sugar and continue beating on medium-high speed until you get fluffy and soft peaks. Then add cornstarch and mix everything until combined.
- Transfer Meringue Mixture to Piping Bag: Transfer the mixture to a piping bag fitted with a star nozzle.
- Pipe Meringue to Form Nests: Pipe the pavlova mixture onto a silicone mat – fill a round circle on the bottom and pipe 2-3 turns for the walls of the pavlova nests. Leave space between each nest as they will expand a little while baking.
- Bake: Put in a hot oven and bake for 10 minutes at 260F (125C) and then reduce heat to 180F (80C) before baking the mini pavlovas for another 30 minutes at 180F (80C). Once finished baking, let the gluten-free pavlova nests cool in the oven switched off for 20 minutes with the door ajar.
- Prepare Cream Filling: Pour the dairy-free whipping cream into a bowl, add the powdered sugar and vanilla. Using a hand mixer, whip the cream until fluffy on high speed until stiff peaks form. (It is important not to over-whip the cream. Whipping time depends on the power of your hand mixer – it is about 2-4 minutes).
- Transfer Whipped Cream to Piping Bag: Transfer the whipped cream to a piping bag fitted with a star nozzle.
- Fill and Assemble Pavlova Nests: Fill Pavlova cakes with whipped cream, top with lemon curd (if desired). Top with fresh berries and mint leaves.
Notes
Egg Whites: Since a pavlova is essentially a meringue-based dessert, and meringues are made with egg whites, these are fundamental. (Unfortunately, I have not made this recipe with an egg white substitute, so I don’t know how it will turn out. I do NOT recommend substituting the egg whites with anything.)
Cream of Tartar: The acidity of the cream of tartar is necessary to stabilize the egg whites to hold in air and water, and helps to give the characteristic high peaks when egg whites are beaten. However, if you do not have cream of tartar, you can use a 1:1 substitution with fresh lemon juice.
Sugar: I prefer using superfine caster sugar because it ensure that the sugar is readily dissolved into the egg whites as the mixture gets beaten. If you only have normal caster sugar instead, just process it to make it super fine before using. If you are diabetic or insulin-resistant, I highly recommend using powdered monkfruit sweetener (a 1:1 sugar alternative that is zero glycemic index and will not raise your blood sugar).
Cornstarch: The cornstarch is a thickening agent and helps to stabilize the pavlova meringue. If you don’t have cornstarch, you can use tapioca starch or arrowroot starch instead.
Whipping Cream: Make sure the whipping cream is very cold before whipping so it comes together easily. I like using dairy-free whipping cream to keep this recipe totally dairy-free. Alternatively, if you are not lactose-intolerant, feel free to use normal whipping cream instead.
Vanilla Extract: Adding a bit of vanilla extract gives the cream a delicious flavor, but if you aren’t keen or don’t have it on hand, feel free to leave it out instead.
Lemon Curd: You can either use storebought curd, or make your own with my homemade lemon curd recipe (very easy!).
Garnishing: Feel free to decorate the mini pavlova nests as desired – fresh berries, mint, almond flakes, powdered sugar or maple syrup.
Best Eaten Immediately: For best results, serve these mini gluten-free pavlova nests immediately. I do NOT recommend storing them in the refrigerator for more than a few hours.
- Prep Time: 10 mins
- Cooling Time: 20 mins
- Cook Time: 40 mins
- Category: Desserts
- Method: Baking
- Cuisine: Western