Description
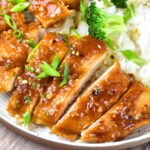
Sweetened with honey and fragrant with garlic, this easy gluten-free honey garlic chicken is a delicious chicken dinner that comes together quickly, and is perfect for busy weeknights! Serve over fluffy rice for a satisfying meal. Totally dairy-free too.
Ingredients
- 1 1/2 pounds chicken breasts, sliced into evenly thin fillets
- 4 tablespoons cornstarch
- 1/2 teaspoon ground black pepper
- 1 teaspoon garlic powder
- 1 teaspoon salt
- 2 tablespoons olive oil
- 2 tablespoons butter (dairy-free butter if lactose-intolerant)
- 3 garlic cloves, minced finely (about 1 tablespoon minced)
- 1 cup chicken broth
- 4 tablespoons honey
- 1 tablespoon apple cider vinegar
- 2 tablespoon gluten-free soy sauce
Instructions
- Coat Chicken in Cornstarch Mixture: In a bowl, mix cornstarch, salt, black pepper, and garlic powder. Coat each chicken cutlet evenly on both sides, shaking off any excess. (Coating in cornstarch helps create a light crust and keeps the chicken juicy inside).
- Pan-Fry Chicken Fillets: Heat olive oil in a large skillet over medium heat. Place the chicken fillets in the pan and cook for about 4-5 minutes per side until golden brown. Once done, transfer them to a plate and set aside.
- Sauté Garlic: Reduce the heat to low and add the butter to the same pan. Once melted, add the minced garlic and sauté for about 2 minutes, stirring constantly, until fragrant and lightly golden.
- Stir in Remaining Ingredients: Stir in the apple cider vinegar, honey, gluten-free soy sauce, and chicken broth, scraping up any browned bits from the bottom of the pan (the brown bits will enhance the sauce’s depth of flavor).
- Simmer Sauce: Bring the mixture to a gentle boil, then reduce the heat to low and letting the sauce simmer for about 5 minutes until slightly thickened.
- Add Chicken to Sauce: Return the cooked chicken fillets to the skillet. Use a spoon to coat each piece of chicken with the honey garlic with the sauce. Cover the skillet with a lid and cook for another 5 minutes, allowing the flavors to absorb and the sauce to thicken slightly.
- Garnish & Serve: Garnish with sesame seeds, chopped parsley, or red pepper flakes for extra flavor. Serve hot with steamed rice or vegetables.
Notes
Chicken: I used boneless, skinless chicken breasts, but you can also use skinless, boneless chicken thighs if you prefer. Make sure to slice the chicken into evenly-thin fillets to ensure even cooking.
Cornstarch: Coating the chicken in cornstarch before pan-frying it helps create a light crust and keeps the chicken juicy inside, so make sure you don’t skip the cornstarch!
Seasonings: I used a mix of ground black pepper and garlic powder. However, you may also add a bit of onion powder if you like.
Oil: I used extra virgin olive oil, but you can also use another type of vegetable oil if you prefer (such as canola oil, sunflower oil, etc.)
Butter: I used dairy-free butter to keep this recipe dairy-free, but you can also use regular butter, or vegetable oil of choice if you prefer.
Garlic: Since this is a recipe for honey garlic chicken, garlic is a key ingredient. I used approximately 1 tablespoon minced garlic to get the pronounced taste of garlic, but you can increase or reduce the amount according to how much garlic flavor you want.
Broth: Homemade chicken broth is best, but you can also use store-bought chicken broth or chicken stock for convenience.
Honey: Honey is a key ingredient here, so make sure to use it! Possible alternatives if you rather not use honey are maple syrup or agave nectar.
Apple Cider Vinegar: Apple cider vinegar adds a nice tanginess to the sauce. Alternatively, you can also use white wine vinegar if you prefer.
Soy Sauce: I used gluten-free soy sauce (tamari) to keep this recipe gluten-free. However, if you are not Celiac or gluten-intolerant, go ahead and use regular soy sauce instead.
Storing: To store, placed any leftover honey garlic chicken in an airtight container and store in the refrigerator for up to 4 days. Reheat in the microwave or on the stovetop until hot before serving.
- Prep Time: 5 mins
- Cook Time: 35 mins
- Category: Main Dish
- Method: Stovetop
- Cuisine: Asian