Easy Gluten-Free Lava Cake (Dairy-Free Option)
Indulge in this rich and moist gluten-free lava cake, a decadent homemade dessert that’s surprisingly easy to make. With a gooey center and deep chocolate flavor, it’s the ultimate treat for Valentine’s day, or any special occasion. Plus, it has a dairy-free option so everyone can enjoy this deliciously warm and melty delight!
")
Want to save this recipe?
Enter your email & I’ll send it to your inbox. Plus, get great new recipes from me every week!
What is Lava Cake?
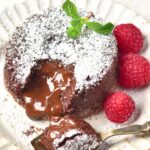
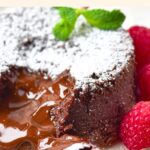
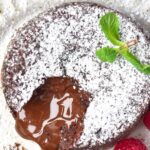
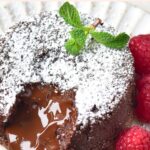
Chocolate lava cake is an individual-sized dessert with a characteristic soft, moist cake exterior and molten chocolate center (which resembles “lava” from a volcano, hence the name).
Basically a cross between a traditional chocolate cake and a soufflé, lava cake is often served warm with a scoop of vanilla ice cream or a dusting of powdered sugar, and garnished with fresh berries.
The secret to its signature liquid “lava” effect is baking it just long enough for the edges to set while the molten center remains slightly undercooked. This creates a deliciously melty chocolate core when you cut into it.
")
Why You’ll Love This Recipe:
- Few Ingredients: All you need for this molten chocolate lava cake are a handful of simple ingredients that are easily accessible at the local grocery store (nothing fancy required!).
- Super Easy to Make: Preparing these individual gluten-free lava cakes is literally a piece of cake (pun intended 😂). The key is to ensure that you don’t over-bake the cakes, so that the center remains characteristically thick and gooey.
- Totally Gluten-Free & Dairy-Free: The best part is that this recipe is 100% gluten-free and dairy-free, which means that even those with Celiac or gluten or lactose intolerances can enjoy this decadent dessert too!
")
Ingredients You’ll Need:
Here’s a visual overview of the ingredients required for making this gluten-free lava cake recipe.
(For exact measurements, please scroll down to the printable recipe card at the bottom of this post.)
")
Recipe Notes + Substitutions:
- Butter: If you are lactose-intolerant, go ahead and use dairy-free butter (vegan butter) instead.
- Dark Chocolate: I suggest using dark chocolate with at least 70% chocolate (as opposed to milk chocolate) for a richer flavor and deeper chocolate brown color (a dark chocolate bar or dark chocolate chips will both work). If you are lactose-intolerant, go ahead and use dairy-free chocolate instead.
- Eggs: Eggs are a necessary binder to bind the ingredients together, so make sure you include them.
- Sugar: I used white sugar, but cane sugar or light brown sugar will work too.
- Gluten-Free Flour: I recommend using a good-quality gluten-free all-purpose flour blend that is made up of lighter flours/starches (such as rice flour, tapioca starch, corn starch or potato starch) for the best results. I do NOT recommend using a gluten-free blend with heavier flours (such as garbanzo bean flour). If you’re not Celiac or gluten-intolerant, feel free to use regular wheat flour instead.
- Xanthan Gum: Xanthan gum is the replacement for gluten in gluten-free flours, and helps the ingredients to better bind together. If your gluten-free flour blend does not already include xanthan gum, make sure to add it in.
How to Make Gluten-Free Lava Cake (Step by Step):
1. Preheat and Grease
Preheat the oven to 450°F (230°C). Grease 6 small ramekins with butter, ensuring all sides are coated. Lightly dust with gluten-free all-purpose flour to prevent sticking and achieve a clean release after baking.
2. Melt Chocolate and Butter
In a microwave-safe bowl, melt the chocolate and butter using 30-second pulses, stirring between each until smooth. Let the mixture cool slightly to avoid scrambling the eggs when adding eggs in later.
")
")
3. Beat Eggs, Yolks, Sugar and Salt
In a separate mixing bowl, combine the eggs, egg yolks, sugar, and salt. Using a hand mixer or stand mixer, beat the mixture for about 3–4 minutes until it becomes thick, pale, and fluffy.
(TIP: Beating until fluffy is essential for creating a light texture in the cake, so make sure you don’t skip this step!).

")
4. Sift in Flour and Xanthan Gum
Whisk the gluten-free all-purpose flour and xanthan gum in a small bowl until combined. Sift the gluten-free flour mixture into the liquid mixture, folding it carefully using a spatula, ensuring the mixture remains airy and smooth.
5. Combine Egg Mixture with Chocolate Mixture
Gently pour in the melted chocolate and butter mixture, stirring continuously to combine without deflating the batter.
")
")
6. Transfer Batter to Ramekins
Divide the batter evenly between the prepared ramekins, filling them just below the rim.
7. Bake
Place the ramekins on a baking sheet and bake for exactly 8 minutes. The edges should be firm, but the center should still jiggle slightly when gently shaken.
8. Let Rest Before Removing
Remove from the oven and let the cakes rest in the ramekins for 3–4 minutes. Carefully run a knife around the edges, then invert onto a plate.
")
")
9. Garnish and Serve
Dust the molten chocolate cakes with confectioner’s sugar (also known as powdered sugar) and serve immediately with fresh berries and mint leaves for a refreshing contrast.
")
Dish by Dish Tips/Tricks:
- Don’t Over-Bake: As I previously mentioned earlier in this post, it is essential that you do NOT over-bake the chocolate lava cakes. You want to bake it just enough so that the outside forms a soft and moist cake exterior, while still retaining the molten chocolate interior.
- Garnish With: I love serving these gluten-free molten lava cakes with a sprinkling of confectioner’s sugar (aka. powdered sugar) or a little cocoa powder and fresh berries (either raspberries or strawberries for a contrast in color). Alternatively, you can serve each individual cake with a scoop of vanilla ice cream.

Other Chocolate Desserts You’ll Enjoy:
- 5-Minute Chocolate Pudding (Gluten-Free, Vegan)
- Coconut Flour Chocolate Cake (Gluten-Free, Dairy-Free)
- Chocolate Almond Bark (Gluten-Free, Vegan)
- Rich Chocolate Bundt Cake (Gluten-Free, Dairy-Free)
Other Gluten-Free Cakes to Bake:


P.S. If you try this recipe, I’d love for you to leave a star rating below, and/or a review in the comment section further down the page. I always appreciate your feedback. Be sure to check out my entire Recipe Index for all the recipes on the blog. You can also follow me on Pinterest, Facebook or Instagram! Sign up for my Email List to get fresh recipes in your inbox each week!
Gluten-Free Lava Cake (Dairy-Free Option)
- Total Time: 28 minutes
- Yield: 6 servings 1x
- Diet: Gluten Free
Description
Indulge in this rich and moist gluten-free lava cake, a decadent homemade dessert that’s surprisingly easy to make. With a gooey center and deep chocolate flavor, it’s the ultimate treat for Valentine’s day, or any special occasion. Plus, it has a dairy-free option so everyone can enjoy this deliciously warm and melty delight!
Ingredients
- 1/2 cup butter
- 6 ounces dark chocolate, broken into squares or roughly chopped
- 2 eggs
- 2 egg yolks
- 3 tablespoons sugar
- 1/2 teaspoon salt
- 2 tablespoons gluten-free all-purpose flour
- 1/8 teaspoon xanthan gum (omit if your gluten-free flour blend already includes it)
- Confectioner’s sugar, for dusting (optional)
Instructions
- Preheat and Grease: Preheat the oven to 450°F (230°C). Grease 6 small ramekins with butter, ensuring all sides are coated. Lightly dust with gluten-free all-purpose flour to prevent sticking and achieve a clean release after baking.
- Melt Chocolate and Butter: In a microwave-safe bowl, melt the chocolate and butter using 30-second pulses, stirring between each until smooth. Let the mixture cool slightly to avoid scrambling the eggs when adding eggs in later.
- Beat Eggs, Yolks, Sugar and Salt: In a separate mixing bowl, combine the eggs, egg yolks, sugar, and salt. Using a hand mixer or stand mixer, beat the mixture for about 3–4 minutes until it becomes thick, pale, and fluffy. This step is essential for creating a light texture in the cake.
- Sift in Flour and Xanthan Gum: Whisk the gluten-free all-purpose flour and xanthan gum in a small bowl until combined. Sift the gluten-free flour mixture into the liquid mixture, folding it carefully using a spatula, ensuring the mixture remains airy and smooth.
- Combine Egg Mixture with Chocolate Mixture: Gently pour in the melted chocolate and butter mixture, stirring continuously to combine without deflating the batter.
- Transfer Batter to Ramekins: Divide the batter evenly between the prepared ramekins, filling them just below the rim.
- Bake: Place the ramekins on a baking sheet and bake for exactly 8 minutes. The edges should be firm, but the center should still jiggle slightly when gently shaken.
- Let Rest Before Removing: Remove from the oven and let the cakes rest in the ramekins for 3–4 minutes. Carefully run a knife around the edges, then invert onto a plate.
- Garnish and Serve: Dust with confectioner’s sugar (also known as powdered sugar) and serve immediately with fresh berries and mint leaves for a refreshing contrast.
Notes
Butter: If you are lactose-intolerant, go ahead and use dairy-free butter (vegan butter) instead.
Dark Chocolate: I suggest using dark chocolate with at least 70% chocolate (as opposed to milk chocolate) for a richer flavor and deeper chocolate brown color. If you are lactose-intolerant, go ahead and use dairy-free chocolate instead.
Eggs: Eggs are a necessary binder to bind the ingredients together, so make sure you include them.
Sugar: I used white sugar, but cane sugar or light brown sugar will work too.
Gluten-Free Flour: I recommend using a good-quality gluten-free all-purpose flour blend that is made up of lighter flours/starches (such as rice flour, tapioca starch, corn starch or potato starch) for the best results. I do NOT recommend using a gluten-free blend with heavier flours (such as garbanzo bean flour).
Xanthan Gum: Xanthan gum is the replacement for gluten in gluten-free flours, and helps the ingredients to better bind together. If your gluten-free flour blend does not already include xanthan gum, make sure to add it in.
- Prep Time: 15 mins
- Resting Time: 5 mins
- Cook Time: 8 mins
- Category: Desserts
- Method: Baking
- Cuisine: American

My family and I love this recipe! Especially my celiac sister!
YAY! So happy to hear that!