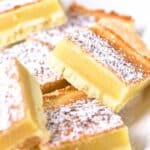
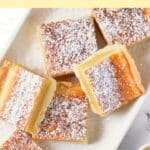
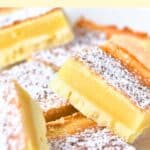
Easy Gluten-Free Lemon Bars (Dairy-Free)
With a buttery shortbread crust topped with a tangy and creamy lemon filling, and sprinkled with powdered sugar, these gluten-free lemon bars are the perfect dessert for spring and summer! Totally dairy-free too.
")
Want to save this recipe?
Enter your email & I’ll send it to your inbox. Plus, get great new recipes from me every week!
Jump to:
- What are Lemon Bars?
- Why This Recipe Works:
- Ingredients You’ll Need:
- Recipe Notes + Substitutions:
- How to Make Gluten-Free Lemon Bars (Step by Step):
- 3. Transfer Crust Mixture to Baking Dish
- 4. Prepare Lemon Filling
- Dish by Dish Tips/Tricks:
- Recipe FAQs:
- Other Gluten-Free Lemon Desserts You’ll Enjoy:
- Individual Dessert Bars You’ll Love:
- Gluten-Free Desserts to Indulge In:
- Gluten-Free Lemon Bars (Dairy-Free)
What are Lemon Bars?
Hugely popular in the United States, lemon bars are basically lemon squares with a crunchy shortbread base, and a creamy lemon custard filling or topping, over which a fine dusting of powdered sugar is sifted.
This classic lemon dessert with its refreshing citrus taste is a big hit during the warmer spring and summer months, but to be honest, it tastes so good I could eat it all year round!
The base for classic lemon bars is usually made with wheat flour (which contains gluten) and hence is not gluten-free, unless specifically said to be so.
However, today we’ll be making a gluten-free and dairy-free version that the whole family will love!
")
Why This Recipe Works:
- Simple Ingredients: The main ingredients for these gluten-free dairy-free lemon bars are easily found at your local grocery stores (nothing fancy required!).
- Easy to Make: Making these gluten-free lemon squares involves preparing and par-baking the shortbread base, and then preparing the lemon custard mixture which you pour over the pre-baked crust and then bake until ready.
- Perfect Texture & Flavor: The crunchiness of the crust contrasts beautifully with the creaminess of the tangy lemon curd filling, making these easy lemon bars the perfect summer dessert!
- Totally Gluten-Free & Dairy-Free: The good news is that these lemon slices are 100% gluten-free and dairy-free, which means that even those with Celiac disease or gluten or lactose intolerances can enjoy them without issues!

Ingredients You’ll Need:
Here’s a visual overview of the ingredients required for this gluten-free lemon bars recipe.
(For exact measurements, please scroll down to the printable recipe card at the bottom of this post.)
")
Recipe Notes + Substitutions:
- Gluten-Free Flour Blend: I recommend using a good-quality gluten-free measure-for-measure flour blend (a 1:1 substitute for regular all-purpose flour) and that is made up of lighter flours/starches (such as rice flour, tapioca starch, corn starch or potato starch). I do NOT recommend a gluten-free flour blend that is made up of heavier flours (such as garbanzo bean flour).
- Xanthan Gum: Xanthan gum is the replacement for gluten in gluten-free flours, and helps to better bind the ingredients together. If your gluten-free flour blend does not include xanthan gum, make sure to include it in.
- Cornstarch: If you are allergic to corn, you can also use tapioca starch or arrowroot starch instead.
- Powdered Sugar: Powdered sugar (also known as icing sugar or confectioner’s sugar), is sugar that has been processed until superfine. If you are diabetic or insulin-resistant, I highly recommend using powdered monkfruit sweetener (a 1:1 powdered sugar substitute that is zero glycemic index and will not raise your blood sugar).
- Butter: I used unsalted dairy-free butter to keep this lemon bars recipe dairy-free. Feel free to use coconut oil if you prefer (if using coconut oil, I recommend using refined coconut oil which has a more neutral flavor as opposed to extra virgin coconut oil which has a more pronounced coconut smell and taste.) However, if you are not lactose-intolerant, go ahead and use regular unsalted butter instead.
- Eggs: Eggs are a necessary ingredient for the smooth and creamy texture of the lemon filling, so make sure you include them in. I do NOT recommend substituting the eggs with anything in this case.
- Sugar: I used white sugar, but cane sugar or light brown sugar will work just as well. If you are diabetic or insulin-resistant, I recommend using granulated monkfruit sweetener (a 1:1 sugar substitute that is zero glycemic index and will not raise your blood sugar).
- Fresh Lemon Juice & Zest: Using the juice and zest from fresh lemons will really impart a beautiful tangy flavor to the lemon filling. However, if you don’t have fresh lemon available, bottled lemon juice will work too.
How to Make Gluten-Free Lemon Bars (Step by Step):
1. Preheat Oven and Line
Preheat the oven to 350F and line a 9”x13” baking pan with aluminum foil or parchment paper.
Alternatively, you can also use a square pan if you prefer.
2. Process Crust Ingredients
Combine the gluten-free all-purpose flour, xanthan gum (if using), cornstarch, salt, powdered sugar and cubes of dairy-free butter in a food processor. Process together until you get a sand-like texture.
Alternatively, if you don’t have a food processor, you can also whisk the dry ingredients together in a large mixing bowl and then use two knives or a pastry cutter to cut the cold butter into the dry ingredients.

3. Transfer Crust Mixture to Baking Dish
Transfer the crumb mixture to the lined baking pan, pressing the mixture firmly to get an even layer, creating ½ inch borders at the sides.
Bake for 20 minutes in the preheated oven until the buttery crust is lightly golden brown.

4. Prepare Lemon Filling
Zest two lemons and squeeze the juice from both lemons. Combine the eggs, zest, lemon juice, sugar, and gluten-free all-purpose flour.
Whisk the filling ingredients thoroughly so that there are no lumps of flour.

5. Pour Filling Over Crust
Pour the filling into the baking dish with the pre-baked crust and place back in the oven. For a softer filling, bake for 20 minutes; for a denser filling, bake for 30 minutes.
")
6. Let Cool Completely
Remove the finished lemon bars from the oven and let cool for about 2 hours at room temperature on a wire rack, until the filling has set.

7. Sprinkle with Powdered Sugar and Cut
Once the lemon filling has fully set, use the sides of the aluminum foil to remove the bars from the pan.
Sprinkle the top with a very light dusting of powdered sugar and cut into 12 squares or rectangular pieces.

Dish by Dish Tips/Tricks:
- Make Lime Bars: If you prefer, go ahead and swap out the lemon zest and juice with 1/2 cup lime juice and 1 tablespoon lime zest to make gluten-free lime bars instead.
- Cut into Rectangles or Squares: I’ve cut these easy lemon bars into squares but you can also cut them into rectangles if you prefer.
- Make a Lemon Tart: If you like, you can bake this in a round tart pan instead and serve it as a lemon-flavored tart.
- Make a Graham Cracker Crust: Swap out the gluten-free shortbread crust with a gluten-free graham cracker crust instead.
Recipe FAQs:
To store, place these gluten-free lemon bars in an airtight container or wrap with plastic wrap and store in the refrigerator for up to 5 days.

Other Gluten-Free Lemon Desserts You’ll Enjoy:
- Lemon Meringue Pie (Gluten-Free, Dairy-Free)
- No-Bake Lemon Cheesecake (Gluten-Free, Vegan)
- Easy Lemon Curd (Gluten-Free, Dairy-Free)
- Lemon Olive Oil Cake (Gluten-Free, Dairy-Free)
- Lemon Ricotta Bread (Gluten-Free)
- No-Bake Lemon Icebox Pie (Gluten-Free, Dairy-Free)
Individual Dessert Bars You’ll Love:
- Chocolate Chip Blondies (Gluten-Free, Dairy-Free)
- Moist Pumpkin Bars (Gluten-Free, Dairy-Free)
- Easy Banana Bars (Gluten-Free, Dairy-Free)
- Chocolate Pecan Bars (Gluten-Free, Dairy-Free)
- Cranberry Bliss Bars (Gluten-Free, Dairy-Free)
Gluten-Free Desserts to Indulge In:


P.S. If you try this recipe, I’d love for you to leave a star rating below, and/or a review in the comment section further down the page. I always appreciate your feedback. Be sure to check out my entire Recipe Index for all the recipes on the blog. You can also follow me on Pinterest, Facebook or Instagram! Sign up for my Email List to get fresh recipes in your inbox each week!
Gluten-Free Lemon Bars (Dairy-Free)
- Total Time: 3 hours
- Yield: 6 1x
- Diet: Gluten Free
Description
With a buttery shortbread crust topped with a tangy and creamy lemon filling, and sprinkled with powdered sugar, these gluten-free lemon bars are the perfect dessert for spring and summer! Totally dairy-free too.
Ingredients
For the Gluten-Free Shortbread Crust:
- 1 1/2 cups gluten-free measure-for-measure flour
- 1/2 teaspoon xanthan gum (omit if your gluten-free flour blend already includes it)
- 5 tablespoons cornstarch
- 1/3 teaspoon salt
- 1/2 cup powdered sugar
- 1 cup unsalted dairy-free butter, cold and cubed
For the Creamy Lemon Filling:
- 3 eggs
- 1 cup sugar
- Juice and zest of 2 lemons (approximately 1/2 cup lemon juice, and 1 tablespoon lemon zest)
- 3 tablespoons gluten-free measure-for-measure flour
For the Garnish:
- 1 tablespoon powdered sugar, for sprinkling
Instructions
- Preheat Oven and Line: Preheat the oven to 350F and line a 9”x13” baking pan with aluminum foil.
- Process Crust Ingredients: Combine the gluten-free all-purpose flour, xanthan gum (if using), cornstarch, salt, powdered sugar and cubes of dairy-free butter in a food processor. Process together until you get a sand-like texture. Alternatively, if you don’t have a food processor, you can also whisk the dry ingredients together in a large mixing bowl and then use two knives or a pastry cutter to cut the butter into the dry ingredients.
- Transfer Crust Mixture to Baking Dish: Transfer the crumb mixture to the lined baking pan, pressing the mixture firmly to get an even layer, creating ½ inch borders at the sides. Bake for 20 minutes in the preheated oven until the crust is lightly golden brown.
- Prepare Lemon Filling: Zest two lemons and squeeze the juice from both lemons. Combine the eggs, zest, lemon juice, sugar, and gluten-free all-purpose flour. Whisk the filling ingredients thoroughly so that there are no lumps of flour.
- Pour Filling over Crust: Pour the filling into the baking dish with the pre-baked crust and place back in the oven. For a softer filling, bake for 20 minutes; for a denser filling, bake for 30 minutes.
- Let Cool Completely: Remove the finished lemon bars from the oven and let cool for about 2 hours at room temperature, until the filling has set.
- Sprinkle with Powdered Sugar and Cut: Once the lemon filling has fully set, use the sides of the aluminum foil to remove the bars from the pan.Sprinkle the top with a light dusting of powdered sugar and cut into squares or rectangular pieces.
Notes
Gluten-Free Flour Blend: I recommend using a good-quality gluten-free measure-for-measure flour blend (a 1:1 substitute for regular all-purpose flour) and that is made up of lighter flours/starches (such as rice flour, tapioca starch, corn starch or potato starch). I do NOT recommend a gluten-free flour blend that is made up of heavier flours (such as garbanzo bean flour).
Xanthan Gum: Xanthan gum is the replacement for gluten in gluten-free flours, and helps to better bind the ingredients together. If your gluten-free flour blend does not include xanthan gum, make sure to include it in.
Cornstarch: If you are allergic to corn, you can also use tapioca starch or arrowroot starch instead.
Powdered Sugar: Powdered sugar (also known as icing sugar or confectioner’s sugar), is sugar that has been processed until superfine. If you are diabetic or insulin-resistant, I highly recommend using powdered monkfruit sweetener (a 1:1 powdered sugar substitute that is zero glycemic index and will not raise your blood sugar).
Butter: I used unsalted dairy-free butter to keep this lemon bars recipe dairy-free. However, if you are not lactose-intolerant, go ahead and use regular unsalted butter instead.
Eggs: Eggs are a necessary ingredient for the smooth and creamy texture of the lemon filling, so make sure you include them in. I do NOT recommend substituting the eggs with anything in this case.
Sugar: I used white sugar, but cane sugar or light brown sugar will work just as well. If you are diabetic or insulin-resistant, I recommend using granulated monkfruit sweetener (a 1:1 sugar substitute that is zero glycemic index and will not raise your blood sugar).
Lemon Juice & Zest: Fresh lemon juice and zest will really impart a beautiful tangy flavor to the lemon filling.
Storing: To store, place the lemon bars in an airtight container or wrap with plastic wrap and store in the refrigerator for up to 5 days.
- Prep Time: 10 mins
- Chilling Time: 2 hours
- Cook Time: 50 mins
- Category: Desserts
- Method: Baking
- Cuisine: American


Can you use parchment paper instead of aluminum foil because it turns out foil is toxic
Hi Diane, yes sure go ahead and use parchment paper instead 🙂
These are excellent! I did use real butter. And I recommend that you grease the aluminum foil that you line the pan with – mine stuck to the foil in place. So good, will make these again. (I baked the filling for 30 minutes)
YAY! So happy to hear that you enjoyed this recipe Mary Anne! Thanks for sharing the tip about greasing the foil. Alternatively, you can use parchment paper too. Hope to see you around the blog again sometime soon!
xx,
felicia
the page don’t work, I click in metric, still say in cups… 🙁
Hi Kitara, thanks for letting me know, I’ll get in touch with my developer to fix that.