Easy Strawberry Crumble Bars (Gluten-Free, Dairy-Free)
These delicious strawberry crumble bars make the perfect anytime snack and an easy summer dessert! Deliciously sweet with the season’s freshest strawberries, these are the best way to celebrate spring and summer. They’re also gluten-free and dairy-free, but no one would care!
")
Want to save this recipe?
Enter your email & I’ll send it to your inbox. Plus, get great new recipes from me every week!
Jump to:
- Crumble bars filled with strawberries and baked to a crisp
- Why This Recipe Works:
- Ingredients You’ll Need:
- Ingredients Notes/Substitutions:
- How to Make Strawberry Crumble Bars (Step by Step):
- Dish by Dish Tips/Tricks:
- Recipe FAQs:
- Other Gluten-Free Summer Desserts You’ll Love:
- Gluten-Free Sweet Treats to Indulge In:
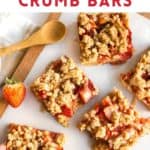
- Easy Strawberry Crumble Bars (Gluten-Free, Dairy-Free)
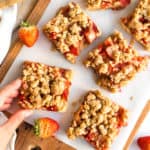
Crumble bars filled with strawberries and baked to a crisp
Now that it’s spring and almost summer in the US, and strawberry season is in full swing, it’s time to eat and bake with as many juicy strawberries as we can.
Definitely one of my favorite berries ever (as well as raspberries and blueberries), strawberries are delicious both fresh or cooked.
")
In today’s recipe, we’ll be using fresh strawberries to make these absolutely amazing gluten-free strawberry crumble bars that Juan and I couldn’t stop eating (no kidding).
These amazing crumb bars feel just like eating mixed berry crumble (one of our favorite desserts ever!) but in individual servings.
They’re the perfect size for a snack and will definitely satisfy your sweet tooth.
Why This Recipe Works:
- Simple Ingredients: The basic ingredients required for these strawberry crumble bars are easily accessible at the grocery store, and you might already have most of them on hand (nothing fancy required!)
- Easy to Make: These crumb bars come together easily, and anyone can make them!
- Amazing Texture and Taste: With a firm crust and delicious strawberry filling finished off with a crunchy crumble topping, this easy strawberry dessert recipe is just like eating berry crumble in bar form!
- Totally Gluten-Free and Dairy-Free: Best of all, this strawberry crumble bars recipe is 100% gluten-free and dairy-free, which means even those with Celiac disease or gluten or lactose intolerances can enjoy them without worries!
Ingredients You’ll Need:
Here’s a visual overview of the ingredients required for making this strawberry crumble bars recipe.
(For exact measurements, please scroll down to the printable recipe card at the bottom of this post.)
")
Ingredients Notes/Substitutions:
- Strawberries: If you don’t have fresh strawberries on hand, you can also use 4 cups of frozen strawberries (just make sure to defrost the strawberries and drain the excess water before using). You can also substitute the strawberries or equal amounts of other fresh berries or 4 cups of frozen berries.
- Brown Sugar: I used brown sugar, but you may also use white sugar or coconut sugar if you prefer.
- Lemon Juice: The lemon juice makes the strawberry filling a little more tart, and I recommend using fresh lemon juice instead of bottled lemon juice. If you prefer not to have a tart taste, you may leave out the lemon juice instead.
- Gluten-Free All-Purpose Flour: In this easy recipe I used a gluten-free all-purpose flour blend, but you can also substitute it with an equal amount of almond meal, almond flour or cashew flour.
- Baking Powder: If you have Celiac disease or gluten intolerance, make sure you use certified gluten-free baking powder.
- Egg: The egg helps to bind the ingredients better together. If you are vegan or allergic to eggs, you can also use aquafaba or an egg-replacer.
- Coconut oil: I like to use refined coconut oil (as it as a neutral taste) instead of extra virgin coconut oil (which tends to have a stronger coconut flavor and taste). You may also use vegan butter if you prefer. Alternatively, if you are not lactose-intolerant, you can replace coconut oil for an equal amount of cold butter or ghee.
- Vanilla Extract: I like adding a bit of vanilla extract for extra flavor, but if you’re not keen on it or don’t have it on hand, feel free to leave it out.
")
How to Make Strawberry Crumble Bars (Step by Step):
1. Preheat and Line
Preheat oven to 350F and line a 10″ x 7″ baking pan with parchment paper.
2. Prepare Strawberry Filling
In a medium bowl, combine the fresh chopped strawberries with 1/2 cup brown sugar, fresh lemon juice, and 1 tablespoon gluten-free all-purpose flour, then mix well and set aside.
")
3. Mix Dry Ingredients For Crumble Mixture
In a large bowl, combine the remaining 3 cups of gluten-free all-purpose flour, the remaining 1 cup of brown sugar, baking powder, and salt together. Whisk until combined.
4. Add Remaining Crumble Ingredients
Add the beaten egg, vanilla extract, and coconut oil to the flour mixture, and use either a pastry cutter (or two knives if you don’t own a pastry cutter) to cut at the coconut oil and the mixture until you get a sand-like crumbly texture.
")
5. Press Crumble Into Pan to Form Crust
Scoop 3/4 of the crumble mixture (reserving the rest) onto the parchment-lined baking pan and press the mixture down evenly and as firmly as you can with the back of a spoon.
6. Par Bake Crust
Bake the crust for 10 minutes until lightly brown.
")
7. Place Strawberry Filling Over Crust and Top with Crumble
Once the crust has been par-baked, pour the strawberry mixture over the crust and spread it out evenly to cover the whole surface. Sprinkle the rest of the reserved topping mixture evenly over the strawberry layer.
")
8. Bake Until Golden Brown
Bake for 30 to 35 minutes in the preheated oven until the crumb topping is golden brown and crispy (if the crumb topping appears to be browning too quickly, cover with aluminium foil until the rest is cooked.)
")
9. Cool Completely Before Slicing
Allow the fresh strawberry crumble bars to cool completely at room temperature before removing them from the pan and slicing them into squares with a sharp knife.
")
Dish by Dish Tips/Tricks:
- Line Baking Sheet: Make sure to line the baking sheet with parchment paper to prevent the crust from sticking to the bottom of the pan, and to make it easier to remove the strawberry crumb bars once baked.
- Swap Strawberries for Other Berries: If you prefer, you can make this recipe with other berries such as blueberries, raspberries, blackberries, or even a mixtures of them!
- Cool Fully Before Slicing: Because of the coconut oil in the crust, it will harden and firm up as it cools. (If you slice it too early, it may be too soft and fall apart. Only once the crust has cooled, slice into 12 squares and enjoy your bars. You’ve earned it!)
- Serve with Ice Cream: While these strawberry crumb squares are perfect on their own, you can also elevate them by serving them with a scoop of ice cream.
Recipe FAQs:
To store, you can either wrap the baking sheet with plastic wrap or place the strawberry crumb bars in an airtight container and store in the refrigerator for up to 5 days.
Yes, you can! To freeze, place the strawberry crumb bars in a single layer in a freezer-safe container and freeze for up to 2 months. Before eating, let the frozen bars thaw completely overnight in the refrigerator, or reheat them in the oven for 5 to 10 minutes at 350F.
Yes, strawberries are naturally free of gluten, which makes them perfectly safe for those with Celiac disease or gluten intolerances.
")
Other Gluten-Free Summer Desserts You’ll Love:
- Gluten-Free Blueberry Crisp (Gluten-Free, Vegan)
- Easy Mixed Berry Crumble (Gluten-Free, Vegan)
- Mixed Berry Coconut Yogurt Popsicles
- Gluten-Free Mixed Berry Crisp
- Gluten-Free Mini Mixed Berry Galettes
- Gluten-Free Strawberry Hand Pies
- Easy Blueberry Hand Pies
Gluten-Free Sweet Treats to Indulge In:


P.S. If you try this recipe, I’d love for you to leave a star rating below, and/or a review in the comment section further down the page. I always appreciate your feedback. Be sure to check out my entire Recipe Index for all the recipes on the blog. You can also follow me on Pinterest, Facebook or Instagram! Sign up for my Email List to get fresh recipes in your inbox each week!
Easy Strawberry Crumble Bars (Gluten-Free, Dairy-Free)
- Total Time: 55 minutes
- Yield: 12 servings 1x
- Diet: Gluten Free
Description
These delicious strawberry crumble bars make the perfect anytime snack and an easy summer dessert! Deliciously sweet with the season’s freshest strawberries, these are the best way to celebrate spring and summer. They’re also gluten-free and dairy-free, but no one would care!
Ingredients
- 3 cups fresh strawberries, leaves removed and cut into pieces
- 1 1/2 cups brown sugar, divided
- 1 tablespoon fresh lemon juice
- 3 cups + 1 tablespoon gluten-free all-purpose flour, divided
- 1 teaspoon baking powder
- 1/4 teaspoon salt
- 1 large egg, beaten
- 1 cup coconut oil, chilled and solid
- 1 teaspoon vanilla extract
Instructions
- Preheat and Line: Preheat oven to 350F and line a 10″ x 7″ baking pan with parchment paper.
- Prepare Strawberry Filling: In a medium bowl, combine the fresh chopped strawberries with 1/2 cup brown sugar, fresh lemon juice, and 1 tablespoon gluten-free all-purpose flour, then mix well and set aside.
- Mix Dry Ingredients for Crumble: In a large bowl, combine the remaining 3 cups of gluten-free all-purpose flour, the remaining 1 cup of brown sugar, baking powder, and salt together. Whisk until combined.
- Add Remaining Crumble Ingredients: Add the beaten egg, vanilla extract, and coconut oil to the flour mixture, and use either a pastry cutter (or two knives if you don’t own a pastry cutter) to cut at the coconut oil and the mixture until you get a sand-like crumbly texture.
- Press Crumble into Pan: Scoop 3/4 of the mixture onto the parchment-lined baking pan and press the mixture down evenly and as firmly as you can with the back of a spoon.
- Par-Bake Crust: Bake the crust for 10 minutes until lightly brown.
- Place Strawberry Filling Over Crust: Once the crust has been par-baked, pour the strawberry mixture over the crust and spread it out evenly to cover the whole surface. Sprinkle the rest of the crumb mixture evenly over.
- Bake Until Golden Brown: Bake for 30 to 35 minutes until the crumb topping is golden brown and crispy (if the crumb topping appears to be browning too quickly, cover with aluminium foil until the rest is cooked.)
- Cool Completely Before Slicing: Allow the bars to cool completely at room temperature before removing them from the pan and slicing them into squares.
Notes
Strawberries: If you don’t have fresh strawberries on hand, you can also use 4 cups of frozen strawberries (just make sure to defrost the strawberries and drain the excess water before using). You can also substitute the strawberries or equal amounts of other fresh berries or 4 cups of frozen berries.
Brown Sugar: I used brown sugar, but you may also use white sugar or coconut sugar if you prefer.
Lemon Juice: The lemon juice makes the strawberry filling a little more tart, and I recommend using fresh lemon juice instead of bottled lemon juice. If you prefer not to have a tart taste, you may leave out the lemon juice instead.
Gluten-Free All-Purpose Flour: In the recipe I used a gluten-free all-purpose flour blend, but you can also substitute it with an equal amount of almond meal or cashew flour.
Baking Powder: If you have Celiac disease or gluten intolerance, make sure you use certified gluten-free baking powder.
Egg: The egg helps to bind the ingredients better together. If you are vegan or allergic to eggs, you can also use aquafaba or an egg-replacer.
Coconut oil: I like to use refined coconut oil (as it as a neutral taste) instead of extra virgin coconut oil (which tends to have a stronger coconut flavor and taste). You may also use vegan butter if you prefer. Alternatively, if you are not lactose-intolerant, you can replace coconut oil for an equal amount of cold butter or ghee.
Vanilla Extract: I like adding a bit of vanilla extract for extra flavor, but if you’re not keen on it or don’t have it on hand, feel free to leave it out.
Storing/Freezing: To store, place the strawberry crumble bars in an airtight container and store in the refrigerator for up to 5 days. To freeze, place the strawberry crumb bars in a single layer in a freezer-safe container and freeze for up to 2 months. Before eating, let the frozen bars thaw completely overnight in the refrigerator, or reheat them in the oven for 5 to 10 minutes at 350F.
Adapted from: Iowa Girl Eats
This recipe was originally posted in May 2020, but has since been republished to include clearer step-by-step instructions, recipe notes, as well as ingredient substitutions.
- Prep Time: 10 mins
- Cook Time: 45 mins
- Category: Desserts
- Method: Baking
- Cuisine: American
I made this recipe and loved it so want to make again, but I had an extremely hard time mixing in the chilled and solid coconut oil because it was very solid. Am I doing something wrong?
Hi Laura! Glad you loved the recipe! The thing about the coconut oil is that when it is super solid it is very hard, so you can let the coconut oil soften a little, but still solid just not as hard, and then either use two knives or a pastry cutter to “cut” the coconut oil into the other crumble mixture ingredients.
I am on a low fodmap diet and in the elimination phase so I can only eat what on the paper my gastro gave me and it’s sooo hard finding things that are void of all ingredients I can’t have so finding this recipe to try was hopeful… I am gluten free and mostly dairy free besides hard cheese like sharp cheddar in small amounts and I use country crock plant based non dairy butter that is actually really good my MIL turned me on to as it’s mostly olive oil and other oils so i was wondering if I could use that instead of coconut oil. Yes I know it’s not going to be cut and cubed but I figured if it’s still cold and I like my crumble a bit softer and moist anyway… but if you think i need the cold and able to cut kind could I use the imperial margine? The ingredients are almost the same as in the plant based butter anyway just more solid and for the lemon juice id just slice a lemon and squeeze out the amount instead of the kind that comes in the little plastic lemon bottle right? I can’t have wheat, barley or rye and I love strawberry breakfast bars and cereal bars yet they all have wheat or inulin and something I can’t have so ok excited to try this
Hi Paige! You can definitely try the country crock plant based non dairy butter. Should work fine too. And yes, you can use either fresh lemon juice or bottled juice if that’s what you have.
i actually made the strawberry mix a couple days in advance bc I forgot I didn’t have an ingredient then today I made the crumble and had the strawberry mix in the fridge.. I always keep stuff three days at most but I used the country Crock plant based dairy free butter and it’s kinda hard so it needs cutting at also like coconut oil and I didn’t have a whisk so I used two plastic forks turned towards each other to mix and chop at the butter and but chunks of dough until it was like sand with a mix of med chunks in the picture and It worked pretty well , easier than the two knives I had … whatever works for you to achieve the same results. The strawberry mix is more juicy and liquidy after refrigerated but it still boils well and works if you like yours moist like I do
I took these bars to take to a picnic. They were easy to make and delicious. I made them the night before and kept them in the fridge.
I will make them again. Thank you for your delicious recipes.
Hi Jane! So happy to hear that you enjoyed these strawberry crumble bars! 🙂 Makes my day to hear that. Hope to see you around the blog again sometime soon!
xx,
Felicia
If I were to make a 9 x 11 size, how would I alter the ingredients?
Hi Sally! I believe you should be able to double the ingredients and it would work just fine.
Tried these after looking at a lot of recipies. They came out perfectly! I substituted 1 cup of the gf flour for 1 cup of oat flower and it was great! Thank you from Italy for the excellent recipe:)
Hi Mar! Grazie mille!! Am so happy to hear that it worked with oat flour too! Italy is such a beautiful country, we might be moving there sometime soon!
Very good! May tweak as crumbly mix is a little dry but my daughter who has celiacs won’t have any problem devouring it (nor will I)! Love the tartness in the strawberries! Will be making this regularly! Thanks and keep sharing recipes!
Hi Andrea! So happy to hear that your daughter can enjoy these crumble bars without issues! If you want to make the crumble mix a little more moist, feel free to add a bit of dairy-free milk (or normal milk) to the mix. Alternatively you can add a drizzle of maple syrup/honey if you prefer. Thanks for your lovely comment, and I hope to see you around the blog again soon!
Is the 3 cups of strawberries measured before or after cutting them up? About how much would that be in weight?
Hi Jenny 3 cups of strawberries would be measured after cutting them up (approximately 600g or 1 1/3 pounds).
Good morning Felicia!
These strawberry crumble bars are great to bring along when going for long walks with friends for snacking and to get a boost of energy to enjoy the walk ….
Have a blessed day ahead!
Mum
Yes, perfect for sharing with friends!
you have 2 ingredients that are not used in the directions – fresh lemon and 1 egg – I thought it was a mistake and included them in the mix and ruined the finished product
Hi Cheryl, I’m so sorry to hear that! Thank you for pointing it out, I’ve corrected the recipe directions to include the lemon juice (goes into the strawberry mixture) and egg (into the flour mixture) accordingly. Once again, I’m so sorry and thank you very much for letting me know 🙂 Have a great Sunday!
Thank you for sharing this lovely and healthy recipe, keep sharing this kind of recipes.
Hi Felicia,
This is a great snack to have for afternoon tea or small group gathering.
Just a question, can these be prepared earlier and kept in the fridge for much later serving, say the following day and still be as fresh? I think I will try it out first so that I know whether it can be prepared in advance.
Thanks again for the tip of having it fully cooled down before cutting.
Bless your heart with lots of love and hugs from home,
Mum
Hi mummy! Yes, you can prepare it in advance and let it chill in the fridge. In fact Juan and I did that, and the base of the bars firmed up even more after chilling so it made it even easier to hold them bars when you eat them 🙂 If you do make these let me know how they go! :))