Description
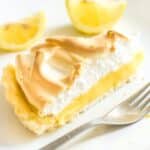
This amazing gluten-free lemon meringue pie is the perfect dessert for any special occasion (think Mother’s day, Christmas, Easter, or any day you want to celebrate at all). A deliciously light and flaky crust filled with smooth, citrusy lemon curd and topped with a sweet and stable Italian meringue that doesn’t weep even after a few days. Totally dairy-free too, but honestly you wouldn’t care!
Ingredients
For the Pie Crust:
- 2 cups gluten-free all-purpose flour + more for dusting
- 2 tablespoons light brown sugar
- 1/2 cup coconut oil, chilled and solid
- 1 egg, beaten + extra for brushing
- 2/3 cup cold water
For the Lemon Curd:
- 6 large eggs
- 1 1/3 cup white sugar
- 2 cups fresh lemon juice (approx. 8 - 9 medium lemons)
- zest of 4 lemons
- 1 cup coconut oil
For the Meringue:
- 1 1/2 cups white sugar
- 1/2 cup water
- 4 egg whites
Instructions
(1) Make the Pie Crust:
- Preheat and Grease: Preheat the oven to 425F and grease a pie pan with a removable bottom.
- Prepare the Pie Crust Dough: In a large mixing bowl, whisk the gluten-free flour and sugar until fully combined. Add chilled coconut oil and cut the coconut oil into the flour (either with a pastry cutter, two knives, or use the back of a fork to press the coconut oil into the flour). You’ll get an off-white crumbly mixture with the texture of coarse sand. Add the beaten egg and mix well. The mixture will still be crumbly, but will be slightly pale yellow now. Add cold water 1 tablespoon at a time, mixing with a spoon until you get a dough that holds together (better to have a dough that’s a little too moist than too dry).
- Roll out Dough: Shape dough into a disc and then roll out the dough between two pieces of parchment paper until the dough is slightly larger than your pie tin.
- Press Dough into Pie Tin: Remove the top parchment paper and then place your hand below the bottom piece of parchment to flip the dough onto your pie tin, then slowly peel off the remaining parchment paper as you press the dough into the tin. Note that the dough may break, but don’t worry as you can easily press the dough back into place (it will still look beautiful once baked).
- Par-Bake the Crust: Brush the exposed edges with egg wash, and then bake the crust for 20 minutes at 425F until the crust is firm and the edges are golden brown. Once done, remove from the oven and let cool.
(2) Prepare the Lemon Curd:
- Cook the Lemon Curd: While the crust is par-baking, prepare the curd. Combine the sugar and eggs together in a large microwave-proof bowl, and whisk well until combined. Add the lemon juice, zest, and melted coconut oil together and mix well. Cook the mixture on high heat in the microwave for 1-minute intervals, whisking well after each minute. This should take between 3 to 7 minutes, depending on the strength of your microwave. You’ll know the lemon curd is ready once the mixture is thick and coats the back of a metal spoon.
- Strain the Curd: Strain the lemon curd through a fine-mesh strainer to ensure that it becomes as smooth and silky as possible. Let the curd cool for at least 10 minutes.
(3) Make the Meringue:
- Make the Syrup: Combine sugar and water in a medium pot, stirring over low heat until sugar is totally dissolved. Once dissolved, turn heat on to high until the syrup comes to a boil.
- Whisk Egg Whites: Meanwhile, whisk egg whites with a hand mixer in a heat-proof bowl until you get firm peaks (about a few minutes). Let syrup boil until it reaches 240F, before pouring the hot syrup into the whipped egg whites, mixing continuously until incorporated and the bottom of the bowl has cooled and the meringue has reached room temperature.
(4) Assemble and Finish Baking the Lemon Meringue Pie:
- Preheat Oven: Preheat oven to 350F and arrange rack to lower-third position.
- Fill the Crust: Fill the par-baked pie crust with the cooled lemon curd.
- Spread Meringue Over Lemon Curd: Scoop the meringue over the lemon curd and gently spread it evenly all over. Use the back of a large spoon to make decorate peaks.
- Bake: Bake the pie for 25 to 30 minutes until the peaks of the meringue are brown. If the meringue is browning too much, tent the pie gently with aluminium foil.
- Cool Completely: Once the pie is baked, remove it from the oven let it cool on a cooling rack for at least 1 hour until it comes to room temperature. Chill the lemon meringue pie for at least 4 hours (or better yet, overnight) before slicing and serving.
Notes
Pie Crust Notes:
- Pie Crust: I’ve included instructions for how to make our favorite gluten-free and dairy-free pie crust, but you can use any pie crust recipe you prefer. For convenience, you can also use a store-bought pie crust (in that case, it make the whole process easier and quicker).
- All-Purpose Gluten-Free Flour: I recommend using a good quality all-purpose gluten-free flour blend that is made up of a mix of lighter flours/starches (such as rice flour, corn starch, tapioca starch) and that includes xanthan gum, which acts as a replacement for gluten in gluten-free flours). I do NOT recommend using a gluten-free blend that uses heavier flours such as garbanzo bean flour as that will result in a denser final texture.
- Sugar: I used light brown sugar, but you may also use regular white sugar, dark brown sugar, or even coconut sugar if you prefer. If you diabetic or insulin resistant, I highly recommend that you use granulated monkfruit sweetener instead (a 1:1 sugar substitute that is zero glycemic index and will not raise your blood sugar).
- Coconut Oil: I like using refined coconut oil which has a neutral taste (as opposed to extra virgin coconut oil which has a more pronounced coconut flavor and smell). Alternatively, if you are not lactose-intolerant, feel free to use butter in equal quantities instead.
- Egg: The egg helps to bind the pie crust ingredients together, so make sure you don’t leave it out!
Lemon Curd Notes:
- Lemon Curd Recipe: The lemon curd recipe I’ve used is simply double the quantity of our favorite microwave lemon curd. In the case that you don’t have a microwave, you can also make the lemon curd on the stovetop. To make it on the stovetop, stir the eggs, sugar, and lemon zest in a small pot. Heat the mixture over low heat until well-combined before adding in lemon juice and coconut oil and mixing well. Make sure to whisk the mixture constantly until it thickens (approximately 5 to 10 minutes). Do not get distracted as that can make the difference between a smooth curd or an eggy mess. Once curd is ready, remove from the stovetop and strain it through a fine-mesh sieve to get rid of any lemon zest.
- Sugar: I used regular white sugar, but you may also use light brown sugar. If you diabetic or insulin resistant, I highly recommend that you use granulated monkfruit sweetener instead (a 1:1 sugar substitute that is zero glycemic index and will not raise your blood sugar).
- Eggs: While some lemon curd recipes only use egg yolks, this one uses whole eggs, so there’s no need to separate whites from yolks.
- Coconut Oil: I like using refined coconut oil which has a neutral taste (as opposed to extra virgin coconut oil which has a more pronounced coconut flavor and smell). Alternatively, if you are not lactose-intolerant, feel free to use butter in equal quantities instead.
- Strain the Curd: While straining the lemon curd through a fine-mesh strainer requires a small extra step, it is definitely a step that will ensure you get a smooth and creamy curd without any extra bits of lemon zest.
Meringue Notes:
- The meringue recipe I’ve included makes an Italian meringue, which includes more steps than the more commonly used French meringue (which only requires you to beat egg whites with sugar until stiff peaks form, but is much less stable) because you have to make a syrup, but will ensure you get a firmer and more durable meringue that doesn’t weep or lose its shape after one day.
This recipe was originally published in April 2021, but has since been republished to include clearer instructions, recipe notes and substitutions.
Meringue recipe adapted from: The Tough Cookie
- Prep Time: 35 mins
- Chilling Time: 4 hours
- Cook Time: 35 mins
- Category: Desserts
- Method: Baking
- Cuisine: American