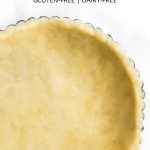
Easy Gluten-Free Pie Crust (Dairy-Free)
This easy gluten-free pie crust has a beautifully light and flaky texture you’ll love! No chilling time required, this homemade pie dough comes together in only 15 minutes with just 5 simple ingredients and is also dairy-free! Keep this handy to bake up all your holiday pies (think pumpkin pie or pecan pie)!
")
Want to save this recipe?
Enter your email & I’ll send it to your inbox. Plus, get great new recipes from me every week!
Jump to:
- Homemade Gluten-Free Crust Recipe
- The Secret to Perfect Flaky Pie Crust
- Why This Recipe Works:
- Ingredients You’ll Need:
- Recipe Notes/Substitutions:
- How to Make Gluten-Free Pie Crust (Step by Step):
- 7. Par-Bake the Crust Dough
- Dish by Dish Tips/Tricks:
- Recipe FAQs:
- Gluten-Free Pies to Make:
- Other Basic Recipes You’ll Find Handy:
- Gluten-Free Dessert Recipes to Enjoy:
- Easy Gluten-Free Pie Crust Recipe (Dairy-Free)
Homemade Gluten-Free Crust Recipe
Since we started cooking gluten-free at home because my husband Juan was diagnosed with Celiac disease, I’d been reluctant to make my own homemade gluten-free pie crust.
It was much easier to buy pre-made pie crust, but most of the store-bought regular pie crust versions use wheat flour and have milk or lactose in them.
Since Juan developed a lactose intolerance earlier this year and we went dairy-free too, I decided that it was finally time to try my hand at making my own crust.
The Secret to Perfect Flaky Pie Crust
I remember learning how to make pie crust at my cooking class a long time ago before we started eating gluten-free, and one thing my professor Pelusa Molina told us was that we had to cut the chilled butter into the flour.
The reason for “cutting in” the solid butter into the flour is to create a flaky texture, which is developed as small chunks of butter remains in the flour, keeping the butter separate from the dry ingredients when baked – and this is what creates the flaky texture.
In this case, we’re making a gluten-free and dairy-free pie crust, so I’m using chilled coconut oil instead of butter (you could also use chilled palm shortening). It’s highly important that the oil or shortening or butter you are using is chilled and hard, so that you can cut into it without it melting.

Why This Recipe Works:
- Simple Ingredients: As you can see from the photo of the ingredients below, you only need 6 ingredients (including water!) for this gluten-free dairy-free pie crust recipe. You probably already have all these on hand, which means that making this pie crust doesn’t require fancy or expensive ingredients.
- Only 15 Minutes and No Chilling Time: This gluten-free pie crust recipe also only requires 15 minutes of hands-on time, and zero chilling is required once assembled, which is a double win (for me at least)!
- Amazing Flaky Texture: You won’t believe just how flaky this pie crust turns out. It’s the perfect pie crust for making all your holiday pies – both sweet pies or savory alike! Try this flaky gluten-free pie crust for gluten-free pies such as apple pie, pecan pie, pumpkin pie, or cranberry pie – I know you’re gonna love it!
- Totally Gluten-Free & Dairy-Free: The best part is that this pie crust is 100% gluten-free and dairy-free, which means that even those with Celiac disease, or who are intolerant to gluten and lactose can enjoy it without any issues!
Ingredients You’ll Need:
Here’s a visual overview of the ingredients required to make this gluten-free pie crust recipe.
(For exact measurements, please scroll down to the printable recipe card at the bottom of the post.)
")
Recipe Notes/Substitutions:
- Gluten-free All-Purpose Flour Blend: I recommend that you use a gluten-free flour blend made with lighter flours or starches such as white rice flour, corn starch, or tapioca starch. I do NOT recommend a gluten-free flour blends that includes denser flours such as garbanzo bean flour.
- Xanthan Gum: Xanthan gum is the replacement for gluten in gluten-free flours, and it is necessary to help the ingredients bind together properly. Make sure you add xanthan gum if you flour blend does not already include it.
- Sugar: I used light brown sugar in this gf pie crust recipe, but you can also use white sugar, cane sugar, dark brown sugar or coconut sugar if you prefer. If you are diabetic or insulin-resistant, I highly recommend that you use granulated monkfruit sweetener (a 1:1 substitute for normal sugar) or you can leave out the sugar completely.
- Coconut Oil: I prefer using refined coconut oil in my cooking as it has a more neutral taste compared to extra virgin coconut oil. You may also use dairy-free butter (vegan butter) if you prefer. Alternatively, if you are not lactose-intolerant, feel free to use chilled butter in equal amounts. You can also use chilled vegetable shortening. I do NOT recommend substituting coconut oil for other vegetable oils that do not solidify when chilled as you need the coconut oil to be solid when cutting it into the flour. Alternatively, if you are not lactose-intolerant, feel free to use cold butter instead.
- Egg: The egg is necessary as a binder for the dough. I personally have not tried making this pie crust dough using an egg-substitute or egg-replacer, so I don’t know if it will work without the egg. (If you do make this without an egg, please let me know how it goes in the comments below, thank you!)
- Ice Water: It’s important that the water is cold when you use it to keep the coconut oil solid. This will help make the crust flaky. (Depending on the humidity of where you live and the type of flour blend used, you may not need to use all the ice water. Add 1 tablespoon of water at a time, mixing until you get a dough that holds together).
How to Make Gluten-Free Pie Crust (Step by Step):
1. Whisk Flour and Sugar
In a large mixing bowl, whisk the all purpose gluten-free flour and sugar until fully combined.
")
2. Cut Coconut Oil into Flour
Add chilled coconut oil and cut the coconut oil into the flour mixture (either with a pastry cutter, two knives, or use the back of a fork to press the coconut oil into the flour). You’ll get an off-white mixture of coarse crumbs with the texture of coarse sand.
")
3. Add Egg
Add the beaten egg and mix well. The mixture will still be crumbly, but will be slightly pale yellow now.

4. Prepare the Dough
Add the ice water 1 tablespoon at a time, mixing with a spoon until you get a dough that holds together.
(TIP: You may not need to use all the ice water. Make sure to add enough water so the dough doesn’t fall apart, as it’s better to have a dough that’s a little too moist than too dry).
")
5. Roll out the Dough
Shape dough into a disc and then use a rolling pin to roll out the dough between two pieces of parchment paper until the dough is slightly larger than your pie tin.

6. Press Dough into Pie Tin
Remove the top piece of parchment paper and then place your hand below the bottom piece of parchment to flip the dough onto your pie tin, then slowly peel off the remaining parchment paper as you press the gluten-free pie crust dough into the tin.
Note that the dough may break, but don’t worry as you can easily press the dough back into place (it will still look beautiful once baked).
")
7. Par-Bake the Crust Dough
Par-bake the pie crust dough for 10 to 15 minutes at 425F to firm it up slightly before adding your filling.
Alternatively, if you need a fully-baked pie crust for the recipe you’re making, simply bake for 30 minutes at 425F until the crust is firm and the edges are golden brown.
")
Dish by Dish Tips/Tricks:
- Savory Pie Crust: If you plan on using the crust for a savory pie, simply leave out the sugar and add 1/2 teaspoon of salt instead.
- “Cutting In” The Coconut Oil: You can either use a pastry cutter or two knives to cut at the solid coconut oil until it disintegrates into the flour. Alternatively, I’ve found that using the back of a fork to press down into the coconut oil also does the job, and is less tiring than using two forks.
- Pie Tin: I like using a 9-inch pie tin with a removable bottom as it makes removing the entire pie from the pie pan much easier. The ridges of the pie tin also make it easier to shape the edges of the pie crust (all you need to do is press the crust into the tin’s edges, no need for any fancy techniques)!
- Brush Edges with Egg Wash: Since this dairy-free pie crust dough doesn’t use butter and tends to bake pretty pale in color, I like to brush the exposed edges of the unbaked crust with beaten egg so that as it cooks it turns a light golden brown.
- Making Double Crust Pie: If your pie recipe requires a double crust, make sure you double this crust recipe (as the recipe is meant to make a single pie crust).
- To Par-Bake the Crust: If you need to blind bake the crust, I recommend par-baking the dough for 10 to 15 minutes at 425F to firm it up slightly before filling it.
- To Pre-Bake the Crust: If you are making this homemade gluten-free pie crust for a recipe that calls for a fully-baked pie crust, simply brush the exposed edges with egg wash, and then bake the crust for 30 minutes at 425F until the crust is firm and the edges are golden brown. The baked crust will keep for up to 5 days in the refrigerator.
Recipe FAQs:
If you are making this pie crust for a recipe that calls for a fully-baked pie crust, brush the exposed edges with egg wash, then bake the crust for 30 minutes at 425F until crust is firm and edges are golden brown. The baked crust will keep for up to 5 days in the fridge. You may also par-bake the crust for 10 to 15 minutes before pouring in the pie filling and then continue to bake the entire pie (filling included).
Yes, you can freeze the gluten-free pie dough if you are not planning on baking it immediately. Simply cover the crust with plastic wrap, and then cover the whole pie tin with aluminium foil. Store the crust dough in the freezer for up to 2 months. When ready to bake your pie crust, remove the plastic wrap and foil and then let the dough thaw for 15 minutes at room temperature while you preheat the oven.
Gluten-Free Pies to Make:
- Sweet Potato Pie (Gluten-Free, Dairy-Free)
- Pecan Pie (Gluten-Free, Dairy-Free)
- Lemon Meringue Pie (Gluten-Free, Dairy-Free)
- Blueberry Pie (Gluten-Free, Dairy-Free)
- Cranberry Pie (Gluten-Free, Dairy-Free)
Other Basic Recipes You’ll Find Handy:
- 5-Minute Homemade Almond Meal
- 5-Minute Homemade Cashew Flour
- Homemade Gluten-Free Tart Crust (Dairy-Free)
- Homemade Cashew Milk (Gluten-Free, Vegan)
- Homemade Almond Milk (Gluten-Free, Vegan)
- 10-Minute Microwave Lemon Curd (Gluten-Free, Dairy-Free)
- Homemade Pumpkin Puree (Gluten-Free, Vegan)
- Homemade Applesauce (Gluten-Free, Vegan)
- Soft, Fluffy Gluten-Free Bread (Gluten-Free, Dairy-Free)
Gluten-Free Dessert Recipes to Enjoy:


P.S. If you try this recipe, I’d love for you to leave a star rating below, and/or a review in the comment section further down the page. I always appreciate your feedback. Be sure to check out my entire Recipe Index for all the recipes on the blog. You can also follow me on Pinterest, Facebook or Instagram! Sign up for my Email List to get fresh recipes in your inbox each week!

Easy Gluten-Free Pie Crust Recipe (Dairy-Free)
- Total Time: 30 minutes
- Yield: 1 pie crust 1x
- Diet: Gluten Free
Description
This easy gluten-free pie crust recipe has a beautifully light and flaky texture you’ll love! No chilling time required, this dough comes together in only 15 minutes with just 5 simple ingredients and is also dairy-free! Keep this handy to bake up all your sweet or savory pies (think pumpkin pie or pecan pie), because you’ll be making this over and over again!
Ingredients
- 2 cups gluten-free all-purpose flour + more for dusting
- 3/4 teaspoon xanthan gum (omit if you flour blend already includes it)
- 2 tablespoons light brown sugar
- 1/2 cup coconut oil, chilled and solid
- 1 egg, beaten
- 2/3 cup ice water, amount necessary
Instructions
- Whisk Flour and Sugar: In a large mixing bowl, whisk the gluten-free flour and sugar until fully combined.
- Cut Coconut Oil into Flour: Add chilled coconut oil and cut the coconut oil into the flour (either with a pastry cutter, two knives, or use the back of a fork to press the coconut oil into the flour). You’ll get an off-white crumbly mixture with the texture of coarse sand.
- Add Egg: Add the beaten egg and mix well. The mixture will still be crumbly, but will be slightly pale yellow now.
- Prepare the Dough: Add cold water 1 tablespoon at a time, mixing with a spoon until you get a dough that holds together (better to have a dough that’s a little too moist than too dry).
- Roll out Dough: Shape dough into a disc and then roll out the dough between two pieces of parchment paper until the dough is slightly larger than your pie tin.
- Press Dough into Pie Tin: Remove the top parchment paper and then place your hand below the bottom piece of parchment to flip the dough onto your pie tin, then slowly peel off the remaining parchment paper as you press the dough into the tin. Note that the dough may break, but don’t worry as you can easily press the dough back into place (it will still look beautiful once baked).
Notes
Gluten-free All-Purpose Flour Blend: I recommend that you use a gluten-free flour blend made with lighter flours or starches such as white rice flour, corn starch, or tapioca starch. I do NOT recommend a gluten-free flour blends that includes denser flours such as garbanzo bean flour.
Xanthan Gum: Xanthan gum is the replacement for gluten in gluten-free flours, and it is necessary to help the ingredients bind together properly. Make sure you add xanthan gum if you flour blend does not already include it.
Sugar: I used light brown sugar in this recipe, but you can also use white sugar, cane sugar, dark brown sugar or coconut sugar if you prefer. If you are diabetic or insulin-resistant, I highly recommend that you use granulated monkfruit sweetener (a 1:1 substitute for normal sugar) or you can leave out the sugar completely.
Coconut Oil: I prefer using refined coconut oil in my cooking as it has a more neutral taste compared to extra virgin coconut oil. You may also use dairy-free butter (vegan butter) if you prefer. Alternatively, if you are not lactose-intolerant, feel free to use chilled butter in equal amounts. You can also use chilled vegetable shortening. I do NOT recommend substituting coconut oil for other vegetable oils that do not solidify when chilled as you need the coconut oil to be solid when cutting it into the flour. Alternatively, if you are not lactose-intolerant, feel free to use cold butter instead.
Egg: The egg is necessary as a binder for the dough. I personally have not tried making this pie crust dough using an egg-substitute or egg-replacer, so I don’t know if it will work without the egg. (If you do make this without an egg, please let me know how it goes in the comments below, thank you!)
Ice Water: It’s important that the water is cold when you use it to keep the coconut oil solid. This will help make the crust flaky. (Depending on the humidity of where you live and the type of flour blend used, you may not need to use all the ice water. Add 1 tablespoon of water at a time, mixing until you get a dough that holds together).
Savory Pie Crust: If you plan on using the crust for a savory pie, simply leave out the sugar and add 1/2 teaspoon of salt instead.
Pie Tin: I like using a 9-inch pie tin with a removable bottom as it makes removing the entire pie from the tin much easier. The ridges of the pie tin also make it easier to shape the edges of the pie crust (all you need to do is press the crust into the tin’s edges, no need for any fancy techniques)!
To Par-Bake the Crust: I recommend par-baking the crust for 10 to 15 minutes at 425F to firm it up slightly before filling it.
To Pre-Bake the Crust: If you are making this pie crust for a recipe that calls for a fully-baked pie crust, simply brush the exposed edges with egg wash, and then bake the crust for 30 minutes at 425F until the crust is firm and the edges are golden brown. The baked crust will keep for up to 5 days in the refrigerator.
Freezing the Pie Crust: If you don’t plan on baking this gluten-free dairy-free crust immediately, simply cover the crust with plastic wrap and then cover the whole pie tin with aluminium foil. The crust can be frozen for up to 2 months. When ready to bake the crust, remove the plastic wrap and foil and let the crust thaw at room temperature for 15 minutes while preheating the oven.
This recipe was originally published in October 2020, but has since been republished to include clearer instructions and additional recipe notes.
Adapted from: A Little Insanity
- Prep Time: 15 mins
- Cook Time: 15 mins
- Category: Basics
- Method: Baking
- Cuisine: Western


Thank you very much for sharing this recipe. My son has wheat and dairy allergies. It is a true milk allergy, not lactose intolerant. I am celiac with lactose intolerant. We miss pies, especially living in New Zealand where pies are incredibly good. I am excited to have found your recipe. I also appreciate you include photos.
Hi Natty! Hope you enjoy this pie crust as much as we do! 😉
Can this be made in a food processor?
Hi Lisa! I believe you can make this pie crust in a food processor. Happy baking!
Best recipe for gluten-free dairy free crust I’ve ever made in 15 years!! Thank you!! Donna
Thank you so much Donna!! I appreciate it!
This weekend, I made this pie crust for a pumpkin pie for one of my daughter’s friends, who loves pumpkin pie but can’t have dairy. It was served at Sunday Brunch for a group of college kids. The response was amazing. They all said it was the best pumpkin pie they ever had, some even said they don’t typically like the crust, but this was the most delicious crust they ever had! I make homemade pies every Thanksgiving and have been making them gluten-free for about 8 years now. I often struggle with them and they never seem to be as good. This will be my new recipe for life. I used King Arthur’s GF flour and refined coconut oil. I also used my food processor so the whole thing was a breeze. It did break a little when putting it in the pie pan, but it was easy to roll out and then easy to patch back together when some of the pieces came apart. I used a regular glass pie plate and baked on the bottom rack. I par-baked it for 10 minutes. The edges started to over-bake a bit with the pumpkin pie so I covered it with a metal pie protector. I’m so thrilled. Thank you for this recipe!
Hi Kristy! Makes me so happy to hear that your daughter and her friends enjoyed this pie crust (and that it was the most delicious crust they’ve had!). Yes, i get what you mean about the dough breaking a little but the great thing is that it’s super easy to patch back. If your daughter’s friends are not dairy-free, you could even substitute the coconut oil with butter. Glad to have you here, and happy baking! Hope to see you around the blog again sometime soon!
xx,
Felicia
This pie crust recipe is amazing! I was diagnosed with Hashimoto’s in 2023 so I’ve been searching for a (delicious) gluten and dairy free pie crust recipe! My mom said she couldn’t even tell that it was GF and DF! My husband also said this is the best gf crust I’ve made so far! Thank you so much! I love baking pies and it’s been a challenge since being diagnosed until now! I put the dough in the fridge while I made the apple pie filling and I was able to make a beautiful lattice crust! Thanks again!
Hi Jenny! Thank you so much for your lovely comment, it made my day 🙂 So happy to hear that both your mum and husband enjoy this GF DF crust…and so happy to know that you were able to make a lattice crust! Happy baking, and hope to see you around the blog again sometime soon!
xx,
felicia
Thank you for these pastry recipe as I have one for gluten free, egg free but not dairy free so thanks. For egg free I use chai egg – 1tbsp chai to 2 1/2 tbsp water & wait till the chai absorbs all the water. 😁
You’re most welcome!! Hope you enjoy this pie crust as much as we do!