Description
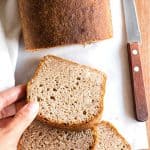
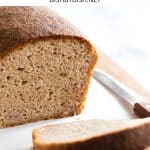
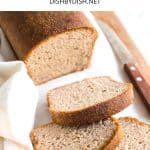
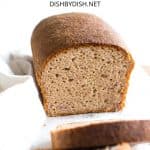
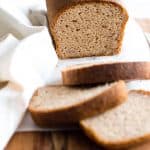
This soft and fluffy brown rice bread is simple to make, and is great for making sandwiches, or toasting and spreading with butter and jam. Made with brown rice flour for extra fiber, this easy yeast bread is totally gluten-free and dairy-free too.
Ingredients
Units
Scale
- 2 cups brown rice flour
- 1 3/4 cups warm water (approximately 105F - 115F)
- 1/4 cup sunflower oil
- 1/4 cup psyllium husk powder
- 1 tablespoon instant yeast
- 2 tablespoons sugar
- 3/4 teaspoons xanthan gum
- 2 eggs, room temperature
- 1 teaspoon baking powder
- 1/2 teaspoon salt
Instructions
- Grease: Grease an 8″x4″ metal loaf pan.
- Whisk Dry Ingredients: In a large mixing bowl, whisk the brown rice flour, psyllium husk powder, instant yeast, sugar, baking powder, xanthan gum, and salt together.
- Add Liquid Ingredients: Add the warm water, sunflower oil, and eggs to the dry ingredients and mix well to get a wet and shaggy dough (the dough is supposed to be shaggy, so don’t worry).
- Transfer to Pan: Transfer the dough to the greased loaf pan and smooth out the top with a spatula.
- Let Dough Rise: Cover the dough pan with a kitchen towel and let the dough rise approximately 30 to 40 minutes in a warm, draft-free place until it has almost doubled in size. (Tip: I like to place the loaf pan in my microwave with the power off – it creates the perfect draft-free and warm environment for rising dough).
- Preheat Oven: During the last 10 minutes of the dough rising, preheat oven to 350F and adjust the oven rack to the middle position.
- Bake: Bake the dough for 40 to 50 minutes until bread has turned dark brown on top and the loaf sounds hollow when tapped. Remove loaf from the oven.
- Cool Completely: Let the loaf cool for 10 minutes in the loaf pan, before removing and letting it cool completely on the wire rack. Use a serrated bread knife to slice once the loaf has completely cooled.
Notes
- Brown Rice Flour: I like making my own 5-minute homemade brown rice flour, but you can easily buy it online instead. Since this recipe is specifically to make brown rice bread, I wouldn’t recommend swapping it with white rice flours, as the textures are different (white rice flour is starchier than brown rice flour). If you would like to make this with other gluten-free flours with a texture similar to brown rice flour, you can use millet flour or sorghum flour in equal quantities.
- Warm Water: Make sure your water is between 105F – 115F. The water needs to be warm enough to activate the yeast, but not so hot that it kills the yeast.
- Sunflower Oil: I used sunflower oil because that’s what I always have on hand. Alternatively, you can use any neutral vegetable oil.
- Psyllium Husk Powder: Psyllium husk powder is essential in the recipe for binding the ingredients and creating the beautiful dome-shape loaf, and I do NOT recommend substituting it with any other ingredient. If you have psyllium husks, you can grind very finely to get a fine psyllium husk powder.
- Sugar: Sugar is required as food for the yeast to feed on so the yeast will be activated and make the bread rise. Do not leave it out.
- Instant Yeast: I like using instant yeast because it doesn’t need to be activated beforehand.
- Xanthan Gum: Since this is a gluten-free recipe, xanthan gum is required as a replacement for gluten to help bind the ingredients together.
- Baking Powder: In addition to the yeast, baking powder helps to give the loaf a little more rise to make it fluffier.
- Eggs: I have not tested this recipe with an egg-replacer, so I don’t know how it will turn out. (If you do try it without eggs, please leave a comment letting me know how it goes, thank you!)
- Use a Serrated Knife to Slice: Make sure to use a serrated bread knife (a knife with ridges) to slice the loaf to prevent the loaf from being squashed (which will happen if you use a knife with smooth edges).
- Storing/Freezing: To store, place the loaf in an airtight container and store in the refrigerator for up to 5 days. To freeze, wrap the cooled loaf in plastic wrap and freeze for up to 3 months. Let frozen loaf thaw completely in the refrigerator overnight before slicing.
- Adapted from: Eat Beautiful
- Prep Time: 10 mins
- Rising Time: 40 mins
- Cook Time: 50 mins
- Category: Bread
- Method: Baking
- Cuisine: American