Easy Dutch Oven Chili (Gluten-Free, Dairy-Free)
This easy stovetop Dutch oven chili con carne is a wholesome and hearty meal that feeds a crowd. Simple to cook, flavorful and delicious, and ready in under an hour, this beef chili recipe is the perfect meal for warming up to on cold nights. Totally gluten-free and dairy-free too.
")
Want to save this recipe?
Enter your email & I’ll send it to your inbox. Plus, get great new recipes from me every week!
Warm Up to A Bowl of Hearty Chili
Is there anything quite as comforting and hearty as a big bowl of chili con carne?
A tasty and spicy stew of minced beef, tomatoes, and kidney beans flavored with chili powder, garlic, cumin and coriander, chili con carne (which is sometimes also called “chile con carne” or “chilli con carne”, literally means “chili with meat”) is just what you need on a cold winter night.
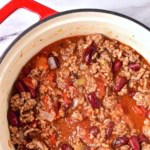
Today we’re making chili in the Dutch oven – a one-pot meal that’s ready in just 50 minutes and can go straight from stovetop to table!
")
Why This Recipe Works
- Simple Ingredients: The ingredients required for this Dutch oven chili recipe are easily accessible at the local grocery store (nothing fancy required!).
- Easy to Make: Preparing this chili con carne is not complicated at all, and a batch is ready in under an hour! It’s a cozy and hearty dinner recipe that’s perfect during the colder seasons.
- Totally Gluten-Free and Dairy-Free: The good thing is that this chili recipe is 100% gluten-free and dairy-free, which means that even those with Celiac disease or gluten or lactose intolerances can enjoy it without issues.
")
Ingredients You’ll Need:
Here’s a visual overview of the ingredients required for this Dutch oven chili recipe.
(For exact measurements and quantities, please scroll down to the printable recipe card at the bottom of this post.)
")
Recipe Notes + Substitutions
- Onion: I used a yellow onion, but you can also use a white onion or red onion instead.
- Garlic: I’m a big fan of garlic, so I like at least three garlic cloves to add flavor.
- Olive Oil: I like the flavor of extra virgin olive oil, but you can use another type of vegetable oil if you prefer (such as corn oil, sunflower oil, coconut oil, avocado oil).
- Ground Beef: I used lean ground beef, but you can use any type of ground beef you have. Alternatively, feel free to substitute the ground beef with ground chicken, ground turkey, or ground pork. If you want to make a vegetarian chili instead, feel free to use vegan ground beef.
- Tomato Paste: Tomato paste is very concentrated and amplifies the intensity of the tomato flavor (this is NOT the same as tomato sauce or tomato ketchup).
- Salt: I used fine table salt, but go ahead and use fine sea salt or fine Himalayan pink salt instead.
- Cumin Powder: I like adding cumin powder for flavor, but if you aren’t keen on the flavor of ground cumin (which can be a little strong for some), feel free to leave it out.
- Granulated Garlic: As I mentioned, I really enjoy the flavor of garlic, so I’m using granulated garlic in addition to fresh garlic for extra flavor. Alternatively, you can also use garlic powder in the same amounts.
- Ground Coriander: Coriander and cumin go very well together in savory recipes, so if you’re adding cumin, be sure to add ground coriander too!
- Red Chili Powder: I like my chili with a bit of heat, so I’m adding chili powder for that kick of spice. Alternatively, you can also use ground black pepper, paprika powder, cayenne pepper powder or crushed red pepper flakes. If you can’t take heat, feel free to leave this out.
- Beef Broth: I used beef broth, but you may also use chicken broth or vegetable broth.
- Chopped Tomatoes: You can get canned chopped tomatoes, or you can chop up your own tomatoes if you prefer.
- Red Kidney Beans: Make sure to use cooked red kidney beans (canned beans are great for convenience, but you can also cook your own if you prefer). You may also use pinto beans or black beans instead.
- Mozzarella Cheese: I used shredded dairy-free mozzarella cheese for topping this delicious Dutch oven chili to keep this recipe dairy-free. If you are not lactose-intolerant, feel free to use normal mozzarella cheese instead or cheddar cheese instead.
- Sweet Corn Kernels: I like adding a handful of cooked sweet corn kernels (canned is fine, but you can cook your own instead if you prefer) to add a bit of color contrast as well as some sweetness to contrast the savory chili.
- Avocado: Diced avocadoes add a nice touch and contrast in color.
- Parsley: I like garnishing this Dutch oven chili con carne with fresh chopped parsley, but feel free to use other fresh herbs such as cilantro or basil.
How to Make Dutch Oven Chili (Step by Step)
1. Sauté Onions and Garlic
Heat up the olive oil in a 6-quart Dutch oven over medium-high heat, then sauté the chopped onions and minced garlic, stirring occasionally until the onions are tender.
")
2. Add Ground Beef
Add the ground beef and sauté, stirring, for another 5 to 7 minutes, until beef is cooked through.
")
3. Add Tomato Paste, Salt and Spices
Add tomato paste, as well as salt and all spices. Stir well.
")
4. Add Broth, Chopped Tomatoes and Beans
Add the beef broth, crushed tomatoes, as well as the drained red kidney beans.
")
5. Simmer
Mix everything thoroughly, then simmer on low heat for 30 minutes, stirring well every 10 minutes.
(TIP: If you want the chili to be less thick, add more broth, then stir and simmer for another 5 minutes.)
")
6. Garnish and Serve
Serve this flavorful chili with your favorite toppings. For example, with grated dairy-free mozzarella cheese, sweet corn kernels, sour cream, diced avocado or herbs.
")
Dish by Dish Tips/Tricks:
- Swap Out Beef for Other Ground Meat: Feel free to substitute the ground beef with ground chicken, ground turkey, or ground pork. If you want to keep this recipe vegetarian, feel free to use vegan ground beef instead.
- Use Beans of Choice: I used red kidney beans for color, but you may also use pinto beans or black beans if you prefer.
- Add Peppers for Extra Heat: I’ve used chili powder to spice up this stovetop chili, but you may also add a diced red bell pepper, jalapeño pepper or chipotle peppers for extra heat.
- Double or Triple the Recipe: You can easily double or triple this stovetop Dutch oven chili recipe to feed a larger crowd. Alternatively, you can make more and then freeze the chili to enjoy on another day.
- Use a Slow Cooker: If you rather not make this chili on the stovetop, feel free to cook it in the slow cooker instead! Combine all the chili ingredients (except for toppings) in a slow cooker and cook on low for 6-8 hours or high for 3-4 hours.
- What to Serve with Chili? I recommend eating this chili with tortilla chips, jalapeño cornbread, or cornbread muffins.
Recipe FAQs:
To store, place any leftover chili in an airtight container and store in the refrigerator for up to 5 days. Reheat in the microwave or on the stovetop until warm before eating.
To freeze, place the cooled chili con carne in a freezer-safe container or individual freezer bags and freeze for up to 2 months. Let the chili thaw completely before reheating in the microwave or in a pot on the stovetop.
I recommending using an enamelled Dutch oven when cooking chili con carne instead of a regular cast iron Dutch oven, because the chili has tomatoes which are acidic (and the acidity may cause corrosion to regular cast iron).
")
Gluten-Free Dinner Recipes You’ll Enjoy:


P.S. If you try this recipe, I’d love for you to leave a star rating below, and/or a review in the comment section further down the page. I always appreciate your feedback. Be sure to check out my entire Recipe Index for all the recipes on the blog. You can also follow me on Pinterest, Facebook or Instagram! Sign up for my Email List to get fresh recipes in your inbox each week!

Easy Dutch Oven Chili (Gluten-Free, Dairy-Free)
- Total Time: 50 minutes
- Yield: 4 servings 1x
- Diet: Gluten Free
Description
This easy stovetop Dutch oven chili is a wholesome and hearty meal that feeds a crowd. Simple to cook, flavorful and delicious, this chili recipe is the perfect meal for warming up to on cold nights. Totally gluten-free and dairy-free
Ingredients
- 1 yellow onion, chopped
- 3 garlic cloves, minced
- 2 tablespoons olive oil
- 1 pound ground beef
- 1 tablespoon tomato paste
- 1 teaspoon salt
- 1/2 teaspoon cumin powder
- 1/2 granulated garlic
- 1/2 teaspoon ground coriander
- 1/2 teaspoon red chili powder
- 1 cup beef broth
- 1 cup chopped tomatoes in tomato juice
- 1 cup canned red kidney beans, drained
- 1/4 cup dairy-free mozzarella cheese, shredded, for topping (optional)
- 1/4 cup sweet corn kernels, for topping (optional)
- 1/4 cup diced avocado, for topping (optional)
- 1 tablespoon fresh chopped parsley, for topping (optional)
Instructions
- Sauté Onions and Garlic: Heat up the olive oil in a large Dutch oven over medium-high heat, then sauté the chopped onions and minced garlic, stirring occasionally until the onions are tender.
- Add Ground Beef: Add the ground beef and sauté, stirring, for another 5 to 7 minutes, until beef is cooked through.
- Add Tomato Paste, Salt and Spices: Add tomato paste, as well as salt and all spices. Stir.
- Add Broth, Chopped Tomatoes and Beans: Add the beef broth, chopped tomatoes in tomato juice, as well as the drained red beans.
- Simmer: Mix everything thoroughly, then simmer on low heat for 30 minutes, stirring well every 10 minutes. Tip: If you want the chili to be less thick, add more broth, then stir and simmer for another 5 minutes.
- Garnish and Serve: Serve the Dutch oven chili with various toppings. For example, with grated dairy-free mozzarella cheese, corn, diced avocado or herbs.
Notes
Onion: I used a yellow onion, but you can also use a white onion or red onion instead.
Garlic: I’m a big fan of garlic, so I like at least three garlic cloves to add flavor.
Olive Oil: I like the flavor of extra virgin olive oil, but you can use another type of vegetable oil if you prefer (such as corn oil, sunflower oil, coconut oil, avocado oil).
Ground Beef: I used lean ground beef, but you can use any type of ground beef you have. Alternatively, feel free to substitute the ground beef with ground chicken, ground turkey, or ground pork. If you want to keep this recipe vegetarian, feel free to use vegan ground beef instead.
Tomato Paste: Tomato paste is very concentrated and amplifies the intensity of the tomato flavor (this is NOT the same as tomato sauce or tomato ketchup).
Salt: I used fine table salt, but go ahead and use fine sea salt or fine Himalayan pink salt instead.
Cumin Powder: I like adding cumin powder for flavor, but if you aren’t keen on the flavor of cumin (which can be a little strong for some), feel free to leave it out.
Granulated Garlic: As I mentioned, I really enjoy the flavor of garlic, so I’m using granulated garlic in addition to fresh garlic for extra flavor. Alternatively, you can also use garlic powder in the same amounts.
Ground Coriander: Coriander and cumin go very well together in savory recipes, so if you’re adding cumin, be sure to add ground coriander too!
Red Chili Powder: I like my chili with a bit of heat, so I’m adding chili powder for that kick of spice. Alternatively, you can also use paprika powder, cayenne powder or crushed red chili flakes. If you can’t take heat, feel free to leave this out.
Beef Broth: I used beef broth, but you may also use chicken broth or vegetable broth.
Chopped Tomatoes: You can get canned chopped tomatoes, or you can chop up your own tomatoes if you prefer.
Red Kidney Beans: Make sure to use cooked red kidney beans (canned beans are great for convenience, but you can also cook your own if you prefer). You may also use pinto beans or black beans instead.
Mozzarella Cheese: I used shredded dairy-free mozzarella cheese for topping this delicious Dutch oven chili to keep this recipe dairy-free. If you are not lactose-intolerant, feel free to use normal mozzarella cheese instead.
Sweet Corn Kernels: I like adding a handful of cooked sweet corn kernels (canned is fine, but you can cook your own instead if you prefer) to add a bit of color contrast as well as some sweetness to contrast the savory chili.
Avocado: Diced avocadoes add a nice touch and contrast in color.
Parsley: I like garnishing this Dutch oven chili con carne with fresh chopped parsley, but feel free to use other fresh herbs such as cilantro or basil.
Storing/Freezing: To store, place any leftover chili in an airtight container and store in the refrigerator for up to 5 days. Reheat in the microwave or on the stovetop until warm before eating. To freeze, place the cooled chili con carne in a freezer-safe container or individual freezer bags and freeze for up to 2 months. Let the chili thaw completely before reheating in the microwave or in a pot on the stovetop.
- Prep Time: 5 mins
- Cook Time: 45 mins
- Category: Main Dish
- Method: Stovetop
- Cuisine: American


Hello Felicia!
This easy to prepare one-pot meal is great for cold and busy nights when the hungry stomachs of the family could be quickly satisfied with a nice warm meal!
Cheers!
Mum
Hi mummy, this Dutch oven chili is definitely comfort food for sure!