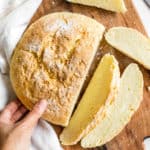
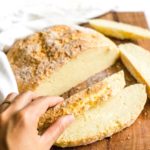
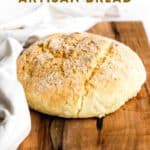
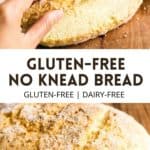
Easy Gluten-Free Artisan Bread (No-Knead, Dairy-Free)
A beautiful gluten-free artisan bread that is crazy easy to make, with no kneading required at all! Perfect for making toast, rustic sandwiches, or accompanying soups and dips, this gorgeous no knead bread recipe is totally gluten-free and dairy-free too, but no one would care!
")
Want to save this recipe?
Enter your email & I’ll send it to your inbox. Plus, get great new recipes from me every week!
Jump to:
- Baking Bread: Before and After
- Bread Baking: Patience is Key
- Why This Recipe Works:
- Ingredients You’ll Need:
- Ingredient Notes/Substitutions:
- How to Make Gluten-Free Artisan Bread (Step by Step)
- Dish by Dish Tips/Tricks:
- Recipe FAQs:
- What to Eat with Artisan Bread
- Other Gluten-Free Yeast Bread Recipes You’ll Love:
- Gluten-Free Quick Breads to Bake:
- Let’s Bake Some Bread!
- Easy Gluten-Free No Knead Bread (Dairy-Free)
Baking Bread: Before and After
You can say that my culinary experience can be divided into two different periods, with the event of baking homemade bread from scratch marking the threshold between the two.
Bread baking, with yeast and the doubling of dough included, transformed the way I looked at my relationship with cooking and baking. It taught me what being self-sufficient was about, and broke the barrier I had in my mind about so many things.
")
The first time I made a loaf of yeast-leavened bread, watching the dough rise and seeing the air-bubbles formed to give the bread height left me in awe.
It was nothing short of a miracle, and after that first loaf, I fell in love with cooking so much more. I also realized that if I could bake bread, which seemed scary and difficult before I’d tried my hand at it, it meant I could also do so many other things.
")
Bread Baking: Patience is Key
Bread baking generally takes a rather large amount of time (unless you’re talking about quick breads), and the act of baking bread is not something you should attempt if you’re in a hurry or lacking in patience.
I find that the best time to bake your own bread is when you know you have nowhere to rush to, and that the dough can take all the time it needs to rise.
Which is precisely why during this special period, when we have been spending an extraordinary amount of time at home, I’ve returned to baking yeasted bread again. With the luxury of time to slow down, relax and return to the kitchen to test out recipes again, I was intent on making a gluten-free version of the perfect artisan loaf.
After a few days of research and testing, I finally settled on this rustic gluten-free artisan bread recipe, which is adapted from this sandwich bread recipe from The Effortless Chic.
Why This Recipe Works:
We’ve made this delicious gluten-free artisan bread recipe 3 times in the past two weeks, and seriously, each time it comes out perfect.
- No Kneading Required: Since gluten-free flours don’t have gluten, there’s no need to knead because only dough with gluten requires kneading. There’s only one rise required, whereas for normal wheat breads you may have to let it rise again once you punch the dough down after its first rise.
- Super Versatile: Eat this gluten-free artisan bread toasted and spread with jam for breakfast, or as avocado toast for brunch, or make rustic sandwiches for lunch. Use it to accompany soups or soak up sauces. Or use this gluten-free no knead bread to make French toast for a special occasion. One thing is for certain – no matter how you choose to eat it, this gluten-free no knead bread is just perfect.
- Gluten-Free and Dairy-Free: Made with wholesome ingredients (and none of the nasty preservatives or additives that store-bought bread tends to come with), this no knead artisan bread is totally gluten-free and dairy-free, which means that those with Celiac disease, gluten sensitivity or lactose intolerances can also indulge without worries!
")
Ingredients You’ll Need:
Here’s a visual overview of the ingredients required to make this gluten-free artisan bread recipe. For exact quantities and measurements, please scroll down to the recipe card at the bottom of this post.
")
Ingredient Notes/Substitutions:
- Gluten-Free Flour Blend: I strongly recommend using a good-quality gluten-free all-purpose flour blend that is made up of a mix of lighter flours/starches (such as rice flour, tapioca starch, corn starch, or potato starch) to ensure a lighter final texture. I do NOT recommend using gluten-free flour blends that include heavier flours (such as garbanzo bean flour) as that will result in a denser texture.
- Xanthan Gum: Xanthan gum is the substitute for gluten in gluten-free flours, and is required to bind the ingredients together. For best results, I highly recommend that you add in the xanthan gum is your gluten-free flour blend does not already include it.
- Tapioca Starch: You may substitute the tapioca starch with equal amounts of either corn or arrowroot starch.
- Warm Water: Water temperature is important here. Make sure the water is between 105F to 115F as the warmth is required to activate the yeast. If the water is too cold, the yeast will not be activated, but if the water is too hot, the high heat will kill the yeast. In this recipe, I use water for simplicity sake, but if you prefer a creamier taste, simple use milk in the same amount. I’ve tried almond milk and cashew milk and both work great.
- Sugar: I used granulated white sugar in this gluten-free artisan bread recipe, but you can also use brown sugar if you prefer. Basically, the sugar is required as “food” for the yeast to feed on so the yeast will be activated and produce the gases to make the bread dough rise.
- Instant Yeast: I like using instant yeast but you may also use quick rising yeast if you prefer.
- Sunflower Oil: I like using sunflower oil, because I almost always have a bottle of it on hand. However, any other liquid oils such as avocado oil or extra virgin olive oil would work great too.
- Apple Cider Vinegar: The acidity from the apple cider vinegar helps the bread dough to rise a little more. If you don’t have ACV on hand, you may also use white rice vinegar or white wine vinegar or even fresh lemon juice.
- Eggs: If you are vegan or allergic to eggs, simply replace the eggs with 2 flaxseed eggs or 4 tablespoons of oil. Eggs give the bread a beautiful yellow color so note that without the eggs the bread will be paler in color on the inside.
How to Make Gluten-Free Artisan Bread (Step by Step)
1. Whisk Flour, Starch and Salt
Whisk the gluten-free all-purpose flour, xanthan gum (if using), tapioca starch, and salt together in a medium bowl until the ingredients are well distributed.
")
2. Activate the Yeast
In a large bowl, combine the lukewarm water, yeast, and sugar together mix well. Set aside for 5 minutes.
(Tip: You should start see bubbles at the surface. If not, it means the yeast has expired and is not working, so you will need to use yeast from a new packet.)
")
3. Add Oil, Apple Cider Vinegar and Eggs
Once the yeast mixture starts to form bubbles, add the oil, apple cider vinegar, beaten eggs and whisk well until you get a homogeneous yellow frothy liquid.
")
4. Sift Dry Ingredients into Wet Ingredients
Sift the dry ingredients into the bowl with the wet ingredients and mix thoroughly for a few minutes until you get a dough that is sticky but not too liquid.
(Tip: If the dough is too wet, add one tablespoon of gluten-free flour at a time, but do not add too much. Gluten-free bread dough will always be a little wetter than normal bread dough, and it is perfectly fine.)
")
5. Transfer Dough to Parchment
Sprinkle gluten-free flour over a sheet of parchment paper and transfer the dough to the parchment. Use a wet hands or wet fingers to gently shape the dough into the a ball that can fit a 6-quart Dutch oven. Transfer the parchment with the dough to a bowl and cover with a tea towel to let it rise for approximately 45 minutes in a draft-free, warm place.
(Note that the dough will rise, but it may not double in size as normal bread dough does).
6. Preheat the Oven
While the gluten-free artisan bread dough rises, preheat the oven to 450F and place a covered 6-quart Dutch oven in the hot oven as the dough rises.
7. Score Bread Dough
Once the dough has risen, use a gluten-free floured knife to score three lines on the top of the loaf and sprinkle the surface with some flour. Carefully transfer both the risen dough together with the parchment to the preheated Dutch oven and cover it with the lid.
")
8. Bake Until Golden and Crusty
Bake for 45 minutes before removing the lid, and then bake for another 15 to 30 minutes until the top is golden brown and crusty.
")
9. Cool Completely Before Slicing
Allow the fresh loaf of bread to cool completely at room temperature before slicing into it (this is important as the bread will continue cooking with the residual heat).
")
Dish by Dish Tips/Tricks:
- Gluten-Free Dough will be Wet and Sticky: Unlike regular wheat bread dough which can be easily shaped with your hands, gluten-free bread dough will be pretty sticky and wet and that is completely perfect, Resist the urge to add more flour as a dough that is too dry will result in a rock-hard gluten-free loaf!
- Extra Fiber and Taste: For extra taste and fiber, you can also substitute 1/2 cup of gluten-free flour blend with sorghum flour, buckwheat flour, quinoa flour, almond flour or brown rice flour.
- Use a Serrated Bread Knife: Make sure to use a serrated knife (basically a knife with ridges) to slice the crusty bread loaf. A smooth knife will only flatten the loaf and make it difficult to slice the bread.
Recipe FAQs:
To store the bread, simply place the fully-cooled loaf in an airtight container or wrap it in plastic wrap and keep it in the refrigerator for up to 5 days. Slice and toast as required.
To freeze, place the fully-cooled loaf in a freezer-safe container or ziplock bag and freeze for up to 3 months. Let the frozen loaf thaw completely overnight in the refrigerator before slicing and toasting.
Basically, placing the bread dough in a covered Dutch oven during the first part of baking helps the bread dough to retain moisture and to rise even more as it bakes. This is known as “oven spring”, in which bread dough experiences its final burst of rising just after being placed in the oven and before the crust fully hardens.
")
What to Eat with Artisan Bread
There are a whole host of ways to enjoy this delicious gluten-free no knead bread, and some of our favorites foods to eat with it are:
- Creamy Pumpkin Soup (Gluten-Free, Vegan)
- Carrot Tumeric Soup (Gluten-Free, Vegan)
- Easy Creamy Hummus (Gluten-Free, Vegan)
- Baba Ganoush (Gluten-Free, Vegan)
- Slow Cooker Lentil Curry (Gluten-Free, Vegan)
")
Other Gluten-Free Yeast Bread Recipes You’ll Love:
- 10 Amazing Gluten-Free Bread Recipes to Make on Repeat
- Soft, Fluffy Gluten-Free Bread (Dairy-Free)
- Fluffy Buckwheat Bread (Gluten-Free, Dairy-Free)
- Soft, Fluffy Brown Rice Bread (Gluten-Free, Dairy-Free)
- Soft, Fluffy Yeast Quinoa Bread (Gluten-Free, Dairy-Free)
- Easy Gluten-Free Sandwich Bread
Gluten-Free Quick Breads to Bake:
- Low Carb Coconut Flour Bread (Gluten-Free, Paleo)
- Gluten-Free Flaxseed Coconut Bread (Paleo, Dairy-Free)
- Gluten-Free Honey Oat Quick Bread
- Gluten-Free Vegan Pumpkin Bread
- Grain-Free Cashew Bread
- The Best Gluten-Free Banana Bread (Dairy-Free)
- Grain-Free Coconut Almond Bread
- Gluten-Free Skillet Cornbread
Let’s Bake Some Bread!


P.S. If you try this recipe, I’d love for you to leave a star rating below, and/or a review in the comment section further down the page. I always appreciate your feedback. Be sure to check out my entire Recipe Index for all the recipes on the blog. You can also follow me on Pinterest, Facebook or Instagram! Sign up for my Email List to get fresh recipes in your inbox each week!
Easy Gluten-Free No Knead Bread (Dairy-Free)
- Total Time: 0 hours
- Yield: 1 loaf 1x
- Diet: Gluten Free
Description
A beautiful gluten-free artisan bread that is crazy easy to make, with no kneading required at all! Perfect for making toast, rustic sandwiches, or accompanying soups and dips, this gorgeous no knead bread recipe is totally gluten-free and dairy-free too, but no one would care!
Ingredients
- 3 1/2 cups gluten-free all-purpose flour
- 3/4 teaspoons xanthan gum (omit if your gluten-free flour blend already includes it)
- 1/2 cup tapioca starch
- 1 1/2 teaspoons salt
- 1 3/4 cup warm water (approx. 105F-110F)
- 2 tablespoons sugar
- 2 1/4 teaspoons instant yeast
- 2 tablespoons sunflower oil
- 1 tablespoon apple cider vinegar
- 2 eggs, beaten
Instructions
- Whisk Flour, Starch and Salt: Whisk the gluten-free all-purpose flour, xanthan gum (if using), tapioca starch, and salt together in a medium bowl until the ingredients are well distributed.
- Activate the Yeast: In a large bowl, combine the warm water, yeast, and sugar together mix well. Set aside for 5 minutes. (You should start see bubbles at the surface. If not, it means the yeast has expired and is not working, so you will need to use yeast from a new packet.)
- Add Oil, ACV and Eggs: Once the yeast mixture starts to form bubbles, add the oil, apple cider vinegar, beaten eggs and whisk well until you get a homogeneous yellow frothy liquid.
- Sift Dry Ingredients into Wet Ingredients: Sift the dry ingredients into the bowl with the wet ingredients and mix thoroughly for a few minutes until you get a dough that is sticky but not too liquid. (If the dough is too wet, add one tablespoon of gluten-free flour at a time, but do not add too much. Gluten-free bread dough will always be a little wetter than normal bread dough, and it is perfectly fine.)
- Transfer Dough to Parchment: Sprinkle gluten-free flour over a sheet of parchment paper and transfer the dough to the parchment. Use a wet spatula to gently shape the dough into the a ball that can fit a 6-quart Dutch oven. Transfer the parchment with the dough to a bowl and cover with a tea towel to let it rise for approximately 45 minutes (note that the dough will rise, but it may not double in size as normal bread dough does).
- Preheat Oven: While the dough rises, preheat the oven to 450F and place a covered Dutch oven in the oven as the dough rises.
- Score Bread Dough: Once the dough has risen, use a gluten-free floured knife to score three lines on the top and sprinkle with some flour. Carefully transfer both the risen dough together with the parchment to the preheated Dutch oven and cover it with the lid.
- Bake Until Golden and Crusty: Bake for 45 minutes before removing the lid, and then bake for another 15 to 30 minutes until the top is golden brown and crusty.
- Cool Completely Before Slicing: Allow the bread to cool completely before slicing into it.
Notes
Gluten-Free Flour Blend: I strongly recommend using a good-quality gluten-free all-purpose flour blend that is made up of a mix of lighter flours/starches (such as rice flour, tapioca starch, corn starch, or potato starch) to ensure a lighter final texture. I do NOT recommend using gluten-free flour blends that include heavier flours (such as garbanzo bean flour) as that will result in a denser texture.
Xanthan Gum: Xanthan gum is the substitute for gluten in gluten-free flours, and is required to bind the ingredients together. For best results, I highly recommend that you add in the xanthan gum is your gluten-free flour blend does not already include it.
Tapioca Starch: You may substitute the tapioca starch with equal amounts of either corn or arrowroot starch.
Warm Water: Make sure the water is between 105F to 115F as the warmth is required to activate the yeast. If the water is too cold, the yeast will not be activated, but if the water is too hot, the high heat will kill the yeast. In this recipe, I use water for simplicity sake, but if you prefer a creamier taste, simple use milk in the same amount. I’ve tried almond milk and cashew milk and both work great.
Sugar: I used granulated white sugar in this recipe, but you can also use brown sugar if you prefer. Basically, the sugar is required as “food” for the yeast to feed on so the yeast will be activated and produce the gases to make the bread dough rise.
Instant Yeast: I like using instant yeast but you may also use quick rising yeast if you prefer.
Sunflower Oil: I like using sunflower oil, because I almost always have a bottle of it on hand. However, any other liquid oils such as avocado oil or olive oil would work great too.
Apple Cider Vinegar: The acidity from the apple cider vinegar helps the bread dough to rise a little more. If you don’t have ACV on hand, you may also use white rice vinegar or white wine vinegar or even fresh lemon juice.
Eggs: If you are vegan or allergic to eggs, simply replace the eggs with 2 flaxseed eggs or 4 tablespoons of oil. Eggs give the bread a beautiful yellow color so note that without the eggs the bread will be paler in color on the inside.
Storing/Freezing: To store the bread, simply place the fully-cooled loaf in an airtight container and keep in the refrigerator for up to 5 days. Slice and toast as required. To freeze, place the fully-cooled loaf in a freezer-safe container or ziplock bag and freeze for up to 3 months. Let the frozen loaf thaw completely overnight in the refrigerator before slicing and toasting.
Adapted from The Effortless Chic
This recipe was originally published in April 2020, but has since been updated to include photos of the ingredients, step-by-step images, ingredient notes and substitutions, as well as clearer instructions.
- Prep Time: 45 mins
- Cook Time: 1 hr 15 mins
- Category: Breads
- Method: Baking
- Cuisine: American

I have this an enameled bread loaf pan (like a dutch oven but in loaf shaped), but it’s only 3 qt. Could I split the dough in half for baking and then maybe freeze the other half of dough?
Hi Chris, I haven’t tried doing that before, but maybe you can make half the amount of dough instead and then place the dough in your loaf pan?
I made this using dairy milk and coconut oil, and it was great! It’s super easy, nice and fluffy, and has great flavor.
Hi Lindsay, thanks for sharing how it went! Glad you enjoyed it, and hope to see you around the blog again soon!
Can rosemary/ garlic be added to this bread recipe?
Hi Linda! Yes, definitely, feel free to add whichever herbs and spices you enjoy. Think of this GF artisan bread recipe as a blank canvas that you can customize according to your preferences!
Happy baking!