Easy Stovetop Popcorn (with Microwave option)
Making homemade popcorn cannot get any easier. It’s cheap, easy and the perfect snack. Learn how to make your own crunchy stovetop popcorn or even in the microwave! You’ll get popcorn that’s ready in just a few minutes and is so good you’ll never need to buy popcorn again.
")
Want to save this recipe?
Enter your email & I’ll send it to your inbox. Plus, get great new recipes from me every week!
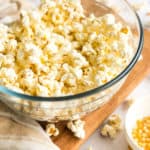
DIY Homemade Popcorn
I love eating popcorn in the movie theatres, and wanted to replicate the experience at home, especially after my friend Ally made some popcorn with coconut oil for me when we hung out at her place. I loved it as a healthy, easy snack.
However, since Ally has moved back to Australia and I can’t eat the popcorn she makes anymore, I decided to make my own.
")
While I knew that I could buy popcorn in paper bags to make in the microwave, I still wanted to learn how to make stovetop popcorn.
Especially because I know that not everyone has a microwave at home, but everyone probably has a pot at home.
")
Popcorn Kernels that Pop
While the corn kernels that we use for popcorn may look similar to the kernels from the corn that we use in cooking, they are not the same. Popcorn kernels have the ability to pop, hence the name “popcorn”.
You should be able to find popcorn kernels in most grocery stores or supermarkets, and there are both white or yellow popcorn kernels. I’m indifferent. For this experiment, I’m using yellow kernels because this is what I can find in my nearest grocery store.
")
Making Perfect Stovetop Popcorn that Doesn’t Burn
The first time I made popcorn on the stovetop, however, I burnt the popcorn and that scared me a little. I didn’t go back to making popcorn for a while, but I kept wondering at the back of my mind what I did wrong.
After researching a bit, I found these posts from Cookie + Kate and Simply Recipes particularly helpful and decided to give it another try. Two more experiments later, and diligently following all the tips I read, I finally succeeded and can’t wait to share the secrets to perfect stovetop popcorn that doesn’t burn! Ready? Let’s go!
")
Tips for Making Stovetop Popcorn
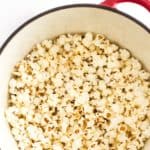
- Use a good heavy-bottom pot. In order for the heat to distribute evenly, you’ll need to use a good quality pot. I used my Dutch oven and it worked perfectly.
- Use an oil with high smoke point. This ensures that it carries enough heat and helps the corn kernels to pop easily. I like using coconut oil but you can also use avocado oil.
- Don’t turn the heat up too high. To prevent the popcorn from burning, make sure you don’t go beyond medium-high heat. If you do that, and smell smoke coming from your pot, you can be certain your popcorn is going to burn.
- Start with a few corn kernels to test temperature. Once the oil is heated, add 3 kernels and cover the pot and wait for them to pop. Once all 3 kernels have popped, it means that the temperature is right.
- Prime the corn kernels for popping. Once the temperature is right, add the other kernels, cover the pot, and let remove it from heat for 30 seconds to let the kernels get primed for popping and to ensure they generally pop at the same time. After the 30 seconds, return the pop to medium high heat and let them pop.
- Keep lid slightly ajar as the popcorn is popping to ensure crispy crunch popcorn. By making sure the lid is slightly ajar, this gives the steam that’s building up in the pot an escape route, making sure that the popcorn remains crispy instead of being soaked in its own steam.
")
How to Make DIY Popcorn in the Microwave with a Bowl
Of course, you can also make microwave popcorn, and it’s super easy. And surprise, surprise, you don’t even need the brown paper bag that stores tend to sell the kernels with. Making popcorn in the microwave is less complicated than making popcorn on the stovetop, and all you need is a large microwave-proof bowl and plate to cover the bowl.
Important: Do not use plastic or metal bowls as plastic will melt in the microwave and metal will explode. Use a glass pyrex bowl or a ceramic bowl to make microwave popcorn.
")
Place the popcorn kernels and 1 tablespoon of coconut oil in the bowl and mix well to coat the kernels with the oil. Cover the bowl with the plate and cook on high heat in the microwave for 2 to 3 minutes until the popping slows to about 1 pop every few seconds.
Tip: Don’t keep cooking them even if there are a few unpopped kernels, or the rest of the popcorn may get overcooked and burn. (I once made the mistake of cooking the popcorn too long and the insides turned really dark and bitter).
")
Healthy Popcorn Seasoning Ideas
Since the popcorn is cooked in a good amount of oil, the only seasoning I like adding on top is a sprinkle of sea salt. However, here are a few other options:
- Sprinkle of sea salt.
- Sprinkle of red chili powder or ground paprika if you like some heat.
- Freshly ground black pepper.
- Melted better
")
If you enjoyed this recipe, you’ll also love these other healthy snacks:
- Easy Creamy Hummus (Gluten-Free, Vegan)
- Easy Maple Coconut Chips (Gluten-Free, Vegan)
- Sunflower Seed Crackers (Gluten-Free, Vegan)
- Gluten-Free Polenta Bruschetta
- Pico de Gallo (Salsa Fresca)
Easy Stovetop Popcorn (with Microwave option)
- Total Time: 10 mins
- Yield: 2 servings 1x
- Diet: Gluten Free
Description
Making homemade popcorn cannot get any easier. It’s cheap, easy and the perfect healthy snack. Learn how to make your own crunchy popcorn on the stovetop or even in the microwave! You’ll get popcorn that’s ready in just a few minutes and is so good you’ll never need to buy popcorn again.
Ingredients
- 1/4 cup coconut oil
- 1/2 cup popcorn kernels (I used yellow kernels, but white kernels are fine too)
- 1/2 teaspoon sea salt (or more as desired)
Instructions
- Melt the coconut oil in a large heavy-bottomed pot (I used a 6-quart Dutch oven) over medium-high heat. Add three popcorn kernels and cover the pot. Wait to hear the kernels pop.
- Once the three kernels have popped, remove them from the pot and add the rest of the kernels. Cover the pot and remove the pot from heat for the next 30 seconds (this is important to prevent the oil from getting too hot, and to prime the kernels to get ready to pop around the same time).
- Once the 30 seconds is over, return the pot to the heat. As the kernels start to pop, place the lid slightly ajar so that the steam that is building up inside the pot can escape. This is ensure that you get crunchy popcorn instead of soggy popcorn.
- Shake the pot slightly to allow the kernels to get heated evenly, and when the popping has slowed to 1 pop every few seconds, remove the pot from the heat immediately. Transfer the popcorn to a large serving bowl and sprinkle salt over evenly.
Notes
Use a Good Heavy Bottom Pot: It’s important to use a good-quality heavy bottom pot to ensure that heat is evenly distributed as the popcorn cooks. I use a 6-quart Dutch oven, but any good pot will also do.
Popcorn Kernels: Make sure you use kernels that are meant to be popped, as nor all corn kernels can pop. Check that the kernels you buy state that they are to be used to make popcorn.
Microwave Popcorn option: You can also make popcorn in the microwave, and it’s super easy. Place 1/2 cup of popcorn kernels and 1 tablespoon of coconut oil in a microwave-proof bowl and mix well to coat the kernels with the oil. Cover the bowl with a microwave-safe plate and cook on high heat in the microwave for 2 to 3 minutes until the popping slows to about 1 pop every few seconds. Important: Do not use plastic or metal bowls or plates because plastic will melt in the microwave and metal will explode!
Healthy Popcorn Seasonings: you can add a sprinkle of sea salt for the most basic option (also my favorite), or red chili powder or ground paprika if you like some heat, or ground black pepper, or even melted butter if you love the buttery popcorn taste.
Adapted from: Cookie + Kate and Simply Recipes
- Cook Time: 10 mins
- Category: Snacks
- Method: Stovetop
- Cuisine: American


Hmm….. I am aware that this is the most popular snacks eaten by people while watching their movies and can get really addictive though.
If you ask me, I would prefer the simpler way, i.e. the microwave method of preparing pop corns for its simplicity. Thanks again Felicia for sharing the different alternatives of preparing this healthy snack which can be ready in no time at all.
I love this healthy snack 🙂
Cheers,
Mum
Hi mummy, yes the microwave version is much easier and less cleanup, but since some people don’t own microwaves or are opposed to using the microwave, having the stovetop option is also good 🙂 You should try it one day if you’ve never made homemade popcorn before. super easy!