Description
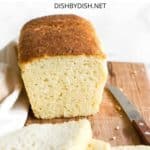
The best soft and fluffy gluten-free bread that is moist, light, and oh so good! Once you make this, you’ll never buy another loaf of storebought bread again! You’ll want to eat it with everything – think avocado toast, or spread with jam, or to make a sandwich or French toast. Dairy-free too.
Ingredients
- 2 1/2 cups gluten-free all-purpose flour
- 1 teaspoon xanthan gum (leave out if your flour blend already includes it)
- 1 teaspoon gluten-free baking powder
- 2 1/4 teaspoon instant yeast
- 2 tablespoons sugar
- 1 teaspoon salt
- 1/3 cup sunflower oil
- 1 teaspoon apple cider vinegar
- 1 1/2 cups warm unsweetened almond milk (or other non-dairy milk or water), between 105-110F
- 2 large eggs, beaten, room temperature
Instructions
- Preheat and Grease: Preheat the oven to 350F and adjust the rack to the middle position. Grease an 8″x 4″ loaf pan with oil.
- Whisk Dry Ingredients: In a large bowl, whisk the all-purpose gluten-free flour, xanthan gum (if using), baking powder, instant yeast, sugar, and salt together to combine.
- Add Wet Ingredients to Get Stick Dough: Add the vegetable oil, apple cider vinegar, warm milk and mix for one minute until combined. Add the beaten eggs and mix for another minute until you get a dough that resembles thick cake batter (the dough will be wet and sticky, but that’s completely fine).
- Transfer Dough to Pan: Transfer the dough to the prepared loaf pan and use a spatula to smooth out the top of the dough.
- Let Dough Rise: Cover the dough with a kitchen towel, and let it rise for the next 30 minutes in a warm, draft-free place, until it has roughly doubled in size.
- Bake Until Golden Brown: Once the dough is done rising, lace the loaf pan on the middle rack of the oven and bake for 50 minutes, until the top is golden brown and the loaf sounds hollow when tapped.
- Remove Loaf from Oven: Remove the loaf from the oven and let it cool down for 10 minutes in the pan before removing it to finish cooling on a rack (this will prevent the bottom from getting soggy). If the bottom is not brown enough for your liking, let it bake bottom-side-up for another 10 minutes at 375F.
- Cool Fully Before Slicing: Allow the loaf to fully cool before slicing (this is important as the loaf may disintegrate if it’s still hot when you slice).
Notes
Gluten-Free All-Purpose Flour Blend: I highly recommend using a good-quality gluten-free all-purpose flour blend that is made of lighter flours/starches (such as rice flour, tapioca starch, corn starch, or potato starch) to ensure a fluffier and lighter final texture. I do NOT recommend using gluten-free flour blends that include heavier flours (such as garbanzo bean flour) as that will result in a densier final texture.
Xanthan Gum: Xanthan gum is a replacement for gluten in gluten-free baked goods, and is what helps to bind the ingredients together. If your gluten-free flour blend does not include xanthan gum, make sure you include it to get the best results.
Baking Powder: To make this gluten-free bread light and fluffy, one of the secret ingredients is baking powder to help give the dough extra rise (on top of using yeast). If you are Celiac or gluten-intolerant, make sure to use certified gluten-free baking powder.
Instant Yeast: I like using instant yeast because there’s no pre-activation time required. If you are not using instant yeast, make sure to activate the yeast according to the packet instructions.
Sugar: I used granulated white sugar in this recipe. The sugar is required as “food” for the yeast to feed on and activate it to create the gases required to make the dough rise. By the end of the process, the sugar would have been consumed by the yeast and hence will not make the bread sweet.
Sunflower Oil: I like using sunflower oil because I always have a bottle of it on hand. You can also use other neutral-flavored vegetable oils in equal quantities. Alternatively, if you are not lactose-intolerant, you may also use melted butter in equal quantities.
Apple Cider Vinegar: The apple cider vinegar creates an acidic environment that helps the gluten-free bread dough to rise even more. If you don’t have ACV on hand, you can also use white vine vinegar, rice wine vinegar, or fresh lemon juice.
Almond Milk: I used my 5-minute homemade almond milk for this recipe, but you can also use my homemade cashew milk, or other non-dairy milk of your choice. If you are not lactose-intolerant, you can also use normal dairy milk instead. I find that using non-dairy milk gives the bread a richer taste, but I’ve also made it with water instead of milk and it comes out delicious as well! Make sure the temperature of the milk or water is between 105 to 115F, as the warmth is required to activate the yeast, but if the liquid is too hot, it might kill the yeast.
Eggs: The eggs provide extra structure and also help the ingredients to bind better together. I have not tried making this gluten-free bread recipe without eggs, but if you are allergic to eggs or vegan, you can try using aquafaba or an egg-replacer (please let me know how it goes if you do that)!
Gluten-Free Dough Consistency: Don’t be alarmed when you see that the dough doesn’t resemble normal wheat bread dough. Gluten-free dough will always be sort of wet and shapeless, just like cake batter. In fact, for gluten-free bread to come out moist and fluffy, the dough has to be wet, otherwise, the bread will be too dry.
Pan Size Will Determine the Height of Bread: I like using an 8″ x 4″ loaf pan because the bread rises slightly more in this smaller pan. If you use a larger pan (such as a 9″ x 5″ pan), just note that the dough will spread out more and as a result will not rise as high compared to baking in a smaller pan.
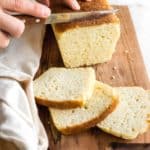
Cut the Bread with Serrated Knife: It’s important to use a serrated knife (knife with a tooth-edge) to slice the bread. Do not use a smooth-edged knife as that may flatten the bread and not cut properly.
How to Store/Freeze the Bread: Store in an airtight container for up to 1 week in the refrigerator, or wrap it in plastic wrap unsliced and freeze for up to 3 months in the freezer. If freezing, make sure to thaw the bread overnight in the refrigerator before slicing and using.
Adapted from: Mama Knows Gluten-Free
This recipe was originally published in August 2020, but has since been republished to include step-by-step photos, recipe notes, ingredient substitutions, as well as clearer text.
- Prep Time: 35 mins
- Cook Time: 50 mins
- Category: Bread
- Method: Baking
- Cuisine: American