Gluten-Free Ciabatta (Dairy-Free)
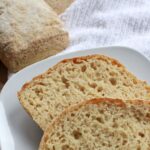
This delicious gluten-free ciabatta has the airy, open-crumbed texture of traditional Italian ciabatta bread, just without gluten or dairy! Perfect for toasting and making sandwiches, you’ll want to batch a fresh batch (or two) and freeze to enjoy homemade bread anytime!
")
Want to save this recipe?
Enter your email & I’ll send it to your inbox. Plus, get great new recipes from me every week!
Delicious Ciabatta Bread
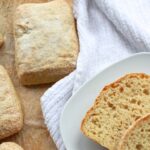
A classic Italian bread that has a flat, rectangle shape, ciabatta is definitely a favorite in our home – we love slicing a ciabatta bun into half lengthwise, toasting both sides until crispy, and then preparing a sandwich with our favorite fillings.
Crispy and golden on the outside, with an airy crumb, ciabatta bread is not only great for making panini sandwiches (it holds up well to grilling), but it’s also great drizzled in olive oil, or served alongside big steaming bowls of soup.
Traditional ciabatta is usually made with wheat flour (which contains gluten), but today we’re making a gluten-free and dairy-free version of ciabatta – so everyone can enjoy it!
")
")
Why You’ll Love this Recipe:
- Simple Ingredients: The main ingredients you’ll need for these gluten-free ciabatta rolls are easily accessible at the local grocery store (nothing fancy required!).
- Easy to Make: Preparing these buns is just a matter or mixing the wet and dry ingredients together to form a homogeneous dough that you later roll and cut into pieces before baking.
- Totally Gluten-Free & Dairy-Free: The best part is that this ciabatta buns recipe is 100% gluten-free and dairy-free, which means that even those with Celiac disease or gluten or lactose intolerances can enjoy them without issues.
")
Ingredients You’ll Need:
Here’s a visual overview of the ingredients required for making this gluten-free ciabatta recipe.
(For exact measurements, please scroll down to the printable recipe card at the bottom of this post.)
")
Recipe Notes + Substitutions:
- Psyllium Husk: Make sure to use whole psyllium husks instead of psyllium husk powder as the binding texture is different.
- Water: It’s best to use warm water between 105F to 115F (as the warmth is required to activate the yeast).
- Millet Flour: I recommend not substituting millet flour for anything else as it’s the main flour here. (You can either use store-bought millet flour or grind your own millet flour).
- Tapioca Starch: I used tapioca starch to add binding power, but if you don’t have tapioca starch, you can use arrowroot starch in equal quantities as well.
- Sorghum Flour: If you wish, you may substitute sorghum flour with brown rice flour or buckwheat flour.
- Yeast: I recommend using instant dry yeast as it doesn’t required any pre-activation period, and can be mixed directly with the dry ingredients.
- Olive Oil: I like using extra virgin olive oil for flavor, but feel free to use other types of vegetable oil if you prefer.
- Apple Cider Vinegar: Apple cider vinegar adds tang to the flavor of the dough, but also creates a more favorable environment for the yeast to create a good rise. So I recommend that you add it in.
How to Make Gluten-Free Ciabatta:
")
Prepare Psyllium Gel: Add the whole psyllium husks to the lukewarm water and stir using a fork until the psyllium is mixed in, set aside to allow the gel to form while combining the dry ingredients.

Whisk Dry Ingredients: In a bowl of a stand mixer, add millet flour, tapioca starch, sorghum flour, sugar, instant yeast and salt. Whisk until well combined.

Add Psyllium Gel, Olive Oil & Apple Cider Vinegar: Make a well in the center of the dry ingredients and pour in the psyllium gel, olive oil and apple cider vinegar. Use the dough hook attachment to knead the dough until it pulls away from the sides. Scrape down the sides of the bowl periodically with a spatula to ensure everything is mixed in. The dough will be slightly sticky but smooth.

Shape Dough into Ball: Transfer the dough from the bowl to a lightly floured work surface. Knead the dough using your hands a couple more times then shape into a ball.
")
Roll Dough to Even Thickness: Using a rolling pin dusted with millet flour, roll out the dough into a rectangular shape about 10 inches long and 8 inches in width. The dough should be about ½ inch in thickness.

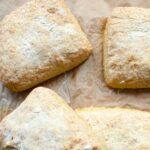
Cut into Rectangles: Cut the dough into 6 rectangles and place onto parchment paper spacing them at least 1 inch apart. Lightly sprinkle extra millet flour on top of each dough rectangle, making sure to flour them generously.

Let Dough Rise: Cover with plastic wrap and set aside for 1 hour until they are doubled in size.

Bake Ciabatta Rolls: Preheat the oven to 475F. When the dough has doubled in size and the oven is fully preheated, place 5 ice cubes into the bottom baking tray then place the sheet pan with the dough pieces on the middle rack of the oven. Reduce the oven temperature to 425F immediately and bake the ciabatta buns for 10 minutes with steam. Do not open the door during this time. After 10 minutes, remove the bottom tray with water, let the steam to escape and continue baking for 15 more minutes without steam.
")
Cool Before Serving: Remove the gluten-free ciabatta buns from the oven once they’re golden brown and allow them to cool on a wire rack to room temperature before cutting and serving.
Dish by Dish Tips:
- No Stand Mixer? No Problem: This dough can be made without the use of a stand mixer. Knead the dough by hand, this will just take a bit longer.
- Storing: These gf ciabatta buns are best served the day of baking but can be stored in an airtight container at room temperature for up to 3 days. Reheat in microwave to soften before serving.
- Freezing: Alternatively, you can place the ciabatta rolls in the freezer for up to 2 weeks.
- Why the Ice Cubes? Placing the ice cubes in the bottom tray creates steam in the oven (for the first 10 minutes), which ensures that the crust doesn’t dry out while still browning at the same time.
- Gluten-Free Flour Blend: The reason why we are usually specific flours (as opposed to a store-bought gluten-free flour blend which tends to have a higher starch content) is because we want to create a blend that is lower in starches so that the gluten-free ciabatta rolls do not turn out gummy or dense).
- Rustic Appearance: Ciabatta is meant to look rustic and have an artisan-style appearance, so don’t worry about cutting the dough into perfect shapes.
Other Gluten-Free Bread Recipes to Bake:


P.S. If you try this recipe, I’d love for you to leave a star rating below, and/or a review in the comment section further down the page. I always appreciate your feedback. Be sure to check out my entire Recipe Index for all the recipes on the blog. You can also follow me on Pinterest, Facebook or Instagram! Sign up for my Email List to get fresh recipes in your inbox each week!

Gluten-Free Ciabatta (Dairy-Free)
- Total Time: 1 hour 55 minutes
- Yield: 6 buns 1x
- Diet: Gluten Free
Description
This delicious gluten-free ciabatta has the airy, open-crumbed texture of traditional Italian ciabatta bread, just without gluten or dairy! Perfect for toasting and making sandwiches, you’ll want to batch a fresh batch (or two) and freeze to enjoy homemade bread anytime!
Ingredients
- 3 tablespoons whole psyllium husks
- 1 1/2 cups lukewarm water (between 105 to 115F)
- 1 cup millet flour, plus more for flouring the work surface
- 1 cup tapioca starch
- 1/2 cup sorghum flour
- 1 tablespoons granulated sugar
- 2 1/2 teaspoons instant dry yeast
- 1 teaspoon salt
- 2 tablespoons olive oil
- 1 1/2 teaspoons apple cider vinegar
Instructions
- Prepare Psyllium Gel: Add the whole psyllium husks to the lukewarm water and stir using a fork until the psyllium is mixed in, set aside to allow the gel to form while combining the dry ingredients.
- Whisk Dry Ingredients: In a bowl of a stand mixer, add millet flour, tapioca starch, sorghum flour, sugar, instant yeast and salt. Whisk until well combined.
- Add Psyllium Gel, Olive Oil & Apple Cider Vinegar: Make a well in the center of the dry ingredients and pour in the psyllium gel, olive oil and apple cider vinegar. Use the dough hook attachment to knead the dough until it pulls away from the sides. Scrape down the sides of the bowl periodically with a spatula to ensure everything is mixed in. The dough will be slightly sticky but smooth.
- Shape Dough into Ball: Transfer the dough from the bowl to a lightly floured work surface. Knead the dough using your hands a couple more times then shape into a ball.
- Roll Dough to Even Thickness: Using a rolling pin dusted with millet flour, roll out the dough into a rectangular shape about 10 inches long and 8 inches in width. The dough should be about ½ inch in thickness.
- Cut into Rectangles: Cut the dough into 6 rectangles and place onto parchment paper spacing them at least 1 inch apart. Lightly sprinkle extra millet flour on top of each dough rectangle, making sure to flour them generously.
- Let Dough Rise: Cover with plastic wrap and set aside for 1 hour until they are doubled in size.
- Preheat Oven: After 45 minutes of rising, set a large heavy duty baking sheet into the oven on the middle lower rack. Place a small metal baking tray or small cast iron skillet on the bottom rack then preheat the oven to 475F. The bottom tray or skillet will be used for ice cubes to create steam while baking.
- Bake Ciabatta Rolls: When the dough has doubled in size and the oven is fully preheated, place 5 ice cubes into the bottom baking tray then place the sheet pan with the dough pieces on the middle rack of the oven. Adjust the oven temperature to 425F immediately and bake the ciabatta buns for 10 minutes with steam. Do not open the door during this time.
- Remove Bottom Tray & Bake Some More: After 10 minutes, remove the bottom tray with water, allow the steam to escape and continue baking for 15 more minutes without steam.
- Cool Before Serving: Remove the ciabatta buns from the oven once they’re golden brown and allow them to cool on a wire rack to room temperature before cutting and serving.
Notes
Psyllium Husk: I used whole psyllium husks to create the psyllium gel but if you only have psyllium husk powder, you can use 1 1/2 tablespoons of psyllium husk powder instead.
Water: It’s best to use warm water between 105F to 115F (as the warmth is required to activate the yeast).
Millet Flour: I recommend not substituting millet flour for anything else as it’s the main flour here. (You can either use store-bought millet flour or grind your own millet flour).
Tapioca Starch: I used tapioca starch to add binding power, but if you don’t have tapioca starch, you can use arrowroot starch in equal quantities as well.
Sorghum Flour: If you wish, you may substitute sorghum flour with brown rice flour or buckwheat flour.
Yeast: I recommend using instant dry yeast as it doesn’t required any pre-activation period, and can be mixed directly with the dry ingredients.
Olive Oil: I like using extra virgin olive oil for flavor, but feel free to use other types of vegetable oil if you prefer.
Apple Cider Vinegar: Apple cider vinegar adds tang to the flavor of the dough, but also creates a more favorable environment for the yeast to create a good rise. So I recommend that you add it in.
- Prep Time: 30 mins
- Rising Time: 1 hour
- Cook Time: 25 mins
- Category: Bread
- Method: Baking
- Cuisine: Italian

Mine didn’t have crispy ciabatta crust but it’s absolutely delicious. most bread-like gluten free product I have made in 15 years. Non GF hubby loves it!
YAY! So happy to hear that you and your hubby both loved it! Maybe to make the crust crispier, you can increase the oven temp a little towards to end of the baking, and bake until the crust is crispier.