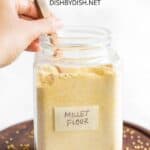
How to Make Millet Flour (Gluten-Free, Dairy-Free, Vegan)
Learn how to make your own millet flour at home! It’s super easy, ready in minutes, and comes out finely ground, making it perfect for baked goods and breads. All your need to make homemade millet flour is hulled millet, a high-speed blender, and a sieve (no special equipment required)! Totally gluten-free, dairy-free, and vegan too.
")
Want to save this recipe?
Enter your email & I’ll send it to your inbox. Plus, get great new recipes from me every week!
Jump to:
- What is Millet?
- What are the Benefits of Eating Millet?
- How to Cook Millet:
- Millet Flour is Perfect for Gluten-Free Baked Goods
- Ingredients You’ll Need:
- How to Make Homemade Millet Flour (Step by Step):
- Dish by Dish Tips/Tricks:
- Recipe FAQs:
- Other Homemade Flour Recipes:
- Other Basic Recipes to Love:
- How to Make Millet Flour (Gluten-Free, Vegan)
What is Millet?
“Millet” basically refers to a group of small-seeded grasses that are grown as cereals, and millets are principally cultivated for human food, especially for making flour.
While millets are technically seeds, they function like a whole grain, which means that you can cook it like you would rice.
Considered an ancient grain, millet has a sweet and nutty flavor, and is naturally gluten-free, which means those with Celiac disease or gluten intolerances can enjoy it without worries.
It makes a great alternative to quinoa, which is also a pseudo-grain. (Fun fact: millet is also generally cheaper than quinoa!)
")
What are the Benefits of Eating Millet?
- Low Glycemic Index: According to WebMD, millet is low in simple carbohydrates and higher in complex carbohydrates. This makes it a low-glycemic food that doesn’t result in extreme spikes in blood sugar level upon consuming millet, making it a good option for diabetics or those who are insulin-resistant.
- Improves Digestion: Millet is rich in dietary fiber (both soluble and insoluble fiber). The insoluble fiber in millet is known as “prebiotic” that supports good bacteria in the digestive system, helping your body process and digest food better.
- Highly Nutritious: Apart from fiber, millet is also a good source nutrients, including potassium, Vitamin A and B, antioxidants, niacin, calcium and iron.
")
How to Cook Millet:
Because millet is a pseudo-grain, and behaves like a grain when cooked, it is great for making porridge or added to salads.
Some of our favorite millet recipes include this creamy millet breakfast porridge, and warm millet bowl with mushrooms and kale.
Millet Flour is Perfect for Gluten-Free Baked Goods
However, apart from cooking millet in a whole seed form, millet can also be ground into a fine flour that works great as a gluten-free flour substitute.
In fact, I’ve been using millet flour to make a delicious loaf of millet bread that I’m sure you’re going to love.
I can’t wait to use millet flour in other baked goods such as brownies, muffins, cakes, and even quick breads!
While you can certainly buy store-bought millet flour, it may not be as easily found as other types of gluten-free flours.
However, that’s not an issue. You’ll be surprised at just how easy it is to make your own millet flour – and you don’t even need any sophisticated flour mill!
All you require to grind millet into flour is a high-speed blender and a fine-mesh sieve (how’s that for amazing)?
")
Ingredients You’ll Need:
Basically, all your need to grind your own millet flour at home is hulled millet.
(Tip: I prefer to use hulled millet (which is how millet is usually sold) as millet tends to have a hard, indigestible husk. Hulled millet will also be easily to grind, as opposed to pearled (unhulled millet).
")
How to Make Homemade Millet Flour (Step by Step):
1. Place Millet in Blender:
Place 1 cup of the millet in the bowl of your high-speed blender.
")
2. First Round Processing
Blend millet on high speed for 30 seconds. Scrape down the sides and blend for another 30 seconds, and repeat a couple of times until you get a fine flour.
")
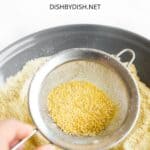
3. Sift
Sift the ground millet through a fine-mesh sieve to filter out any larger pieces that were not ground fine enough to pass through the sieve
(Tip: This step is important to ensure you get the finest texture possible, so make sure you don’t miss it out!)
")
4. Second Round Processing
Return the larger pieces to the blender and blend again until they are finely ground. Sift through a fine mesh sieve to the get rid of any large pieces.
5. Repeat Until All Millet is Used
Repeat with the rest of the millet.
")
6. Store in Airtight Container
Store the finely ground millet flour in an airtight container until ready to be used.
")
Dish by Dish Tips/Tricks:
- Process Millet in Small Batches: It is best to grind and sift the millet in small batches so as not to overwork the motor of your high-speed blender.
- Make Sure to Sift the Flour: To ensure that you get the finest texture possible, I highly recommend using a fine-mesh sieve sifting the homemade millet flour after you process it (it would be best to sift it at least 2 times if possible). While it requires a bit of additional time, this extra step helps you achieve the best results, and gets rid of any unwanted grainy texture in the millet flour.
- Storing: Place the homemade millet flour in an airtight container and store at room temperature for up to 3 months.
Recipe FAQs:
Yes, millet is naturally gluten-free, which means those with Celiac disease or gluten intolerances can enjoy it without worries.
While millet is available in both pearled (unhulled) and hulled form, it is advisable to use hulled millet for consumption, as millet tends to have a hard, indigestible husk. Hulled millet will also be easily to grind, as opposed to the unhulled version.
Other Homemade Flour Recipes:
- Homemade Buckwheat Flour (Gluten-Free, Vegan)
- Homemade Brown Rice Flour (Gluten-Free, Vegan)
- Homemade Cashew Flour (Gluten-Free, Vegan)
- Homemade Almond Meal (Gluten-Free, Vegan)
- Homemade Flaxseed Meal (Gluten-Free, Vegan)
- Homemade Cornmeal (Gluten-Free, Vegan)
Other Basic Recipes to Love:


P.S. If you try this recipe, I’d love for you to leave a star rating below, and/or a review in the comment section further down the page. I always appreciate your feedback. Be sure to check out my entire Recipe Index for all the recipes on the blog. You can also follow me on Pinterest, Facebook or Instagram! Sign up for my Email List to get fresh recipes in your inbox each week!

How to Make Millet Flour (Gluten-Free, Vegan)
- Total Time: 15 minutes
- Yield: 2 1/2 cups 1x
- Diet: Gluten Free
Description
Learn how to make your own millet flour at home! It’s super easy, ready in minutes, and comes out finely ground, making it perfect for baked goods and breads. All your need to make homemade millet flour is hulled millet, a high-speed blender, and a sieve (no special equipment required)! Totally gluten-free, dairy-free, and vegan too.
Instructions
- Place Millet in Blender: Place 1 cup of the millet in the bowl of your high-speed blender.
- First Round Processing: Blend millet on high speed for 30 seconds. Scrape down the sides and blend for another 30 seconds, and repeat a couple of times until you get a fine flour.
- Sift: Sift the ground millet through a fine-mesh sieve to filter out any larger pieces that were not ground fine enough to pass through the sieve.
- Second Round Processing: Return the larger pieces to the blender and blend again until they are finely ground. Sift through a fine mesh sieve to the get rid of any large pieces.
- Repeat: Repeat with the rest of the millet.
- Store: Store the finely ground millet flour in an airtight container for use.
Notes
Millet: I prefer to use hulled millet (which is how millet is usually sold) as millet tends to have a hard, indigestible husk. Hulled millet will also be easily to grind, as opposed to pearled (unhulled millet).
Process in Small Batches: It is best to grind and sift the millet in small batches so as not to overwork the motor of your high-speed blender.
Make Sure to Sift the Flour: To ensure that you get the finest texture possible, I highly recommend using a fine-mesh sieve sifting the homemade millet flour after you process it (it would be best to sift it at least 2 times if possible). This helps you achieve the best results, and gets rid of any unwanted grainy texture.
Storing: Place the millet flour in an airtight container and store at room temperature for up to 3 months.
- Prep Time: 15 mins
- Category: Basics
- Method: Blender
- Cuisine: American

Do I need to rinse and dry the hulled millet before grinding into flour?
Hi Cynthia! I didn’t rinse/dry mine.. I don’t think that’s necessary!
Thank you 🌿
You’re most welcome!
How much flour did 2 cups of hulled Millet make?
Hi Vicky 2 cups of hulled millet will make 2 1/2 cups of millet flour. Enjoy!
Oh my, I made my own millet flour and now I don’t want to use any other. We love it! The bread is extraordinary! I will never buy bread again. Thank you for a great recipe and flour. It’s Mt new staple!
Hi Dianna! So happy to hear you enjoy both the flour and the millet bread! Thanks for your lovely comment and hope to see you around the blog again sometime soon!
xx,
felicia
Thanks Felicia for sharing with us the difference between pearled (unhulled) and hullelld millet for our consumption.
This is useful information to know when we purchase millet grains for blending into millet flour.
Have a blessed day ahead!
Mun
Hi mummy! Isn’t is cool to see how easy it is to grind your own flour at home?