Easy Gluten-Free Tart Crust (Dairy-Free)
Beautifully flaky, this gluten-free tart crust is easy to prepare and only requires 15 minutes of hands-on time (no chilling needed). Perfect for sweet tarts this holiday season (with an option to make it savory too). Totally dairy-free too.
")
Want to save this recipe?
Enter your email & I’ll send it to your inbox. Plus, get great new recipes from me every week!
Jump to:
- Our Favorite Gluten-Free Tart Crust
- Why This Recipe Works:
- Ingredients You’ll Need:
- Recipe Notes + Substitutions
- How to Make Gluten-Free Tart Crust (Step by Step):
- Dish by Dish Tips/Tricks:
- Recipe FAQs:
- Other Gluten-Free Basics to Make:
- Gluten-Free Dessert Recipes to Make:
- Gluten-Free Tart Crust (Dairy-Free)
Our Favorite Gluten-Free Tart Crust
Finding a store-bought gluten-free tart crust that is also dairy-free is very difficult, and over the years I’ve developed a homemade tart crust recipe that I use for making gluten-free tarts.
It’s an easy recipe that comes out beautifully, has the perfect flaky texture, and comes together simply. I know it’ll be a favorite of yours too!
Why This Recipe Works:
- Simple Ingredients: The 6 ingredients required for this gluten-free tart crust recipe are easily accessible at the local grocery store!
- Easy to Make: Preparing this easy gluten-free dairy-free tart crust is uncomplicated to make, and you only need 15 minutes of hands-on time. Plus, no chilling is required!
- Totally Gluten-Free & Dairy-Free: The best part is that this easy shortbread crust recipe is 100% gluten-free and dairy-free, which means that even those with Celiac disease or gluten or lactose intolerances can also enjoy it without any issues!
Ingredients You’ll Need:
Here’s a visual overview of the ingredients required for this gluten-free tart crust recipe.
(For exact measurements, please scroll down to the printable recipe card at the bottom of this post.)
")
Recipe Notes + Substitutions
- Gluten-Free All-Purpose Flour: I highly recommend using a good-quality gluten-free all-purpose flour blend that is made up of lighter flours/starches (such as rice flour, tapioca starch, corn starch or potato starch). I do NOT recommend using a gluten-free blend that is made up of heavier flours (such as garbanzo bean flour). If you are not Celiac or gluten-intolerant, go ahead and use normal wheat flour instead.
- Xanthan Gum: Xanthan gum is the replacement for gluten in gluten-free flours, and helps the ingredients to better bind together. If your gluten-free flour blend does not already include xanthan gum, make sure to add it in.
- Sugar: I used regular white sugar, but feel free to use cane sugar, light brown sugar, dark brown sugar or coconut sugar if you prefer (just bear in mind that the darker the sugar used, the darker will be the tart crust). If you are diabetic or insulin-resistant, I highly recommend using granulated monkfruit sweetener (a 1:1 sugar substitute that is zero glycemic index and will not raise your blood sugar).
- Dairy-Free Butter: I used dairy-free butter (vegan butter) to make this recipe a dairy-free option. You may also use chilled coconut oil if you prefer. Alternatively, if you are not lactose-intolerant, feel free to use regular butter instead. Make sure to keep the butter chilled and then cut the butter into cubes before using.
- Egg: The egg helps to bind the ingredients better together. I have not personally tried making this tart crust recipe without eggs, but if you are vegan or allergic to eggs and want to make a vegan tart crust, you may try substituting the egg with acquafaba or an egg-replacer. (If you do make this tart crust recipe without eggs, please let me know how it goes in the comments below, I’d love to hear!).
- Ice Water: The ice water helps to keep the butter cold as you incorporate it into the tart crust, and to keep the dough firm. Start off with a little bit of ice water and add more as needed (depending on the room temperature and humidity where you are, you may or may not need to use all the ice water).
How to Make Gluten-Free Tart Crust (Step by Step):
1. Preheat Oven and Grease Tart Pan
If you plan to bake the tart dough straightaway, preheat oven to 350F and grease a 9-inch tart pan or pie pan with a removable bottom with non-stick cooking spray. Adjust the oven rack to the middle position.
2. Whisk Flour and Sugar
In a large mixing bowl, whisk the gluten-free all-purpose flour, xanthan gum (if using) and light-brown sugar until fully combined.
3. Cut Butter into Flour
Add chilled butter and cut the chilled dairy-free butter into the flour (either with a pastry cutter, two knives, or use the back of a fork to press the butter into the flour).

You’ll get an off-white crumbly mixture with the texture of coarse sand.
")
4. Add Egg
Add the beaten egg and mix well. The mixture will still be crumbly, but will be slightly pale yellow now.

5. Add Ice Water and Form Tart Dough
Add 1 tablespoon of ice cold water at a time, mixing with a spoon until you get a dough that holds together (better to have a dough that’s a little too moist than too dry).
(TIP: You may or may not need to use all the water, this will depend on the humidity where you live and the gluten-free flour blend.)
6. Shape Dough into Disc
Shape the tart dough into a disc. (At this point, if you don’t plan to use it immediately, wrap the dough ball in various layers of plastic wrap and chill in the refrigerator for a few hours, or freeze for up to 2 months.)

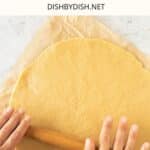
7. Roll Out Dough
If you plan to use this gluten-free pastry dough immediately, roll out it out between two pieces of parchment paper until the dough is slightly larger than your tart pan.
")
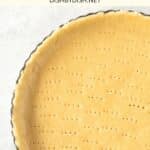
8. Press Dough into Tart Pan
Remove the top parchment paper and then place your hand below the bottom piece of parchment to flip the dough onto your prepared tart pan.
Slowly peel off the remaining parchment paper as you press the dough into the tin, removing any extra dough that protrudes at the top of the pan.
(TIP: Note that the dough may break, but don’t worry as you can easily press the dough back into place (it will still look beautiful once baked)).
")
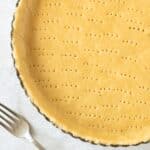
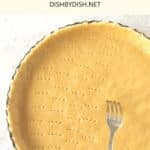
9. Poke Holes into Tart Crust
Using a fork, poke holes into the tart dough (this will prevent the crust from rising up when baking).
")
10. Par Bake Crust Dough Before Using
Par bake the tart shell for 10 minutes then remove from the oven before letting it cool and then filling it with your favorite filling (it’s the perfect base for any tart filling such lemon curd, pastry cream, fresh berries, other fresh fruit etc).
")
Dish by Dish Tips/Tricks:
- Use Tart Pan with Removable Bottom: For best results, I highly recommend using a non-stick tart pan with a removable bottom as that will make the part crust easy to remove (while ensuring that it also keeps its shape once baked).
- Par-Baking the Crust: Poke holes into the crust before par-baking it. After the crust is par-baked, make sure to let it cool slightly before filling it with filling.
- Make Mini Tarts: This recipe makes one medium to large tart crust, but you can divide the dough into two and roll it to get 2 mini tart crusts.
- Free Form Tarts: If you don’t own a tart pan, you can also make a ‘galette‘ which is basically a free form tart. Simply place the tart crust dough on a parchment-lined sheet pan and place the filling in the middle, then fold up the sides of the dough inwards to prepare the filling from spilling.
Recipe FAQs:
If you don’t need to use this gluten-free tart dough immediately, you can simply shape the dough into a disc (up to step 6) and then wrap it with various layers of plastic wrap and then freeze for up to 2 months. Let the dough thaw completely overnight in the refrigerator before rolling it out and baking.
Other Gluten-Free Basics to Make:


Gluten-Free Dessert Recipes to Make:


P.S. If you try this recipe, I’d love for you to leave a star rating below, and/or a review in the comment section further down the page. I always appreciate your feedback. Be sure to check out my entire Recipe Index for all the recipes on the blog. You can also follow me on Pinterest, Facebook or Instagram! Sign up for my Email List to get fresh recipes in your inbox each week!
Gluten-Free Tart Crust (Dairy-Free)
- Total Time: 25 minutes
- Yield: 1 medium tart crust 1x
- Diet: Gluten Free
Description
Beautifully flaky, this gluten-free tart crust is easy to prepare and only requires 15 minutes of hands-on time (no chilling needed). Perfect for sweet tarts this holiday season (with an option to make it savory too). Totally dairy-free too.
Ingredients
- 2 cups gluten-free all-purpose flour blend + more for dusting
- 3/4 teaspoon xanthan gum (omit if you flour blend already includes it)
- 2 tablespoons sugar
- 1/2 cup dairy-free butter, chilled and cut into cubes
- 1 egg, beaten
- 1/2 cup ice water, amount necessary
Instructions
- Preheat Oven and Grease Tart Pan: If you plan to bake the tart dough straightaway, preheat oven to 350F and grease a 9-inch tart pan with a removable bottom with non-stick cooking spray. Adjust the oven rack to the middle position.
- Whisk Flour and Sugar: In a large mixing bowl, whisk the gluten-free flour, xanthan gum (if using) and light-brown sugar until fully combined.
- Cut Butter into Flour: Add chilled butter and cut the chilled dairy-free butter into the flour (either with a pastry cutter, two knives, or use the back of a fork to press the butter into the flour). You’ll get an off-white crumbly mixture with the texture of coarse sand.
- Add Egg: Add the beaten egg and mix well. The mixture will still be crumbly, but will be slightly pale yellow now.
- Add Ice Water and Form Tart Dough: Add 1 tablespoon of ice cold water at a time, mixing with a spoon until you get a dough that holds together (better to have a dough that’s a little too moist than too dry). You may or may not need to use all the water, this will depend on the humidity where you live and the gluten-free flour blend.
- Shape Dough into Disc: Shape the tart dough into a disc. (At this point, if you don’t plan to use it immediately, wrap it in various layers of plastic wrap and chill in the refrigerator for a few hours, or freeze for up to 2 months.)
- Roll Out Dough: If you plan to use the dough immediately, roll out the dough between two pieces of parchment paper until the dough is slightly larger than your tart pan.
- Press Dough into Tart Pan: Remove the top parchment paper and then place your hand below the bottom piece of parchment to flip the dough onto your tart tin, then slowly peel off the remaining parchment paper as you press the dough into the tin. Note that the dough may break, but don’t worry as you can easily press the dough back into place (it will still look beautiful once baked).
- Par-Bake Tart Crust: Using a fork, poke holes into the tart crust (this will prevent the crust from rising up when baking). Par bake the tart crust for 10 minutes then remove from the oven before letting it cool and then filling it with tart filling.
Notes
Gluten-Free All-Purpose Flour: I highly recommend using a good-quality gluten-free all-purpose flour blend that is made up of lighter flours/starches (such as rice flour, tapioca starch, corn starch or potato starch). I do NOT recommend using a gluten-free blend that is made up of heavier flours (such as garbanzo bean flour).
Xanthan Gum: Xanthan gum is the replacement for gluten in gluten-free flours, and helps the ingredients to better bind together. If your gluten-free flour blend does not already include xanthan gum, make sure to add it in.
Sugar: I used regular white sugar, but feel free to use cane sugar, light brown sugar, dark brown sugar or coconut sugar if you prefer (just bear in mind that the darker the sugar used, the darker will be the tart crust). If you are diabetic or insulin-resistant, I highly recommend using granulated monkfruit sweetener (a 1:1 sugar substitute that is zero glycemic index and will not raise your blood sugar).
Dairy-Free Butter: I used dairy-free butter (vegan butter) to keep this recipe dairy-free. If you are not lactose-intolerant, feel free to use regular butter instead. Make sure to keep the butter chilled and then cut the butter into cubes before using.
Egg: The egg helps to bind the ingredients better together. I have not personally tried making this tart crust recipe without eggs, but if you are vegan or allergic to eggs and want to make this egg-free, you may try substituting the egg with acquafaba or an egg-replacer. (If you do make this tart crust recipe without eggs, please let me know how it goes in the comments below, I’d love to hear!).
Ice Water: The ice water helps to keep the butter cold as you incorporate it into the tart crust, and to keep the dough firm. Start off with a little bit of ice water and add more as needed (depending on the room temperature and humidity where you are, you may or may not need to use all the ice water).
Use Tart Pan with Removable Bottom: I highly recommend using a metal tart pan with a removable bottom as that will make the part crust easy to remove (while ensuring that it also keeps its shape once baked).
Par-Baking the Crust: Poke holes into the crust before par-baking it. After the crust is par-baked, make sure to let it cool slightly before filling it with filling.
Freezing Dough: If you don’t need to use the tart dough immediately, you can simply shape the dough into a disc (up to step 6) and then wrap it with various layers of plastic wrap and then freeze for up to 2 months. Let the dough thaw completely overnight in the refrigerator before rolling it out and baking.
- Prep Time: 15 mins
- Cook Time: 10 mins
- Category: Basics
- Method: Baking
- Cuisine: Western

I used aquafaba in place of the egg to make this vegan! I used 3 tbsp and it came out great. I used Bob’s Red Mill GF 1-to-1 Flour which left it a little more grainy than I would have liked – if I try it again I’ll probably go with King Arthur to see if there’s a significant difference.
Hi Matthew, glad it worked with aquafaba too 🙂 Yes, maybe next time you can try King Arthur’s GF flour to see if you prefer that better.
made sml cases from this recipe today Perth western australia temp today is up around 39c so very warm had to add more ice water but they’ve come out looking great fruit mince pies for Xmas day thank you
So happy to hear that! Hope you had a wonderful Christmas!
It is very convenient to prepare the tart dough in advance and have it frozen for future use especially if one has a party coming up.
This is a real time-saving method without compromising the flakiness of the tart crust.
Yes, this tart crust is easy to prepare before hand 🙂