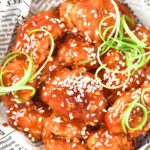
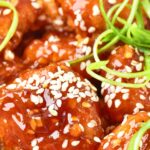
Korean Fried Chicken (Gluten-Free, Dairy-Free)
With a crunchy and crispy coating, tender chicken meat on the inside, and then tossed in a sweet and spicy sauce, this Korean fried chicken is also gluten-free and dairy-free. Go make a batch to enjoy this Asian chicken recipe today!
")
Want to save this recipe?
Enter your email & I’ll send it to your inbox. Plus, get great new recipes from me every week!
Deliciously Crispy Korean Fried Chicken
If you absolutely love fried chicken and also have an appetite for Asian flavors, then you’re going to enjoy this absolutely amazing Korean-style fried chicken.
With a double-frying technique that really sets it apart from regular fried chicken, a thin yet crispy batter coating that covers juicy marinated chicken, all tossed in an extraordinary blend of flavors that will make you beg for seconds!
")

Why You’ll Love This Recipe:
- Simple Ingredients: The main ingredients required for this gluten-free Korean fried chicken recipe are easily accessible at the local grocery store (with the more Asian-profile ingredients usually found in the Asian food section).
- Easy to Make: While there are a couple of steps involved, preparing this fried Korean-style chicken is relatively uncomplicated – marinate, coat, fry twice and then toss in homemade sauce.
- Full of Flavor: Packed with flavor – there are sweet, savory, spicy and acidic notes for the most satisfying umami meal.
- Totally Gluten-Free & Dairy-Free: The best part is that this Asian chicken recipe is 100% gluten-free and dairy-free, which means that even those with Celiac disease or gluten or lactose intolerances can enjoy it without issues!

Ingredients You’ll Need:
Here’s a visual overview of the ingredients required for making this Korean fried chicken recipe.
(For exact measurements, please scroll down to the printable recipe card at the bottom of this post.)
")
Recipe Notes + Substitutions:
- Chicken: I used skinless, boneless chicken breast, but you can also use skinless boneless chicken thighs if you prefer.
- Rice Vinegar: If you are Celiac or gluten-intolerant, make sure to use gluten-free rice vinegar.
- Ginger Paste: Using ginger paste in the marinade adds depth of flavor to the chicken meat, so make sure to add it in.
- Cornstarch: Using cornstarch in the batter creates a lighter coating (as opposed to traditional fried chicken that tends to have a thicker batter using traditional wheat flour. Alternatively, if you are allergic to corn, you can also use potato starch or tapioca starch instead.
- Spices: I used ground black pepper and granulated garlic to add flavor to the coating. Alternatively, you may swap out the granulated garlic for garlic powder.
- Minced Garlic: Minced fresh garlic packs taste to the sauce, so make sure you add it in.
- Soy Sauce: I used gluten-free soy sauce (tamari sauce) to keep this recipe gluten-free. However, if you are not Celiac or gluten-intolerant, go ahead and use regular soy sauce instead. Alternatively, if you are allergic to soy, you may use coconut aminos in equal amounts instead.
- Sesame Oil: Sesame oil adds an unmistakably Asian flavor to this recipe, so definitely add it in.
- Ketchup: If you don’t have ketchup, you can also use tomato sauce instead.
- Chili Paste: Gochujang (Korean red chili paste) adds a kick of heat that balances out the sweetness from the ketchup and sugar. Definitely an ingredient I won’t leave out (unless you cannot tolerate heat).
- Lime Juice: For best flavor, use freshly squeezed lime juice for a touch of acidity.
- Sugar: I used light brown sugar, but you can also use white sugar or cane sugar if you prefer. The sugar adds sweetness to balance out the acidity, heat and savory flavor.
How to Make Korean Fried Chicken:
")
Marinate Chicken Pieces: Place the chicken pieces in a bowl. Add the rice vinegar and ginger paste, then mix thoroughly so every piece is coated. Let the chicken marinate for 10 minutes to absorb the flavor.

Coat Marinated Chicken: In a separate bowl, combine the cornstarch, ground black pepper, granulated garlic and salt. Mix well. Add the marinated chicken and coat each piece evenly, pressing lightly so each piece is coated with the cornstarch mixture.

Pan Fry Chicken: Heat oil in a frying pan over medium heat. Carefully add the chicken pieces in a single layer. Fry for about 7 minutes, turning occasionally, until lightly golden and cooked through. Transfer to a plate and let rest for 5 minutes.
")
Fry Again: Increase the heat to high and add a little more oil if needed. Return the chicken to the pan and fry for an additional 3 minutes, stirring constantly, until the chicken nuggets are deeply golden and very crispy.
")
Prepare Sauce: In a small saucepan, add all sauce ingredients (minced garlic, gluten-free soy sauce, sesame oil, ketchup, chili paste, lime juice and light brown sugar). Stir until smooth, then bring to a gentle boil over medium heat. Cook for 2 minutes, allowing the sauce to thicken slightly. Remove the sauce from heat and let it cool for about 2 minutes so it becomes glossy and sticky.
")
Toss Fried Chicken with Sauce: Add the fried chicken to the sauce and toss quickly until each piece is fully coated.

Garnish & Serve: Serve immediately, garnished with sesame seeds, chili flakes, and sliced green onions if desired.
Dish by Dish Tips:
- Pat Chicken Dry: Make sure to pat the chicken pieces dry before coating them for the crispiest results.
- Double-Frying: The double-frying technique is the secret to making the korean fried chicken pieces super crispy (first fry at a moderate temperature to cook the chicken, the second fry at a higher temperature to really crisp up the exterior), so make sure you don’t skip the extra frying step.
- Serve With: I recommend serving this with freshly cooked white rice (or cauliflower rice for a low carb option).
- Hot Wings: If you like, you can toss air fryer chicken wings with the sweet Gochujang chili sauce for a delicious game day appetizer.
Other Asian Chicken Recipes You’ll Love:
Gluten-Free Main Dishes to Make:


P.S. If you try this recipe, I’d love for you to leave a star rating below, and/or a review in the comment section further down the page. I always appreciate your feedback. Be sure to check out my entire Recipe Index for all the recipes on the blog. You can also follow me on Pinterest, Facebook or Instagram! Sign up for my Email List to get fresh recipes in your inbox each week!
Korean Fried Chicken (Gluten-Free, Dairy-Free)
- Total Time: 45 minutes
- Yield: 4 1x
Description
With a crunchy and crispy coating, tender chicken meat on the inside, and then tossed in a sweet and spicy sauce, this Korean fried chicken is also gluten-free and dairy-free. Go make a batch to enjoy this Asian chicken recipe today!
Ingredients
- 10 oz chicken breast, cut into 1-inch pieces
- 2 tablespoons rice vinegar
- 1 tablespoon ginger paste
- 4 tablespoons cornstarch
- 1 1/2 teaspoon ground black pepper
- 1 teaspoon granulated garlic
- 1 1/2 teaspoon salt
- Oil for frying
- 2 tablespoons minced garlic
- 4 tablespoons gluten-free soy sauce (tamari sauce)
- 2 tablespoons sesame oil
- 4 tablespoons ketchup
- 1 tablespoon Gochujang chili paste
- 2 tablespoons fresh lime juice
- 1 tablespoon light brown sugar
Instructions
- Marinate Chicken Pieces: Place the chicken pieces in a bowl. Add the rice vinegar and ginger paste, then mix thoroughly so every piece is coated. Let the chicken marinate for 10 minutes to absorb the flavor.
- Coat Marinated Chicken: In a separate bowl, combine the cornstarch, ground black pepper, granulated garlic and salt. Mix well. Add the marinated chicken and coat each piece evenly, pressing lightly so each piece is coated with the cornstarch mixture.
- Pan Fry Chicken: Heat oil in a frying pan over medium heat. Carefully add the chicken pieces in a single layer. Fry for about 7 minutes, turning occasionally, until lightly golden and cooked through. Transfer to a plate and let rest for 5 minutes.
- Fry Again: Increase the heat to high and add a little more oil if needed. Return the chicken to the pan and fry for an additional 3 minutes, stirring constantly, until deeply golden and very crispy.
- Prepare Sauce: In a small saucepan, add all sauce ingredients (minced garlic, gluten-free soy sauce, sesame oil, ketchup, chili paste, lime juice and light brown sugar). Stir until smooth, then bring to a gentle boil over medium heat. Cook for 2 minutes, allowing the sauce to thicken slightly. Remove the sauce from heat and let it cool for about 2 minutes so it becomes glossy and sticky.
- Toss Fried Chicken with Sauce: Add the fried chicken to the sauce and toss quickly until each piece is fully coated.
- Garnish & Serve: Serve immediately, garnished with sesame seeds, chili flakes, and sliced green onions if desired.
Notes
Chicken: I used skinless, boneless chicken breast, but you can also use skinless boneless chicken thighs if you prefer.
Rice Vinegar: If you are Celiac or gluten-intolerant, make sure to use gluten-free rice vinegar.
Ginger Paste: Using ginger paste in the marinade adds depth of flavor to the chicken meat, so make sure to add it in.
Cornstarch: Using cornstarch in the batter creates a lighter coating (as opposed to traditional fried chicken that tends to have a thicker batter using traditional wheat flour. Alternatively, if you are allergic to corn, you can also use potato starch or tapioca starch instead.
Spices: I used ground black pepper and granulated garlic to add flavor to the coating. Alternatively, you may swap out the granulated garlic for garlic powder.
Minced Garlic: Minced fresh garlic packs taste to the sauce, so make sure you add it in.
Soy Sauce: I used gluten-free soy sauce (tamari sauce) to keep this recipe gluten-free. However, if you are not Celiac or gluten-intolerant, go ahead and use regular soy sauce instead. Alternatively, if you are allergic to soy, you may use coconut aminos in equal amounts instead.
Sesame Oil: Sesame oil adds an unmistakably Asian flavor to this recipe, so definitely add it in.
Ketchup: If you don’t have ketchup, you can also use tomato sauce instead.
Chili Paste: Gochujang (Korean red chili paste) adds a kick of heat that balances out the sweetness from the ketchup and sugar. Definitely an ingredient I won’t leave out (unless you cannot tolerate heat).
Lime Juice: For best flavor, use freshly squeezed lime juice for a touch of acidity.
Sugar: I used light brown sugar, but you can also use white sugar or cane sugar if you prefer. The sugar adds sweetness to balance out the acidity, heat and savory flavor.
- Prep Time: 5 mins
- Cook Time: 40 mins
- Category: Appetizer, Dinner
- Method: Frying
- Cuisine: Asian


YUM YUM YUM!!!
YAY! Happy to hear that Candice!
Thank you for all your great recipes. Is it possible to bake them in the oven instead of frying them?
Hi Gila! Yes, you should be able to bake them in the oven until crispy before tossing with the sauce 🙂 Enjoy!