Super Easy Gluten-Free Pizza Crust (No-Knead, Dairy-Free)
Finally, an easy gluten-free pizza crust that actually holds up well, bakes up crusty on the outside and chewy on the inside! No rising time needed, no kneading required, and this pizza crust recipe is ready in less time than it takes to order a pizza, the perfect meal for pizza night.
This is the perfect base for our gluten-free caprese pizza or any pizza toppings you love. It’s totally dairy-free (with an egg-free option too), but no one would know!
")
Want to save this recipe?
Enter your email & I’ll send it to your inbox. Plus, get great new recipes from me every week!
Jump to:
- The Quest for Proper Gluten-Free Pizza
- The Best Gluten-Free Pizza Crust
- Why This Recipe Works:
- Ingredients You’ll Need:
- Ingredient Notes/Substitutions:
- How to Make This Easy Gluten-Free Pizza Crust (Step by Step)
- Super Simple Gluten-Free Pizza Recipe
- Dish by Dish Tips/Tricks:
- Recipe FAQs:
- If you enjoyed this recipe, you’ll also love these other recipes:
- Gluten-Free Bread Recipes to Enjoy:
- Easy Gluten-Free Pizza Crust (Dairy-Free)
The Quest for Proper Gluten-Free Pizza
When my husband Juan was first diagnosed with Celiac disease in 2015 and we began following a gluten-free diet, we went on a search for good gluten-free pizza – but unfortunately the options that were available in restaurants or delivery in Buenos Aires were far from what real pizza should feel or taste like.
Now when I say real pizza I mean pizza made with wheat flour that could hold up on it’s own and wasn’t soggy or too thick or felt like stiff sheet of cardboard. I’m talking about pizza that is crusty on the outside and chewy on the inside. You know, basically the pizza of pizza dreams.
")
The Best Gluten-Free Pizza Crust
After googling and researching online and testing out this great recipe a few times, I’m so happy to tell you that we’ve finally got our gluten-free pizza crust down pat.
In fact, we’ve been eating pizza at least once a week since we’ve perfected this gluten-free crust. The best part is that we can add any toppings we like! YAY to pizza dreams coming true!
Make sure you keep this gluten-free pizza crust recipe handy so the next time it’s pizza night, you can enjoy it in the comfort of your own home. Say goodbye to pizza delivery!
Why This Recipe Works:
Easy to Make: It’s simple, easy, doesn’t require any kneading, and honestly yields a pizza crust so close to the real thing you wouldn’t realize it was gluten-free.
Comes Together Quickly: This gluten-free pizza crust recipe is ready from scratch in just 45 minutes (no rising time required)! What’s not to love?
Gluten-Free and Dairy-Free (with Egg-Free Option): This amazing homemade pizza crust is totally gluten-free and dairy-free, which means those who are Celiac or have gluten or lactose intolerances can also enjoy it! There’s also an option to make it egg-free, so those with egg allergies or on a vegan diet can also eat it!
")
Ingredients You’ll Need:
Here’s a visual overview of the ingredients needed to make this super easy gluten-free pizza crust recipe – most of which you might already have.
The ingredients include warm water, sugar, instant yeast, gluten-free all-purpose flour, brown rice flour, xanthan gum, salt, an egg, vegetable oil, and apple cider vinegar. For exact quantities and measurements, please scroll down to the recipe card at the bottom of the post.
")
Ingredient Notes/Substitutions:
- Warm Water: Make sure that the water is between 105F to 115F as the warm environment is required to activate the yeast, but if the water is too hot, it will kill the yeast.
- Yeast: I like using instant dry yeast because it activates immediately.
- Sugar: The sugar is necessary because the yeast needs to feed on the sugar to be activated. Don’t worry about the sugar making the dough sweet, because the once the yeast is done feeding on it, the dough will not be sweet at all.
- Gluten-Free All-Purpose Flour: I recommend using a good-quality gluten-free flour blend that has a mix of lighter flours/starches (such as white rice flour, corn starch, tapioca starch or potato starch) to ensure a lighter final texture. I do NOT recommend using flour blends with heavier flours (such as garbanzo bean flour) as that will result in a denser final texture.
- Brown Rice Flour: I like using brown rice flour to add a bit more fiber to the dough (learn how to make homemade brown rice flour in just minutes)! If you don’t have brown rice flour on hand, or don’t want to use it, simply replace it with the same amount of gluten-free all-purpose flour. Alternatively, you may also substitute the brown rice flour with other flours such as millet flour, sorghum flour, almond flour or buckwheat flour.
- Xanthan Gum: Xathan gum takes the role of gluten in gluten-free flours, and is necessary for binding the ingredients together.
- Egg: If you want to make this dough completely vegan, swap out the egg for a chia egg or flax egg for binding purposes.
- Oil: I like using sunflower oil because I always have a bottle of it at home. Alternatively, you may also use other vegetable oils such as extra virgin olive oil or avocado oil.
- Apple Cider Vinegar: Apple cider vinegar creates an acidic environment that helps the dough rise better. Alternatively, you may also use rice vinegar, or white wine vinegar if you don’t have ACV on hand.
How to Make This Easy Gluten-Free Pizza Crust (Step by Step)
1. Preheat and Line
Preheat oven to 450F and line a large round pizza pan with parchment paper or a silpat.
2. Activate Yeast
In a small bowl, mix the warm water, sugar, and instant yeast together and let it sit for 5 minutes until it turns foamy (if the mixture doesn’t turn foamy, it means the yeast isn’t working so throw it away and use a new packet of yeast).
")
3. Whisk Dry Ingredients
In a large bowl, whisk the gluten-free all-purpose flour, brown rice flour, xanthan gum and salt together.
")
3. Add Wet Ingredients to Dry Ingredients to Form Pizza Dough
Add in the beaten egg, oil, apple cider vinegar, and the yeast mixture. Mix very well together until you get a thick sticky dough (note that gluten-free dough will be much more wet and stickier than normal wheat flour dough, and that’s perfectly fine).
There’s no rise needed, so you don’t have to wait for the pizza crust to double in size – the rising gets down in the oven. There’s also no kneading required, as with most gluten-free bread dough, which is perfect.
")
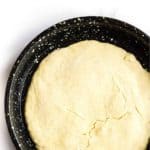
5. Transfer Dough to Prepared Pizza Pan
Transfer the pizza dough to the prepared silpat-lined or parchment-lined round pizza pan, and spread the dough out into a 12-inch round (or divide into 2 smaller rounds if you prefer).
If you prefer, you can also use a baking sheet or a pizza stone.
")
6. Bake Until Golden Brown and Crusty
Bake for 20 to 30 minutes on the lowest rack in the hot oven until it’s golden brown and you get a crusty crust at the bottom.
")
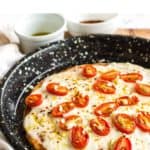
7. Place Toppings and Cook
Once the bottom is crusty, remove the silpat or parchment paper and place the crust directly on the pizza pan. Add pizza sauce and toppings of choice and bake for another 15 minutes until toppings are ready.
Once the bottom is crusty, remove the silpat or parchment paper and place the crust directly on the pizza pan.
Spread this gluten-free pizza crust with your favorite sauce and place your favorite toppings on top. Cook for another 15 minutes until cheese (or dairy-free cheese) is melted, and enjoy!
")
Super Simple Gluten-Free Pizza Recipe
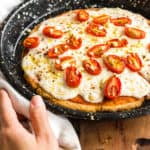
If you’ve got a bit of tomato sauce, some mozzarella cheese (we use a vegan version made with almonds), cherry tomatoes, fresh garlic, chili flakes, and olive oil, you’re just a few minutes away from your own homemade caprese pizza.
This is pretty much the base for a lot of the pizzas we eat at home. I like to spread out the tomato sauce and let it dry slightly in the oven for 5 minutes before placing the cheese and halved grape tomatoes.
Then I let it cook for another 10 minutes until the cheese is all melted and gooey and delicious, sprinkle on the fresh chopped garlic and chili flakes, and drizzle a bit of olive oil over. There you go! Homemade pizza in less than the amount of time you’d take to order one! Buon Appetito!
")
Dish by Dish Tips/Tricks:
- Testing the Yeast: Start off by mixing the warm water (approximately 105F to 115F in temperature), sugar, and instant yeast in a small bowl and let it sit in a warm place for five minutes until it turns foamy. This step is important for you to check if the yeast is working. If the yeast mixture doesn’t foam up, it means that the yeast is expired. Throw it away and start again with a new packet of yeast.
- Replace Brown Rice Flour with Other Flours: I like adding brown rice flour in addition to the gluten-free all-purpose flour to add a bit more fiber and give it more of a whole grain feel. If you prefer, you can also replace the brown rice flour with other flours that are rich in fiber such as millet flour, sorghum flour, or buckwheat flour.
- Crust Thickness: Depending on how your like your crust, you may get one large pizza (thicker crust) or two smaller pizzas (thin crust).
Recipe FAQs:
If not using the pizza crust immediately, let it cool completely before wrapping it in plastic wrap and then storing in the refrigerator for up to 2 days before using.
To freeze, wrap the cooled crust in plastic wrap and freeze for up to 3 months. To use, thaw the crust on a pizza pan in the oven at 450F for 10 minutes before adding toppings and baking for another 15 minutes until ready.
")
If you enjoyed this recipe, you’ll also love these other recipes:
- Easy Caprese Pizza (Gluten-Free, Vegan)
- Easy Gluten-Free Naan Bread (No-Yeast, Dairy-Free)
- Easy Gluten-Free No Knead Bread (Dairy-Free)
- Gluten-Free Focaccia Bread (Dairy-Free, Vegan)
- Easy Gluten-Free Sandwich Bread (Vegan)
- Soft, Fluffy Gluten-Free Bread (Dairy-Free)
- Fluffy Buckwheat Bread (Gluten-Free, Dairy-Free)
- Gluten-Free Honey Oat Quick Bread
- Gluten-Free Flaxseed Coconut Bread (Paleo, Dairy-Free)
- 10 Easy Gluten-Free Bread Recipes to Make on Repeat
Gluten-Free Bread Recipes to Enjoy:


P.S. If you try this recipe, I’d love for you to leave a star rating below, and/or a review in the comment section further down the page. I always appreciate your feedback. Be sure to check out my entire Recipe Index for all the recipes on the blog. You can also follow me on Pinterest, Facebook or Instagram! Sign up for my Email List to get fresh recipes in your inbox each week!
Easy Gluten-Free Pizza Crust (Dairy-Free)
- Total Time: 45 minutes
- Yield: 1 large pizza crust 1x
- Diet: Gluten Free
Description
Finally, an easy gluten-free pizza crust that actually holds up well, bakes up crusty on the outside and chewy on the inside! No rising time needed, no kneading required, and this pizza crust recipe is ready in less time than it takes to order a pizza, the perfect meal for pizza night. This is the perfect base for our gluten-free caprese pizza or any pizza toppings you love! It’s totally dairy-free (with an egg-free option too), but no one would know!
Ingredients
- 3/4 cup warm water (approximately 105F to 115F)
- 1 tablespoon sugar
- 2 1/4 teaspoons instant yeast
- 1 1/2 cups gluten-free all-purpose flour
- 1/2 cup brown rice flour
- 3/4 teaspoon xanthan gum (omit if your gluten-free flour blend already includes it)
- 2 teaspoons salt
- 1 large egg, beaten
- 1 tablespoon sunflower oil
- 1 teaspoon apple cider vinegar
Instructions
- Preheat and Line: Preheat oven to 450F and line a large round pizza pan with parchment paper or a silpat.
- Activate Yeast: In a small bowl, mix the warm water, sugar, and instant yeast together and let it sit for 5 minutes until it turns foamy (if the mixture doesn’t turn foamy, it means the yeast isn’t working so throw it away and use a new packet of yeast).
- Whisk Dry Ingredients: In a large bowl, whisk the gluten-free all-purpose flour, brown rice flour, xanthan gum and salt together.
- Add Wet Ingredients to Dry Ingredients to Form Dough: Add in the beaten egg, oil, apple cider vinegar, and the yeast mixture. Mix very well together until you get a thick sticky dough (note that gluten-free dough will be much more wet and stickier than normal wheat flour dough, and that’s perfectly fine).
- Transfer Dough to Prepared Pizza Pan: Transfer the pizza dough to the prepared silpat-lined or parchment-lined pan, and spread the dough out into a 12-inch round (or divide into 2 smaller rounds if you prefer).
- Bake Until Golden and Crusty: Bake for 20 to 30 minutes on the lowest rack until pizza crust is golden brown and crusty on the bottom. Once the bottom is crusty, remove the silpat or parchment paper and place the crust directly on the pizza pan. Add pizza sauce and toppings of choice and bake for another 15 minutes until toppings are ready.
Notes
Warm Water: Make sure that the water is between 105F to 115F as the warm environment is required to activate the yeast, but if the water is too hot, it will kill the yeast.
Yeast: I like using instant dry yeast because it activates immediately.
Sugar: The sugar is necessary because the yeast needs to feed on the sugar to be activated. Don’t worry about the sugar making the dough sweet, because the once the yeast is done feeding on it, the dough will not be sweet at all.
Gluten-Free All-Purpose Flour: I recommend using a good-quality gluten-free flour blend that has a mix of lighter flours/starches (such as rice flour, corn starch, tapioca starch or potato starch) to ensure a lighter final texture. I do NOT recommend using flour blends with heavier flours (such as garbanzo bean flour) as that will result in a denser final texture.
Brown Rice Flour: I like using brown rice flour to add a bit more fiber to the dough (learn how to make homemade brown rice flour in just minutes)! If you don’t have brown rice flour on hand, or don’t want to use it, simply replace it with the same amount of gluten-free all-purpose flour. Alternatively, you may also substitute the brown rice flour with other flours such as millet flour, sorghum flour, almond flour or buckwheat flour.
Xanthan Gum: Xathan gum takes the role of gluten in gluten-free flours, and is necessary for binding the ingredients together.
Egg: If you want to make this dough completely vegan, swap out the egg for a chia egg or a flax egg for binding purposes.
Oil: I like using sunflower oil because I always have a bottle of it at home. Alternatively, you may also use other vegetable oils such as extra virgin olive oil or avocado oil.
Apple Cider Vinegar: Apple cider vinegar creates an acidic environment that helps the dough rise better. Alternatively, you may also use rice vinegar, or white wine vinegar if you don’t have ACV on hand.
Storing/Freezing: If not using the pizza crust immediately, let it cool completely before wrapping it in plastic wrap and then storing in the refrigerator for up to 2 days before using. To freeze, wrap the cooled crust in plastic wrap and freeze for up to 3 months. To use, thaw the crust on a pizza pan in the oven at 450F for 10 minutes before adding toppings and baking for another 15 minutes until ready.
Adapted from: Gluten-Free Palate
This recipe was originally published in June 2020, but has since been updated with recipe notes, ingredient substitutions,and clearer step-by-step instructions.
- Prep Time: 15 mins
- Cook Time: 30 mins
- Category: Pizza
- Method: Baking
- Cuisine: Italian


Hi, Felicia. You have such a great website!! I use it all the time but I forget to comment. Thanks for all your work you put into it. Every recipe I have tried has been great!!
Hi Heather, thank YOU so much for your lovely comment, it completely made my day! So happy to know you enjoy the recipes and that it’s helpful for you! Hope to see you around the blog again sometime soon!
xx,
felicia
Question. Why the sunflower oil specifically? Allergic to it. Can you use another? Also, sunflower oil is not heart healthy – oil or avocado oil would be better.
Hi you can use any other type of oil 🙂
Felicia,
oh my GOODNESS! I have bought G-F pizza from different pizza places, and the crust was always horrible! Tasted like a cardboard cracker and hard as a brick. I vowed never to buy another one because I was always so disappointed! This crust was fabulous and so much like a REAL pizza crust should taste! I did a few different things…used 1/2 tbsp. honey instead of sugar & it worked great! Also, used buckwheat flour instead of the brown rice flour…excellent! I also reduced the salt way down (I can’t really do sugar or much salt at all) to 1/8 tsp. and also added 1 tsp. baking powder. Used Extra Virgin Olive oil and all these changes worked perfectly! Also used a pizza stone! I can’t say enough good things about your crust! I will be trying your Caprese Pizza! Looks yummy! I pre-cooked and drained veggies (mushrooms, bell peppers, & onions) so the crust would not get soggy! Also, I’m dairy free…your D-F cheese looks so good on the Caprese picture…wish they had that here in the United States! Thanks again for satisfying my pizza craving!
Hi Terri! So happy to hear that you enjoyed this gluten-free pizza crust!! Glad it worked with all the different substitutions too 🙂 Regarding the cheese: Have you tried violife dairy free cheese? I’ve heard very good feedback on it!
Good morning Felicia,
This easy “no-rise” pizza crust is ideal when we need to have a fresh pizza meal in a short time to satisfy our craving and hunger.
I like to have them (in sufficient quantity for a pizza party) prepared in advance and deep freezed them for future party where i need to serve a variety of pizza flavours for party guests.
Thank you again for this great time-saving recipe post.! 🙂
Have a great and blessed day!
Love you lots,
Mum
Hi mummy! Yes, this gluten-free pizza crust has definitely been a life saver!! 😉
Thank Felicia,
We will try making this no-rise pizza crusts substituting gluten-free flour with plain flour for our next pizza meal at home. What a great idea to save the preparation time without having to wait for the dough to rise.
Cheers and have a great week-end ahead!
Big hugs and lots of kisses from home,
Mum
Hi Mummy! Don’t know if daddy will like pizza cos of the cheese, but well you can always make it without cheese! I remember when we were young and daddy was traveling on his work trips you’d take us out to Pizza Hut 🙂 Those were the days 😉