
Egg-Free Gluten-Free Bread (So Tender!)
Soft and tender, this egg-free gluten-free bread is perfect for toasting and eating with butter, or for making sandwiches. I highly recommend baking a couple of loaves and freezing to enjoy homemade bread anytime – they’ll be gone in no time!

Want to save this recipe?
Enter your email & I’ll send it to your inbox. Plus, get great new recipes from me every week!
Recipe Testing for the Perfect Egg-Free Gluten-Free Loaf
In all my years of recipe testing and developing gluten-free bread recipes, I often find that eggs play an essential role in helping the dough rise and creating a beautiful dome once baked.
While testing the recipes, I’ve thrown away so many loaves of vegan gluten-free bread because the inside texture was either too gummy or too dense, and simply assumed that a decent gluten-free loaf had to include eggs (and usually at least two).
But this year, with the price of eggs soaring to ridiculous highs, and many readers requesting a gluten-free bread recipe without eggs, I finally decided it was time to go back to the grind and figure this one out.
Finally… Fluffy Gluten-Free Bread Without Eggs!
So I spent the past few months tweaking recipe after recipe, determined to develop an egg-free and gluten-free bread recipe that was soft, fluffy and delicious.
And I’m ecstatic to share this amazing loaf of bread with you!
There are no eggs, no dairy, and no gluten in this loaf, yet it is incredibly tender and moist, holds together well, and is perfect toasted to not!


Why You’ll Love this Recipe:
- Simple Ingredients: You only need a handful of ingredients to make this gluten and egg-free bread, all of which are easily accessible at the local grocery store (nothing fancy required!).
- Easy to Make: Preparing this bread is easy peasy! Simply mix the dry and wet ingredients together to get a shaggy dough that resembles thick cake batter, which you let rise in a loaf pan. Once doubled in size, bake until golden brown, let cool and slice!
- Totally Gluten-Free, Dairy-Free & Vegan: The best part is that this homemade bread recipe is 100% gluten-free, dairy-free and vegan, which means that even those with Celiac disease or those with gluten or lactose intolerances, or those simply on an egg-free or vegan diet can enjoy it without issues!
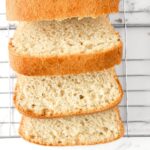
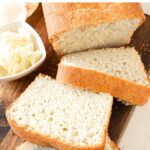
- Amazing Texture: With a golden brown crust and a beautifully tender crumb, even your gluten-eating friends and family will love it! (I know that because my friend and her family can eat gluten but they devoured 3 whole loaves of this anyway!).

Ingredients You’ll Need:
Here’s a visual overview of the ingredients required for making this egg-free gluten-free bread recipe.
(For exact measurements, please scroll down to the printable recipe card at the bottom of this post.)

Recipe Notes + Substitutions:
- Gluten-Free All-Purpose Flour: I recommend using a good-quality gluten-free all-purpose flour blend that is made up of lighter flours/starches (such as rice flour, tapioca starch, corn starch or potato starch) to ensure a lighter and fluffier final texture. I do NOT recommend using a gluten-free flour blend that is made up of heavier flours (such as garbanzo bean flour) as that will result in a denser final texture.
- Xanthan Gum: Xanthan gum is the replacement for gluten in gluten-free flours and helps to better bind the ingredients together. If your gluten-free flour blend does not already include xanthan gum, make sure to add it in.
- Brown Rice Flour: You can either grind your own brown rice flour or buy store-bought. Alternatively, you may also use millet flour or sorghum flour instead.
- Instant Yeast: I like using instant yeast because there is no pre-activation period required and you can mix the instant yeast directly with the other dry ingredients.
- Sugar: The sugar acts as “food” for the yeast to feed on so it can produce the gases required to create air pockets in the dough and make the dough rise. I used white sugar, but cane sugar, light brown sugar, dark brown sugar or coconut sugar will work too.
- Psyllium Husk Powder: I recommend using lighter-colored psyllium husk powder (some versions are darker and look like a brownish-purple) to ensure a lighter colored loaf. If you don’t have access to psyllium husk powder, you can make your own by grinding whole pysllium husks until they have a very fine texture.
- Baking Powder: Baking powder adds more rise to the dough, so make sure to add it in.
- Warm Water: It’s important that you use warm water that is between 105F and 115F (this is because the warmth is required to activate the yeast, but if the water is too hot, the high heat will kill the yeast). Alternatively, you may also use warm unsweetened almond milk if you prefer.
- Oil: I like using sunflower oil because I always have a bottle of it on hand. However, feel free to use other types of vegetable oil that is liquid at room temperature (such as olive oil, canola oil, avocado oil, etc.).
How to Make This Gluten-Free Egg-Free Bread (Step by Step):
Prepare Dough and Transfer to Pan

Whisk Dry Ingredients: In a large mixing bowl, whisk the gluten-free all-purpose flour, xanthan gum (if using), brown rice flour, instant yeast, baking powder, psyllium husk powder, sugar, and salt. Whisk until well combined.

Add Wet Ingredients: Add the warm water and oil to the dry ingredients.

Mix Wet and Dry Ingredients to Get Dough: Mix the wet ingredients and the dry ingredients well until you get a shaggy homogeneous dough that resembles thick cake batter (the dough will be a little wet, but that’s fine, don’t add more flour!).

Transfer Dough to Pan: Grease an 8”x4” metal loaf pan with oil or nonstick baking spray (alternatively, you may also line the pan with parchment paper). Transfer the dough to the prepared loaf pan, using a wet spatula to smooth out the top of the dough.
Let Dough Rise and Bake Until Golden

Let Dough Rise: Place the pan in a warm, draft-free space and let bread rise for approximately 30 minutes until it has doubled in size and the top of the dough has risen to the top of the pan. While the dough is almost done rising, preheat the oven to 350F (180C).

Bake Until Golden: Once the dough has fully doubled in size, place it on the middle rack of the preheated oven and bake for 50 to 60 minutes until it is golden on top and the loaf sounds hollow when tapped.
Let Cool Before Slicing

Let Cool Fully Before Slicing: Let the loaf fully cool on a wire rack (for at least 2 hours) or overnight before slicing into pieces.

Slice and Enjoy: Slice into the cooled loaf and enjoy!
Dish by Dish Tips:
- Use Light-Colored Pysllium Husk Powder: I recommend using lighter-colored psyllium husk powder (some versions are darker and look like a brownish-purple) to ensure a lighter colored loaf. If you don’t have access to psyllium husk powder, you can make your own by grinding whole pysllium husks until they have a very fine texture.
- Optional Add-Ins: If you wish to make gluten-free seed bread, go ahead and toss in a handful of mixed seeds (chia seeds, flax seeds, sunflower seeds, pumpkin seeds, etc.) together with the dry ingredients.
- Let Cool Before Slicing: It’s very important that you let the loaf cool completely on a cooling rack at room temperature before slicing because for gluten-free bread, the loaf will continue cooking with the residual heat even after removing it from the oven. If you slice into the loaf before it has fully cooled, you’ll get a gummy inside.
- Use Metal Pan: I highly recommend using a metal pan (as opposed to a glass pan or ceramic pan) as metal conducts heat better, which will allow the bottom and sides of the loaf to brown evenly.
- Bread Maker: I personally do not own a bread machine, but I believe you can also place all the ingredients for this gluten-free bread recipe in your bread maker, and bake it using the the “gluten-free” setting.
- Sandwich Bread or Toasted: You can use this gf bread un-toasted for regular sandwiches, or toast it and eat it with butter and jam, or make grilled cheese sandwiches!
- Storing/Freezing: To store, wrap the cooled gluten-free bread in plastic wrap or place in an airtight container and store for up to one week. To freeze, place it in a freezer-safe bag and freeze for up to 2 months. (Tip: Slice the bread into thin slices before wrapping, so you can take out one frozen slice at a time when needed!)
Gluten-Free Bread Recipes You’ll Love:
- Fluffy Gluten-Free White Bread (Dairy-Free)
- Tender Potato Bread (Gluten-Free, Dairy-Free)
- Brown Rice Bread (Gluten-Free, Dairy-Free)
- Buckwheat Bread (Gluten-Free, Dairy-Free)
P.S. If you try this recipe, I’d love for you to leave a star rating below, and/or a review in the comment section further down the page. I always appreciate your feedback. Be sure to check out my entire Recipe Index for all the recipes on the blog. You can also follow me on Pinterest, Facebook or Instagram! Sign up for my Email List to get fresh recipes in your inbox each week!
Egg-Free Gluten-Free Bread
- Total Time: 1 hour 40 minutes
- Yield: 12 slices 1x
- Diet: Gluten Free
Description
Soft and tender, this egg-free gluten-free bread is perfect for toasting and eating with butter, or for making sandwiches. I highly recommend baking a couple of loaves and freezing to enjoy homemade bread anytime – they’ll be gone in no time!
Ingredients
- 2 cups gluten-free all-purpose flour
- 1/2 teaspoon xanthan gum (omit if your gluten-free flour blend already includes it)
- 1 cup brown rice flour
- 2 1/4 teaspoons instant yeast
- 2 tablespoons sugar
- 3 tablespoons psyllium husk powder (make sure to use the lighter colored psyllium husk powder for a lighter colored loaf)
- 1 teaspoon baking powder
- 1 teaspoon salt
- 1 3/4 warm water (between 105 to 115F), or more if your dough is too dry
- 1/2 cup sunflower oil
Instructions
- Whisk Dry Ingredients: In a large mixing bowl, whisk the gluten-free all-purpose flour, xanthan gum (if using), brown rice flour, instant yeast, baking powder, psyllium husk powder, sugar, and salt. Whisk until well combined.
- Add Wet Ingredients: Add the warm water and oil to the dry ingredients.
- Mix Wet and Dry Ingredients to Get Dough: Mix the wet ingredients and the dry ingredients well until you get a shaggy homogeneous dough that resembles thick cake batter (dough will be a little wet, but that’s fine, don’t add more flour!).
- Transfer to Pan: Grease an 8”x4” metal loaf pan with oil or nonstick baking spray. Transfer the dough into the pan, using a wet spatula to smooth out the top of the dough.
- Let Dough Rise: Place the pan in a warm, draft-free space and let the dough rise for approximately 30 minutes until it has doubled in size and the top of the dough has risen to the top of the pan. (I like leaving the pan in the microwave with the microwave switched off). Depending on the humidity and room temperature where you live, you may require more or less rising time. For example, on a hot and humid summer day, 30 minutes should be enough, but on a cold winter day, you may need up to 1 hour.
- Preheat Oven: While the dough is almost done rising, preheat the oven to 350F (180C).
- Bake Until Golden: Once the dough has fully doubled in size, place it on the middle rack of the preheated oven and bake for 50 to 60 minutes until it is golden on top and the loaf sounds hollow when tapped.
- Let Cool Fully Before Slicing: Let the loaf fully cool on a wire rack (for at least 2 hours) or overnight before slicing into pieces.
Notes
Gluten-Free All-Purpose Flour: I recommend using a good-quality gluten-free all-purpose flour blend that is made up of lighter flours/starches (such as rice flour, tapioca starch, corn starch or potato starch) to ensure a lighter and fluffier final texture. I do NOT recommend using a gluten-free flour blend that is made up of heavier flours (such as garbanzo bean flour) as that will result in a denser final texture.
Xanthan Gum: Xanthan gum is the replacement for gluten in gluten-free flours and helps to better bind the ingredients together. If your gluten-free flour blend does not already include xanthan gum, make sure to add it in.
Brown Rice Flour: You can either grind your own brown rice flour or buy store-bought. Alternatively, you may also use millet flour or sorghum flour instead.
Instant Yeast: I like using instant yeast because there is no pre-activation period required and you can mix the instant yeast directly with the other dry ingredients.
Sugar: The sugar acts as “food” for the yeast to feed on so it can produce the gases required to create air pockets in the dough and make the dough rise. I used white sugar, but cane sugar, light brown sugar, dark brown sugar or coconut sugar will work too.
Psyllium Husk Powder: I recommend using lighter-colored psyllium husk powder (some versions are darker and look like a brownish-purple) to ensure a lighter colored loaf. If you don’t have access to psyllium husk powder, you can make your own by grinding whole pysllium husks until they have a very fine texture.
Baking Powder: Baking powder adds more rise to the dough, so make sure to add it in.
Warm Water: It’s important that you use warm water that is between 105F and 115F (this is because the warmth is required to activate the yeast, but if the water is too hot, the high heat will kill the yeast).
Oil: I like using sunflower oil because I always have a bottle of it on hand. However, feel free to use other types of vegetable oil that is liquid at room temperature (such as olive oil, canola oil, avocado oil, etc.).
Let Cool Before Slicing: It’s very important that you let the loaf cool completely on a wire rack at room temperature before slicing because for gluten-free bread, the loaf will continue cooking with the residual heat even after removing it from the oven. If you slice into the loaf before it has fully cooled, you’ll get a gummy inside.
- Prep Time: 10 mins
- Rising Time: 30 mins
- Cook Time: 60 mins
- Category: Bread
- Method: Baking


I have made this bread recipe twice each time it did not rise. As a home ec teacher, I feel that the yeast should be added to the water first and add sugar to make it bubble up and grow instead of adding the yeast into the dry ingredient. Could the instant yeast be dead?
Hi Donna, I used instant yeast so there is not need to preactivate the yeast. However, if your instant yeast doesn’t make the bread dough rise, then it could be that it’s expired and you might need to use a fresh packet. To test if the yeast works, you can combine a bit of it with warm water and sugar, let the mixture sit for 5 minutes in a warm place and check that it turns foamy. If not, throw our the expired yeast and use a new batch.
I made this bread today and the initial rise looked beautiful. However, it completely fell back down during baking. What would cause this?
Hi Laura, if the bread fell back down during baking it could mean that the dough was too wet. I would reduce the amount of water by 1/4 cup – the dough will probably rise more slowly, but it shouldn’t fall back down during baking. Hope this helps!
I made this following the directions. Unfortunately I didn’t get a rise and my bread turned out purple!
Hi Brin, the purple color could be from the psyllium husk you used (some pysllium husk powder makes baked goods turn purple) I recommend the brand NOW as that brand doesn’t make bread turn purple. As for not getting a rise, it could be that your yeast was expired). Make sure to check if it works (activate the yeast with sugar and warm water and let it sit for 5 minutes. If the yeast mixture doesn’t foam and create bubbles, throw out the yeast and buy a new packet).
I used this recipe for gluten free bread and used bob’s red mill flour with tapioca flour. I have allergies to rice. I also, used flaxseed meal instead of psyllium husk. I’m can’t wait to try it. It did rise properly, too.
Did your substitutions work?
Please may I ask if I could do this recipe in a bread making machine?
How would you go about it if so. Thank you Jo 🙏
Hi Jo! That shouldn’t be a problem. I don’t personally own a bread making machine, but I believe you can place all the ingredients in the bread machine and cook it on the Gluten-Free bread setting.
Thanks for the recipe! My wife is gluten and egg free so this is great. The only problem is the batter was much thicker and dryer than the pictures and it didn’t rise. It was very dense but the flavor was still good. Any suggestions on the batter and texture? Thanks Chris
Hi Chris, if the dough is too thick, simply add 1 or 2 extra tablespoons of water to make the dough a little more like cake batter. It should rise properly then.
Hi Felicia, thank you for this incredible recipe. I have attempted this twice and unfortunately I am not able to achieve the shaggy cake like batter consistency when mixing the ingredients. Am I missing something? FYI, I’m using rice based flour for the gf flour. Thanks again!
Hi Fairoze, may I know how your batter turned out? Is it drier or is it too liquid compared to the photos?
Buenísima receta de pan. Haré este finde y luego cuento.
Excelente por lo práctica para cocinar…
Ms. gracias Felicia!!!!
Hola!! Espero que te guste y que estés muy bien!!!
Un beso grande desde Singapur!!