Soft, Fluffy Gluten-Free Potato Bread (Dairy-Free)
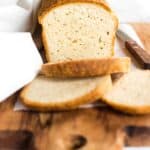
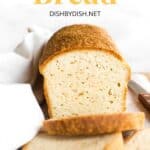
Incredible soft and fluffy, this easy gluten-free potato bread is a great way to make use of leftover mashed potatoes. It’s perfect for making sandwiches, avocado toast, or eating as toast with jam. Totally dairy-free too, but no one would know! Say goodbye to dense and dry gluten-free bread for good! Go bake a loaf to enjoy homemade gluten-free bread today!
")
Want to save this recipe?
Enter your email & I’ll send it to your inbox. Plus, get great new recipes from me every week!
Jump to:
- My Love for Homemade Bread
- Leftover Mashed Potatoes? Make Potato Bread!
- Is Potato Bread Gluten-Free?
- Why This Recipe Works:
- Ingredients You’ll Need:
- Recipe Notes+ Substitutions:
- How to Make Gluten-Free Mashed Potato Bread (Step by Step):
- Dish by Dish Tips/Tricks:
- Recipe FAQs:
- Other Gluten-Free Yeast Breads You’ll Love:
- Other Gluten Free Bread Recipes to Bake:
- Soft, Fluffy Gluten-Free Potato Bread (Dairy-Free)
My Love for Homemade Bread
I have an undeniable love for homemade bread.
Nothing beats pulling out a freshly baked loaf from the still-warm oven, the heat rushing towards your face and the aroma of homemade bread surrounding you like a warm blanket.
If there’s anything the past couple of years have shown me, it’s that the process of making homemade bread is therapeutic, and it never fails to leave me in awe whenever I watch bread dough double in size after rising.
Some of our favorite gluten-free yeast breads that we make on a regular basis include this gluten-free white bread, this fluffy buckwheat bread, brown rice bread, teff bread, and this soft sorghum bread.
")
Leftover Mashed Potatoes? Make Potato Bread!
If you often end up with mashed potatoes left over from dinner, you can use it to make mashed potato bread (i.e. bread made with mashed potatoes).
Is Potato Bread Gluten-Free?
Most store-bought potato bread tends to use normal wheat flour in the ingredients, and since wheat flour contains gluten, it is usually not gluten-free.
However, I wanted to make a gluten-free and dairy-free version, so after 4 whole rounds of recipe testing (yes, 4 rounds indeed!), I finally arrived at the perfect recipe (adapted from here), and I’m ecstatic to share what is possibly my new favorite bread.
Gluten-free potato bread that’s so delicious you can eat it on its own, but is also perfect for making sandwiches, or toasted and spread with jam.
")
Why This Recipe Works:
- Simple Ingredients: The ingredients required for this gluten-free dairy-free potato bread recipe are easily accessible from the local grocery store (nothing fancy needed!).
- Easy to Make: With the help of a high-speed blender (or simple muscle power) to process the mashed potatoes and eggs for a smooth consistency, all you need to do is combine the wet ingredients with the dry ingredients to get the dough. Then transfer the dough to a pan, let it rise, and bake! How much simpler does homemade bread get?
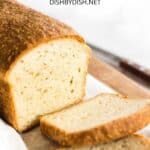
- Soft and Fluffy Texture: This gluten-free potato bread comes out incredibly soft and tender, every single time. This beautiful soft bread is about to change your life! Say goodbye to dense, dry and hard gluten-free bread at last!
- Totally Gluten-Free & Dairy-Free: Instead of using regular flour and butter (which regular potato bread recipes tend to include), I’m using a gluten-free all-purpose flour blend and sunflower oil. This means that this delicious potato bread is 100% gluten-free and dairy-free, which means that even those with Celiac disease or have gluten and lactose intolerances can still have their bread and eat it too!
")
Ingredients You’ll Need:
Here’s a visual overview of the ingredients required to make this gluten-free potato bread recipe.
(For exact measurements, please scroll down to the printable recipe card at the bottom of this post.)
")
Recipe Notes+ Substitutions:
- Mashed Potatoes: In this gluten-free potato bread recipe, I like using leftover mashed potatoes, but you can also use fresh mashed potatoes or instant mashed potatoes made from potato flakes if that’s what you have. If you like, you can also use mashed sweet potatoes if you prefer.
- Eggs: Eggs help to bind the ingredients better and gives the loaf a better rise. If you are vegan or allergic to eggs, you may also use aquafaba or an egg-replacer.
- Water: Make sure the warm water has a temperature of between 105F to 115F. If the water is too cold, the yeast will not get activated, but if the water is too hot, the high heat will kill the yeast. Alternatively, of you prefer, you may also use warm dairy-free milk (such as almond milk, cashew milk, tigernut milk, rice milk, coconut milk etc.). If you are not vegan or lactose-intolerant, feel free to use normal whole milk instead.
- Oil: I like using sunflower oil because I always have a bottle of sunflower oil on hand. You may also use another vegetable oil such as olive oil, avocado oil, or even melted coconut oil or melted vegan butter. Alternatively, if you are not lactose-intolerant, feel free to use normal butter if you prefer.
- Gluten-Free All-Purpose Flour: I recommend using a good-quality gluten-free all-purpose flour blend that includes lighter flours and starches (such as rice flour, tapioca starch, corn starch, potato starch) to ensure you get a light and fluffy final texture. I do NOT recommend using a blend with heavier flours (such as garbanzo bean flour) as that will result in a denser bread.
- Xanthan Gum: Xanthan gum is the replacement for gluten in gluten-free flours, and helps the ingredients to better bind together. If your gluten-free flour blend does not already include it, make sure you add it in.
- Psyllium Husk Powder: Psyllium husk powder is basically whole psyllium husks that have been ground into a super fine powder, and is both a great binding agent that is essential in helping the bread have a beautiful dome once risen, plus provides added fiber. If you only have access to whole psyllium husks, you can grind the whole husks into a powder. For best results, I do NOT recommend leaving it out or swapping it out for anything else.
- Instant Yeast: I like using instant yeast because there’s not activation time required and you can mix it with all the other ingredients at the same time. However, if you don’t have instant yeast, you may use active dry yeast instead (just make sure you activate it with sugar and warm water before adding it to the other ingredients).
- Sugar: I used granulated white sugar, but you may also use light brown sugar, dark brown sugar or coconut sugar if you prefer (just note that brown sugar or coconut sugar may cause the inside of the bread to be slighter darker in color). In this case, the sugar is food for the yeast, and is necessary for the yeast to feed on (and be activated) in order to produce the gases in the dough-rising process. Do not leave out the sugar (it will be consumed by the yeast and will not make the bread sweet).

How to Make Gluten-Free Mashed Potato Bread (Step by Step):
1. Grease
Grease an 8″ x 4″ metal loaf pan with oil.
")
2. Whisk Dry Ingredients
In a large bowl, sift the gluten-free all-purpose flour, xanthan gum (if using), psyllium husk powder, instant yeast, and sugar. Whisk well to combine.
")
3. Blend
Process the mashed potatoes and eggs in a high-speed blender until you get a thick, creamy yellow mixture.
")
4. Add Water and Oil
Transfer the potato mixture to a large mixing bowl. Add water and oil and mix well to get a pale yellow liquid.
")
5. Form the Dough
Add the dry ingredients to the bowl with the wet ingredients and mix well until you get a homogeneous sticky dough, scraping down the sides of the bowl.
(Tip: the dough will be wet and look shaggy, but that’s the texture you want. If gluten-free bread dough is too dry, the bread will turn out dense and hard once baked.)
")
6. Transfer Dough to Pan
Transfer the dough to the prepared loaf pan and use a wet spatula to smooth out the top of the dough.
")
7. Let the Dough Rise
Cover the pan with a kitchen towel and let the dough rise a warm place free of drafts for 40 to 50 minutes, until it has roughly doubled in size and has risen just above the top of the pan.
(Tip: I like to place the pan in the microwave with the microwave switched off).
")
8. Preheat the Oven
While the dough is rising, preheat the oven to 350F and place the rack in the center position.
9. Bake Until Golden Brown
Bake for 1 hour until the top of the bread is golden brown the loaf sounds hollow when tapped.
")
10. Let Cool Before Slicing
Allow the gluten-free mashed potato bread to cool for 10 minutes in the pan, before removing and placing it on a wire rack to fully cool at room temperature (at least 30 minutes) before slicing.

Dish by Dish Tips/Tricks:
- Pan Size Determines Bread Height: In this gluten-free potato bread recipe, I use an 8″ x 4″ loaf pan, so if you were to use a larger loaf pan, you’ll probably end up with a wider and shorter loaf as compared to the photos.
- Use a Metal Pan: For best results, I recommend that you use a metal loaf pan to ensure that the dough gets evenly heated from all sides and to ensure you get a nice golden brown crust all around.
- Swap Out Mashed Potatoes: If you don’t have fresh mashed potatoes, you can used instant mashed potatoes instead. You can also use mashed sweet potatoes instead, go ahead and substitute it in equal quantities!
- Be Patient and Allow to Cool: As with all gluten-free baking, patience is a virtue, and it’s important to let this mashed potato bread fully cool at room temperature before cutting into it. This is because even after you remove the bread from the oven, the bread still continues to cook with the residual heat. If you slice into the mashed potato bread too early, it may fall apart or have a gummy texture.
")
Recipe FAQs:
To store, place the cooled potato bread in an airtight container and place in the refrigerator for up to 5 days.
Yes, definitely! To freeze, wrap the cooled loaf in plastic wrap or place it in a freezer bag and freeze for up to 3 months. Let frozen loaf thaw in the refrigerator overnight before slicing. Alternatively, you may also slice the bread before freezing so you can take out slices of the bread at a time and toast it immediately.
To make mashed potatoes, boil washed russet potatoes (or the variety of potatoes you have) until they are easily pierced with a sharp knife. Once boiled, run the potatoes under cold water and then peel them before mashing them. Feel free to add salt, herbs, or dairy-free milk to the mashed potatoes before using.
")
Other Gluten-Free Yeast Breads You’ll Love:
- Gluten-Free White Bread (Dairy-Free)
- Fluffy Buckwheat Bread (Gluten-Free, Dairy-Free)
- Soft Sorghum Bread (Gluten-Free, Dairy-Free)
- Brown Rice Bread (Gluten-Free, Dairy-Free)
- Soft Gluten-Free Dinner Rolls (Dairy-Free)
- Easy Artisan Bread (Gluten-Free, Dairy-Free)
- Quinoa Yeast Bread (Gluten-Free, Dairy-Free)
Other Gluten Free Bread Recipes to Bake:


P.S. If you try this recipe, I’d love for you to leave a star rating below, and/or a review in the comment section further down the page. I always appreciate your feedback. Be sure to check out my entire Recipe Index for all the recipes on the blog. You can also follow me on Pinterest, Facebook or Instagram! Sign up for my Email List to get fresh recipes in your inbox each week!
Soft, Fluffy Gluten-Free Potato Bread (Dairy-Free)
- Total Time: 2 hours
- Yield: 1 loaf 1x
- Diet: Gluten Free
Description
Incredibly soft and fluffy, this easy gluten-free potato bread is a great way to make use of leftover mashed potatoes. It’s perfect for making sandwiches, avocado toast, or eating as toast with jam. Totally dairy-free too, but no one would know! Go bake a loaf to enjoy homemade gluten-free bread today!
Ingredients
- 1 cup mashed potatoes
- 2 large eggs, beaten
- 1 cup warm water (between 105F to 115F)
- 1/4 cup sunflower oil
- 2 1/4 cups gluten-free all-purpose flour
- 1 teaspoon xanthan gum (omit if your flour blend already includes it)
- 2 tablespoons psyllium husk powder
- 2 1/4 teaspoons instant yeast
- 1 tablespoon sugar
- 1/4 teaspoon salt
Instructions
- Grease: Grease an 8″ x 4″ loaf pan with oil.
- Whisk Dry Ingredients: In a large bowl, sift the gluten-free all-purpose flour, xanthan gum (if using), psyllium husk powder, instant yeast, sugar and salt. Whisk well to combine.
- Blend: Process the mashed potatoes and eggs in a high-speed blender until you get a thick, creamy yellow mixture.
- Add Water and Oil: Transfer the mixture to a large mixing bowl. Add water and oil and mix well to get a pale yellow liquid.
- Form the Dough: Add the dry ingredients to the bowl with the wet ingredients and mix well until you get a homogeneous sticky dough (the dough will look shaggy and be rather wet, but that’s the texture you want).
- Transfer Dough to Pan: Transfer the dough to the prepared loaf pan and use a wet spatula to smooth out the top of the dough.
- Let Rise: Cover the pan with a kitchen towel and let the dough rise a warm, draft-free place for 40 to 50 minutes, until it has roughly doubled in size (I like to place the pan in the microwave with the microwave switched off).
- Preheat Oven: While the dough is rising, preheat the oven to 350F and place the rack in the center position.
- Bake Until Golden Brown: Bake for 1 hour until the top of the bread is golden brown the loaf sounds hollow when tapped.
- Let Cool Before Slicing: Allow the loaf to cool for 10 minutes in the pan, before removing and placing it on a wire rack to fully cool (at least 30 minutes) before slicing.
Notes
Mashed Potatoes: I like using leftover mashed potatoes, but you can also use fresh mashed potatoes or instant mashed potatoes if that’s what you have. If you like, you can also use mashed sweet potatoes if you prefer.
Eggs: Eggs help to bind the ingredients better and gives the loaf a better rise. If you are vegan or allergic to eggs, you may also use aquafaba or an egg-replacer.
Water: Make sure the warm water has a temperature of between 105F to 115F. If the water is too cold, the yeast will not get activated, but if the water is too hot, the high heat will kill the yeast. Alternatively, of you prefer, you may also use warm dairy-free milk (such as almond milk, cashew milk, tigernut milk, rice milk, coconut milk etc.). If you are not vegan or lactose-intolerant, feel free to use normal whole milk instead.
Oil: I like using sunflower oil because I always have a bottle of sunflower oil on hand. You may also use other types of vegetable oils such as olive oil, avocado oil, or even melted coconut oil or melted vegan butter. Alternatively, if you are not lactose-intolerant, feel free to use normal butter if you prefer.
Gluten-Free All-Purpose Flour: I recommend using a good-quality gluten-free all-purpose flour blend that includes lighter flours and starches (such as rice flour, tapioca starch, corn starch, potato starch) to ensure you get a light and fluffy final texture. I do NOT recommend using a blend with heavier flours (such as garbanzo bean flour) as that will result in a denser bread.
Xanthan Gum: Xanthan gum is the replacement for gluten in gluten-free flours, and helps the ingredients to better bind together. If your gluten-free flour blend does not already include it, make sure you add it in.
Psyllium Husk Powder: Psyllium husk powder is basically whole psyllium husks that have been ground into a super fine powder, and is a great binding agent that is essential in helping the bread have a beautiful dome once risen. If you only have access to whole psyllium husks, you can grind the whole husks into a powder. For best results, I do NOT recommend leaving it out or swapping it out for anything else.
Instant Yeast: I like using instant yeast because there’s not activation time required and you can mix it with all the other ingredients at the same time. However, if you don’t have instant yeast, you may use active dry yeast instead (just make sure you activate it with sugar and warm water before adding it to the other ingredients).
Sugar: I used granulated white sugar, but you may also use light brown sugar, dark brown sugar or coconut sugar if you prefer (just note that brown sugar or coconut sugar may cause the inside of the bread to be slighter darker in color). In this case, the sugar is food for the yeast, and is necessary for the yeast to feed on (and be activated) in order to produce the gases in the dough-rising process. Do not leave out the sugar (it will be consumed by the yeast and will not make the bread sweet).
Storing/Freezing: To store, place the cooled gluten-free mashed potato bread in an airtight container and place in the refrigerator for up to 5 days. To freeze, wrap the cooled loaf in plastic wrap and freeze for up to 3 months. Let frozen loaf thaw in the refrigerator overnight before slicing. Alternatively, you may also slice the bread before freezing so you can take out slices of the bread at a time and toast it immediately.
Adapted from: Serious Eats
- Prep Time: 10 mins
- Rising Time: 50 mins
- Cook Time: 1 hour
- Category: Bread
- Method: Baking
- Cuisine: American

Dear Felicia,
The regular bread was delicious and I want to try this one.
–I did not use the psyllium husk in that other loaf and it didn’t ‘dome’ as you mentioned here–I’m glad I saw that note!
–Do you know if anyone has tried the doubled recipe in the 9×5 pan?
That was a comment from the other recipe, but I don’t wanna waist a good loaf!
I did let my dough (batter) rise about 2x as long, and it was very beautiful (Except for no dome).
Also, my oven is persnickity, so I had to bake it twice as long also. But it was still moist, and not at all burnt!
Hi Sister, yes, make sure to use psyllium husk as it helps to create the “dome” shape. Hopefully it works! I don’t know about doubling the recipe.. not sure how that would work, but if you do make it, please let me know how it goes!
if using a bread machine, what order would you suggest placing the ingredients in? I’m new to baking. any suggestions would help also!
thank you.
Hi Missy, I personally don’t own a bread machine, but I would imagine you could add the wet ingredients first, then add the dry ingredients and the machine will mix it all together.
Hi!
I used the method in the recipe. My bread machine sucks. I accidentally used a 10 in by 5 in pan and it didn’t raise that much. Can I use a Pullman pan with the lid off?
Hi Missy, yes I believe a Pullman with the lid off would work (baking it in the oven).
Can I bake this bead in bread machine? Thank you for all your wonderful recepies
Hi Maryna! Yes, you can definitely bake it in a bread machine. Just make sure to use the “gluten-free” setting.
I made this recipie tonight and unfortunately it didn’t rise at all, would the recipie be affected if I activated the yeast in the warm water and sugar before adding it to the rest of the ingredients?
even though it didn’t rise the bread was delicious, thanks for the amazing recipie
Hi James! If your bread dough didn’t rise, I believe it must be because your water was either too hot or too cold (it has to be between 105-115F) if the water is too hot it will kill the yeast, if the water is not warm enough there is not enough heat for the yeast to be activated. If the water was at the correct temp, then your yeast was probably expired, you’ll have to buy a new batch and check that it’s not expired.
Glad you enjoyed the taste of the bread, hopefully if you make another batch with new yeast and correct water temp it will rise and you can enjoy fluffy potato bread!