Easy Gluten-Free Slider Buns (Dairy-Free)
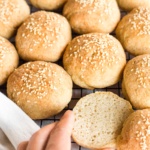
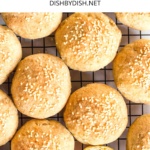
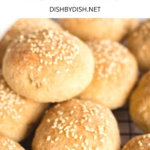
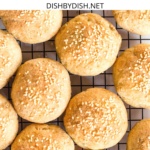
Soft, fluffy and tender, these easy gluten-free slider buns are perfect for mini hamburgers or your game day slider sandwiches or even enjoyed alone! No kneading required, there gluten-free potato buns are also dairy-free, but no one would care! Bake a batch to enjoy today!
")
Want to save this recipe?
Enter your email & I’ll send it to your inbox. Plus, get great new recipes from me every week!
Jump to:
- I Love Homemade Bread
- Our Favorite Yeast Bread Recipes:
- Homemade Gluten-Free Slider Buns
- Why This Recipe Works:
- Ingredients You’ll Need:
- Recipe Notes + Substitutions
- How to Make Gluten-Free Slider Buns (Step by Step)
- Dish by Dish Tips/Tricks
- Recipe FAQs:
- Other Gluten-Free Bun Recipes:
- Gluten-Free Bread Recipes You’ll Love:
- Gluten-Free Slider Buns (Dairy-Free)
I Love Homemade Bread
There’s no denying how much I love baking a loaf of homemade bread, especially yeast bread.
Few things are quite as satisfying as watching bread dough rise, then placing it in the oven to bake, before pulling out a freshly made loaf that’s still warm and smells just like home.
")
Homemade Gluten-Free Slider Buns
One thing that I’ve had on my recipes-to-develop list for the longest time is slider buns – which are perfect for making slider sandwiches (or mini burgers)!
So, I finally got about to developing this recipe (using the same dough as my gluten-free bagels).
And I’m so excited to share these delicious potato buns with you!
Why This Recipe Works:
- Simple Ingredients: The ingredients required for this gluten-free slider buns recipe are easily accessible from the local grocery store.
- Easy to Make: Preparing the slider bun dough is as simple as mixing the dry ingredients with the wet ingredients, then shaping the dough into balls, which you flatten slightly before letting them rise. Once risen, brush with oil and sprinkle with seeds, then bake and enjoy!
- Totally Gluten-Free and Dairy-Free: The best part is that this potato buns recipe is 100% gluten-free and dairy-free, which means that even those with Celiac disease or gluten or lactose intolerances can enjoy it without worries!
")
Ingredients You’ll Need:
Here’s a visual overview of the ingredients required for this gluten-free slider buns recipe.
(For exact measurements and quantities, please scroll down to the recipe card at the bottom of this post.)
")
Recipe Notes + Substitutions
- Mashed Potatoes: I like using leftover mashed potatoes, but you can also use fresh mashed potatoes. Alternatively, you may also use equal amounts of sweet potato puree or mashed pumpkin puree as well.
- Eggs: Eggs help the ingredients to bind better and give the bagels better rise. I haven’t tried making this slider bun recipe without eggs, but I believe that if you are vegan or allergic to eggs, you may also use aquafaba or an egg-replacer (please let me know how it goes in the comments below if you make these slider buns without eggs).
- Warm Water: Make sure the warm water has a temperature of between 105 to 115F. If the water is too cold, the yeast will not be activated, but if the water is too hot, the high heat will kill the yeast. Alternatively, if you prefer, you may also use warm unsweetened non-dairy milk for extra flavor (such as almond milk, cashew milk, tigernut milk, rice milk, soy milk, or oat milk). If you are not lactose-intolerant, feel free to use normal cow’s milk instead.
- Sunflower Oil: I like using sunflower oil because I always have a bottle of it on hand. You may also use another type of vegetable oil (such as olive oil, avocado oil, melted coconut oil) or even melted vegan butter. Alternatively, if you are not lactose-intolerant, feel free to use normal melted butter if you prefer.
- Gluten-Free All-Purpose Flour: I recommend using a good-quality gluten-free all-purpose flour blend that includes lighter flours/starches (such as rice flour, corn starch, tapioca starch or potato starch) to ensure that you get a light and fluffy final texture. I do NOT recommend using gluten-free flour blends that use heavier flours (such as garbanzo bean flour) as it will result in a denser texture.
- Xanthan Gum: Xanthan gum is the replacement for gluten in gluten-free flours, and helps the ingredients to better bind together. If your gluten-free flour blend does not already include xanthan gum, make sure you add it in.
- Psyllium Husk Powder: Psyllium husk powder is an amazing binding agent and makes a big difference in the rise of the gluten-free slider buns. For best results, I do NOT recommend leaving it out or swapping it out for anything else. (If you only have access to whole psyllium husks, you can use a coffee grinder or a high-speed blender to grind the whole husks into a super fine powder.)
- Baking Powder: I like adding a bit of baking powder to help the potato buns rise better. If have Celiac disease or are gluten-intolerant, make sure to use certified gluten-free baking powder.
- Instant Yeast: I prefer using instant yeast because there’s not pre-activation required, and you can mix it in with all the other dry ingredients at the same time. However, if you don’t have instant yeast, you may also use active dry yeast instead (just make sure to activate the yeast with sugar and warm water before adding it to the other ingredients).
- Sugar: In this case, sugar acts as the food that the yeast will feed on in order to produce the gases essential in the dough-rising process. Do not leave out the sugar. It will be consumed by the yeast and will not make the gluten-free slider buns sweet. I used granulated white sugar, but you may also use light brown sugar, dark brown sugar, or coconut sugar if you prefer (just note that the darker the color of the sugar, the darker the interior of the buns).
- Salt: I added a pinch of salt to enhance the flavor, but feel free to leave it out if you are on a salt-free diet.
- Sesame Seeds: I like sprinkling white sesame seeds to decorate the buns, but feel free to use black sesame seeds if you wish). Alternatively, you can also sprinkle the dough with a mix of seeds (think chia seeds, poppy seeds, flax seeds, sesame seeds and sunflower seeds). You can also use everything bagel seasoning if you prefer.
How to Make Gluten-Free Slider Buns (Step by Step)
1. Line
Line a large baking sheet with parchment paper or a silpat.
")
2. Blend Mashed Potatoes and Eggs
Process the mashed potatoes and beaten eggs in a high-speed blender until you get a thick, creamy yellow mixture.
")
3. Add Water and Oil
Transfer the potato-egg mixture to a large mixing bowl. Add the water and oil and mix well to get a pale yellow liquid mixture.
")
4. Whisk Dry Ingredients
In a large bowl, sift the gluten-free all-purpose flour, xanthan gum, baking powder, salt, psyllium husk powder, instant yeast, and sugar together. Whisk well to combine.
")
5. Combine Wet and Dry Ingredients to Form Dough
Add the dry ingredients to the bowl with the wet mixture and mix well until you get a homogeneous sticky dough.
(TIP: The dough will look shaggy and be rather wet, but that’s the texture you want).
")
6. Form Dough Balls
Oil the palms of your hands and divide the gluten-free dough into 12 equal portions, rolling each portion into a medium-sized ball.
Place the dough balls at least 2 inches apart on the prepared baking sheet.
")
7. Flatten Balls Slightly
Flatten the slider dough balls slightly with oiled fingers.
")
8. Let Rise
Cover the baking sheet with a kitchen towel and let the dough rise in a warm place free of drafts or wind for 1 hour until it has almost doubled in size.
")
9. Preheat Oven
Towards the end of the rising time, preheat the oven to 350F and place the rack in the center position.
10. Brush with Oil
Brush the risen dough will oil.
")
11. Sprinkle with Seeds
Sprinkle sesame seeds on top of the dough.
")
12. Bake Until Golden Brown
Bake for 25 to 30 minutes until the top of the gluten-free slider buns are golden brown.
")
13. Let Cool Before Slicing
Allow the gluten-free potato buns to cool for a 5 minutes in the pan before removing and placing a wire rack to cool fully at room temperature before slicing.
")
Dish by Dish Tips/Tricks
- Make Bagels: You can use the same dough as these potato sliders to make these amazing soft, fluffy gluten-free bagels.
- Make Hamburger Buns: If you prefer slightly larger buns that will be great for hamburgers, simply divide the dough into 6 equal portions instead of 12, or divide the dough between the cavities of a hamburger bun pan. Bake at 350F for 35 to 40 minutes until golden brown on top.
- Make Hot Dog Buns: Want to make longer buns for hot dogs? Simply divide the dough between the cavities of a hot dog bun mold, let the dough rise and then brush with oil once rise. Bake at 350F for 35 to 40 minutes until golden brown on top.
- No Mashed Potatoes? Don’t worry, you can substitute the mashed potatoes with sweet potato puree or pumpkin puree to make these fluffy buns if you prefer.
Recipe FAQs:
To store, place the cooled gluten-free buns in an airtight container and store in the refrigerator for up to 5 days.
Yes you can! To freeze, wrap the gluten-free potato buns in plastic wrap and freeze for up to 3 months. Before eating, let the frozen potato slider buns thaw overnight in the refrigerator, or you can reheat them in the oven for 5 minutes at 350F.
")
Other Gluten-Free Bun Recipes:
- Gluten-Free Hamburger Buns (Dairy-Free)
- Low Carb Buns (Gluten-Free, Dairy-Free, Keto)
- Hot Dog Buns (Gluten-Free, Dairy-Free)
Gluten-Free Bread Recipes You’ll Love:


P.S. If you try this recipe, I’d love for you to leave a star rating below, and/or a review in the comment section further down the page. I always appreciate your feedback. Be sure to check out my entire Recipe Index for all the recipes on the blog. You can also follow me on Pinterest, Facebook or Instagram! Sign up for my Email List to get fresh recipes in your inbox each week!
Gluten-Free Slider Buns (Dairy-Free)
- Total Time: 1 hour 50 minutes
- Yield: 12 slider buns 1x
- Diet: Gluten Free
Description
Soft, fluffy and tender, these easy gluten-free slider buns are perfect for mini hamburgers or your game day slider sandwiches or even enjoyed alone! No kneading required, there gluten-free potato buns are also dairy-free, but no one would care! Bake a batch to enjoy today!
Ingredients
- 1 cup mashed potatoes
- 2 large eggs, beaten
- 1 cup warm water
- 1/2 cup sunflower oil, plus more for brushing
- 2 1/4 cups gluten-free all-purpose flour
- 1 teaspoon xanthan gum (omit if your gluten-free flour blend already includes it)
- 1 teaspoon baking powder
- 1/2 teaspoon salt
- 2 tablespoons psyllium husk powder
- 2 1/4 teaspoons instant yeast
- 1 tablespoon sugar
- 1 tablespoon sesame seeds
Instructions
- Line: Line a large baking sheet with parchment paper or a silpat.
- Blend Mashed Potatoes and Eggs: Process the mashed potatoes and beaten eggs in a high-speed blender until you get a thick, creamy yellow mixture.
- Add Water and Oil: Transfer the potato-egg mixture to a large mixing bowl. Add the water and oil and mix well to get a pale yellow liquid mixture.
- Whisk Dry Ingredients: In a large bowl, sift the gluten-free all-purpose flour, xanthan gum, baking powder, salt, psyllium husk powder, instant yeast, and sugar together. Whisk well to combine.
- Combine Wet and Dry Ingredients to Form Dough: Add the dry ingredients to the bowl with the wet ingredients and mix well until you get a homogeneous sticky dough (the dough will look shaggy and be rather wet, but that’s the texture you want).
- Form Dough Balls: Oil the palms of your hands and divide the dough into 12 equal portions, rolling each portion into a medium-sized ball. Place the dough balls at least 2 inches apart on the prepared baking sheet.
- Flatten Balls Slightly: Flatten the slider dough balls slightly with oiled fingers.
- Let Rise: Cover the baking sheet with a kitchen towel and let the dough rise in a warm, draft-free place for 1 hour until it has almost doubled in size.
- Preheat Oven: Towards the end of the rising time, preheat the oven to 350F and place the rack in the center position.
- Brush with Oil: Brush the risen dough will oil.
- Sprinkle with Seeds: Sprinkle sesame seeds on top of the dough.
- Bake Until Golden Brown: Bake for 25 to 30 minutes until the top of the gluten-free slider buns are golden brown.
- Let Cool Before Slicing: Allow the gluten-free potato buns to cool for a 5 minutes in the pan before removing and placing a wire rack to cool fully at room temperature before slicing.
Notes
Mashed Potatoes: I like using leftover mashed potatoes, but you can also use fresh mashed potatoes. Alternatively, you may also use equal amounts of sweet potato puree or mashed pumpkin puree as well.
Eggs: Eggs help the ingredients to bind better and give the bagels better rise. I haven’t tried making this slider bun recipe without eggs, but I believe that if you are vegan or allergic to eggs, you may also use aquafaba or an egg-replacer (please let me know how it goes in the comments below if you make these slider buns without eggs).
Warm Water: Make sure the warm water has a temperature of between 105 to 115F. If the water is too cold, the yeast will not be activated, but if the water is too hot, the high heat will kill the yeast. Alternatively, if you prefer, you may also use warm unsweetened non-dairy milk for extra flavor (such as almond milk, cashew milk, tigernut milk, rice milk, soy milk, or oat milk). If you are not lactose-intolerant, feel free to use normal cow’s milk instead.
Sunflower Oil: I like using sunflower oil because I always have a bottle of it on hand. You may also use another type of vegetable oil (such as olive oil, avocado oil, melted coconut oil) or even melted vegan butter. Alternatively, if you are not lactose-intolerant, feel free to use melted normal butter if you prefer.
Gluten-Free All-Purpose Flour: I recommend using a good-quality gluten-free all-purpose flour blend that includes lighter flours/starches (such as rice flour, corn starch, tapioca starch or potato starch) to ensure that you get a light and fluffy final texture. I do NOT recommend using gluten-free flour blends that use heavier flours (such as garbanzo bean flour) as it will result in a denser texture.
Xanthan Gum: Xanthan gum is the replacement for gluten in gluten-free flours, and helps the ingredients to better bind together. If your gluten-free flour blend does not already include xanthan gum, make sure you add it in.
Psyllium Husk Powder: Psyllium husk powder is an amazing binding agent and makes a big difference in the rise of the gluten-free slider buns. For best results, I do NOT recommend leaving it out or swapping it out for anything else. (If you only have access to whole psyllium husks, you can use a coffee grinder or a high-speed blender to grind the whole husks into a super fine powder.)
Baking Powder: I like adding a bit of baking powder to help the potato buns rise better. If have Celiac disease or are gluten-intolerant, make sure to use certified gluten-free baking powder.
Instant Yeast: I prefer using instant yeast because there’s not pre-activation required, and you can mix it in with all the other dry ingredients at the same time. However, if you don’t have instant yeast, you may also use active dry yeast instead (just make sure to activate the yeast with sugar and warm water before adding it to the other ingredients).
Sugar: In this case, sugar acts as the food that the yeast will feed on in order to produce the gases essential in the dough-rising process. Do not leave out the sugar. It will be consumed by the yeast and will not make the gluten-free slider buns sweet. I used granulated white sugar, but you may also use light brown sugar, dark brown sugar, or coconut sugar if you prefer (just note that the darker the color of the sugar, the darker the interior of the buns).
Salt: I added a pinch of salt to enhance the flavor, but feel free to leave it out if you are on a salt-free diet.
Sesame Seeds: I like sprinkling white sesame seeds to decorate the buns, but feel free to use black sesame seeds if you wish). Alternatively, you can also sprinkle the dough with a mix of seeds (think chia seeds, flax seeds, sesame seeds and sunflower seeds). You can also use everything bagel seasoning if you prefer.
Storing/Freezing: To store, place the cooled gluten-free slider buns in an airtight container and store in the refrigerator for up to 5 days. To freeze, wrap the gluten-free potato buns in plastic wrap and freeze for up to 3 months. Before eating, let the frozen potato slider buns thaw overnight in the refrigerator, or you can reheat them in the oven for 5 minutes at 350F.
- Prep Time: 20 mins
- Rising Time: 1 hour
- Cook Time: 30 mins
- Category: Bread
- Method: Baking
- Cuisine: American
Loved these buns and I’m not even gluten free. Really nice toasted.
A simple fuss free recipe
YAY! Happy to hear that Lee! Thanks for your lovely comment, and hope to see you around the blog again sometime soon!
Are the mashed potatoes warm when you use then? If I am using leftover mashed potatoes, I am wondering if I need to heat them up first.
Hi Tara, maybe bring the mashed potatoes to room temperature (instead of using them cold). Or you can heat them up very slightly in the microwave before using.
Hi Felicia,
I have always been looking for gluten free potato 😀buns recipe
Hope you enjoy these as much as we do!
hi there…can you use instant mashed potatoes? thats all I have. thank you
Hi Lila! Yes, instant mashed potatoes will work 🙂 Happy baking!
Do you make the mashed potatoes with milk and butter?
Hi Nila, you can if you wish, but I literally just mash cooked potatoes without the milk and butter.
Thank you so much for the speedy reply. I’m going to make them tomorrow.
Hope you enjoy them Nila! Happy weekend!
I just made these, and they are phenomenal! I adjusted the recipe a bit and made them egg free!
I used gluten free cloud 9 flour. I replaced the sunflower oil with avocado oil. and I replaced the eggs with applesauce! worked amazing! you can’t even notice that they are egg free. soft and moist still! thanks for sharing this recipe!
Hi Donna! So happy to hear that these slider buns worked with applesauce and avocado oil! 🙂 Thanks for sharing your substitutions and really glad you enjoyed them! See you on the blog again sometime son!
xx,
Felicia
Good morning Felicia!
It is always so refreshing to go through your post especially when you also share on the versatility and interchangeability of using different types of ingredients to make these slider buns.
Thanks with love,
Mum
Hi mummy, these slider buns are super flexible right?