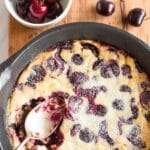
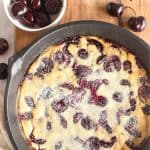
Easy Gluten-Free Clafoutis (Dairy-Free)
This deliciously easy gluten-free clafoutis is filled with sweet, juicy cherries, puffed and golden at the edges, and dusted with finely shredded coconut. This quick dessert comes together in just 30 minutes, cooks in just one skillet, and you can use fresh or frozen cherries too. Dairy-free too, but you wouldn’t know it!
")
Want to save this recipe?
Enter your email & I’ll send it to your inbox. Plus, get great new recipes from me every week!
Jump to:
- What is Clafoutis?
- The Perfect Gluten-Free Cherry Dessert for Summer
- My Trusty Cast Iron Skillet
- Why This Recipe Works:
- Ingredients You’ll Need:
- Ingredient Notes/Substitutes:
- How to Make Gluten-Free Clafoutis (Step by Step)
- Dish by Dish Tips/Tricks
- Recipe FAQs:
- Cast Iron Skillet Recipes to Love:
- Other Dessert Recipes You’ll Enjoy:
- Gluten-Free Clafoutis Recipe (Dairy-Free)
What is Clafoutis?
Originating from the Limousin region of France, clafoutis (sometimes also written as “clafouti“) is a classic French dessert containing fruit in a thick, flan-like batter.
Traditional versions of clafoutis normally use black cherries as the fruit of choice, but other fruits such as berries or even pears can always be used.
This traditional French dessert is normally served with a dusting of powdered sugar and served lukewarm, often times with heavy cream, if desired.
")
The Perfect Gluten-Free Cherry Dessert for Summer
In my opinion, cherry clafoutis is a dessert recipe that anyone should always keep on hand, because of how incredibly simple and easy it is to make.
Especially at this time of year in the summer, during cherry season when sweet cherries abound, this is one delicious but easy recipe that will have you licking the plate clean!
Also, because of how quickly it takes to make it, I recommend that you keep this recipe in your back pocket for the next time you’re in need of a fancy-looking dessert at the last minute.
My Trusty Cast Iron Skillet
One of the most used items in the kitchen is my cast iron skillet (which I’ve had for the last 7 years and counting), and we use it for frying, sautéing, and also baking. It’s the sort of multi-purpose item that can be used in so many different ways that I feel no kitchen is complete without it.
We’ve made savory foods such as sweet potato and kale breakfast skillet and my favorite crustless spinach quiche, snacks such as skillet cornbread, as well as desserts such as pear custard pie and mixed berry crumble.
In today’s gluten-free cherry clafoutis recipe, we’ll be using the cast iron skillet to first cook the cherries on the stovetop until they soften, before pouring the batter over them and then baking it in the oven (in the same skillet).
I love that I don’t have to use two different pots/skillets for the stovetop and then the oven, and if you don’t already have a cast iron skillet, I highly recommend that you get one!

Why This Recipe Works:
- Simple Ingredients: The ingredients required for this gluten-free dairy-free clafoutis recipe are easily accessible at the grocery store, and you might already even have most of the ingredients at home.
- Easy and Quick to Make: You literally only need 30 minutes to prepare this perfect summer dessert from start to finish, and either fresh or frozen cherries will work as well.
- Totally Gluten-Free and Dairy-Free: I’ve used gluten-free all-purpose flour instead of regular flour, and I’ve also used coconut oil in place of butter. This makes the recipe 100% gluten-free and dairy-free, so even those with Celiac disease or gluten or lactose intolerances can still enjoy this sweet dessert!
")
Ingredients You’ll Need:
Here’s a visual overview of the ingredients required for this gluten-free clafoutis recipe.
(For exact measurements, please scroll down to the printable recipe card at the bottom of this post.)
")
Ingredient Notes/Substitutes:
- Gluten-Free All-Purpose Flour: I recommend using a gluten-free flour blend that includes xanthan gum and is made of lighter flours and starches such as rice flour/corn starch/tapioca starch (this will result in a lighter texture). I do NOT recommend using flour blends that include heavier flours such as garbanzo bean flour as it will result in a denser texture. If your flour blend does not include xanthan gum, add 1/8 teaspoon of xanthan gum to it.
- Eggs: The eggs are essential in this recipe and help to bind the ingredients together as well as to give the clafoutis a custardy texture. I do NOT recommend substituting the eggs in this recipe.
- Sugar: I used normal white sugar, but feel free to use light brown sugar, dark brown sugar or coconut sugar if you prefer (just bear in mind that the darker the sugar used, the darker the batter will be). If you are diabetic or insulin-resistant, I highly recommend that you use granulated monkfruit sweetener (a 1:1 sugar substitute that is zero glycemic index and does not raise your blood sugar).
- Almond Milk: I used my 5-minute homemade almond milk for this dairy-free clafoutis recipe, but you can also use other non-dairy milks (such as cashew milk, tigernut milk, rice milk, coconut milk, or soy milk). Alternatively, if you are not lactose-intolerant, feel free to use regular milk instead.
- Cherries: I used fresh cherries because they were available, but you can also use frozen cherries if that’s what you have. Simply make sure the frozen cherries are thawed and drained before using them.
- Coconut Oil: I prefer using refined coconut oil which has a neutral taste (as opposed to extra virgin coconut oil which has a stronger coconut flavor and smell). Alternatively, if you are not lactose-intolerant, feel free to use butter or ghee instead.
- Finely Shredded Coconut: I like to use finely shredded coconut (you can easily process shredded coconut in your blender until you get a fine powder) instead of powdered sugar. However, if you prefer powdered sugar or powdered monkfruit sweetener, go ahead and use that instead.
How to Make Gluten-Free Clafoutis (Step by Step)
1. Preheat Oven
Preheat oven to 425F (220C).
2. Pit Cherries
Using a cherry pitter, remove the cherry pits and stems. Cut cherries into halves. Set aside.
")
3. Prepare Gluten-Free Clafoutis Batter
In a large bowl, combine the gluten-free all-purpose flour with eggs, sugar, milk and melted coconut oil. Whisk very well until you get a completely smooth and creamy batter.
")
4. Cook Cherries
In a large 12-inch cast iron skillet, melt the coconut oil over medium heat on the stove. Add in the pitted cherries, and cook until the cherries have just softened and are completely coated with coconut oil (approximately 2 minutes).
Sprinkle the cherries with sugar and cook until the sugar has turned into a syrup (1 to 2 minutes).

5. Pour Clafoutis Batter over Cherries
Pour the cherry clafouti batter over the softened cherries.
")
6. Bake Until Golden on the Edges
Pour the batter over the cooked cherries. and place the skillet on the middle rack of the oven then bake for 18 to 20 minutes or until the clafoutis is puffed and golden brown on the edges.
(Tip: Do not oven the oven door before baking time is up or the clafoutis may collapse).
")
7. Garnish and Serve
Sprinkle the top of this gluten-free cherry clafoutis with finely shredded coconut (or confectioners’ sugar or icing sugar) and serve warm with a scoop of vanilla ice cream.
")
Dish by Dish Tips/Tricks
- No Cast Iron Skillet? No Problem: Ideally, using a cast iron skillet would be the best as you can cook the cherries in the skillet on the stovetop and pour the batter directly in the same skillet to bake. However, if you don’t own a cast iron skillet, you can cook the cherries in the skillet that you have, and the transfer the cherries to a baking dish or cake pan before pouring the batter over the cherries to bake.
- Swap Cherries for Berries or Other Fruits: If you want to make this gluten-free clafoutis with berries instead of cherries, go ahead! You can either use fresh berries or frozen berries (just make sure the frozen berries are thawed and drained). Or use stone fruit such as peaches, apricots or plums to make peach clafoutis, apricot clafoutis or plum clafoutis.
- Optional Flavoring: If you like, feel free to add a teaspoon of vanilla extract for extra flavor.
")
Recipe FAQs:
If there are leftovers, store the cooled gluten-free cherry clafoutis in an airtight container in the refrigerator for up to 3 days. Heat the clafoutis dessert up in the oven at 350F (180C) for 5 to 10 minutes before eating.
Yes of course! To freeze, place cooled gluten-free clafoutis in a freezer-safe container and freeze for up to 2 months. Let clafoutis thaw completely overnight in the refrigerator and then reheat in the oven at 350F (180C) for 5 to 10 minutes before serving.
")
Cast Iron Skillet Recipes to Love:
- Pear Custard Pie (Gluten-Free, Dairy-Free)
- Mixed Berry Crumble (Gluten-Free, Dairy-Free)
- Sweet Potato and Kale Breakfast Skillet (Gluten-Free, Paleo)
- Easy Gluten-Free Naan Bread (Dairy-Free)
- Crustless Spinach Quiche (Gluten-Free, Dairy-Free)
- Easy Skillet Cornbread (Gluten-Free, Dairy-Free)
Other Dessert Recipes You’ll Enjoy:


P.S. If you try this recipe, I’d love for you to leave a star rating below, and/or a review in the comment section further down the page. I always appreciate your feedback. Be sure to check out my entire Recipe Index for all the recipes on the blog. You can also follow me on Pinterest, Facebook or Instagram! Sign up for my Email List to get fresh recipes in your inbox each week!
Gluten-Free Clafoutis Recipe (Dairy-Free)
- Total Time: 30 minutes
- Yield: 4 servings 1x
- Diet: Gluten Free
Description
This deliciously easy gluten-free clafoutis is filled with sweet, juicy cherries, puffed and golden at the edges, and dusted with finely shredded coconut. This quick cherry dessert comes together in just 30 minutes, cooks in just one skillet, and you can use fresh or frozen cherries too. Dairy-free too, but you wouldn’t know it!
Ingredients
For the Gluten-Free Clafoutis Batter:
- 1/2 cup gluten-free all-purpose flour
- 2 large eggs
- 2 tablespoons sugar
- 3/4 cup almond milk
- 1 tablespoon coconut oil, melted
For the Cherries:
- 2 cups fresh, pitted cherries
- 1 tablespoon coconut oil
- 1 tablespoon sugar
For Topping:
- 1/2 tablespoon finely shredded coconut for sprinkling (optional)
Instructions
- Preheat: Preheat oven to 425F (220C).
- Pit Cherries: Using a cherry pitter, remove the cherry pits and stems. Cut cherries into halves. Set aside.
- Prepare Clafoutis Batter: In a large bowl, combine the gluten-free all-purpose flour with eggs, sugar, milk and melted coconut oil. Whisk very well until you get a completely smooth batter.
- Cook Cherries: In a large 12-inch cast iron skillet, melt the coconut oil over medium heat on the stove. Add in the pitted cherries, and cook until the cherries have just softened and are completely coated with coconut oil (approximately 2 minutes). Sprinkle the cherries with sugar and cook until the sugar has turned into a syrup (1 to 2 minutes)
- Pour Batter over Cherries: Pour the batter over the cooked cherries.
- Bake Until Golden Brown: Place in the middle rack of the oven then bake for 18 to 20 minutes or until the clafoutis is puffed and golden brown on the edges. (Do not open the oven door before baking time is up or the clafoutis may collapse).
- Garnish and Serve: Sprinkle with finely shredded coconut and serve warm.
Notes
Gluten-Free All-Purpose Flour: I recommend using a gluten-free flour blend that includes xanthan gum and is made of lighter flours and starches such as rice flour/corn starch/tapioca starch (this will result in a lighter texture). I do NOT recommend using flour blends that include heavier flours such as garbanzo bean flour as it will result in a denser texture. If your flour blend does not include xanthan gum, add 1/8 teaspoon of xanthan gum to it.
Eggs: The eggs are essential in this recipe and help to bind the ingredients together as well as to give the clafoutis a custardy texture. I do NOT recommend substitute the eggs in this recipe.
Sugar: I used normal white sugar, but feel free to use light brown sugar, dark brown sugar or coconut sugar if you prefer (just bear in mind that the darker the sugar used, the darker the batter will be). If you are diabetic or insulin-resistant, I highly recommend that you use granulated monkfruit sweetener (a 1:1 sugar substitute that is zero glycemic index and does not raise your blood sugar).
Almond Milk: I used my 5-minute homemade almond milk for this cherry clafoutis recipe, but you can also use other non-dairy milks such as cashew milk, rice milk, or soy milk. Alternatively, if you are not lactose-intolerant, feel free to use normal dairy milk instead.
Cherries: I used fresh cherries because they were available, but you can also use frozen cherries if that’s what you have. Simply make sure the frozen cherries are thawed and drained before using them.
Coconut Oil: I prefer using refined coconut oil which has a neutral taste (as opposed to extra virgin coconut oil which has a stronger coconut flavor and smell). Alternatively, if you are not lactose-intolerant, feel free to use butter or ghee instead.
Finely Shredded Coconut: I like to use finely shredded coconut (you can easily process shredded coconut in your blender until you get a fine powder) instead of powdered sugar. However, if you prefer powdered sugar or powdered monkfruit sweetener, go ahead and use that instead.
No Cast Iron Skillet? No Problem: Ideally, using a cast iron skillet would be the best as you can cook the cherries in the skillet on the stovetop and pour the batter directly in the same skillet to bake. However, if you don’t own a cast iron skillet, you can cook the cherries in the skillet that you have, and the transfer the cherries to a baking dish before pouring the batter over the cherries to bake.
Storing: If there are leftovers, store the cooled cherry clafoutis in an airtight container in the refrigerator for up to 3 days. Heat it up in the oven at 350F (180C) for 5 to 10 minutes before eating.
Freezing: To freeze, place cooled cherry clafoutis in a freezer-safe container and freeze for up to 2 months. Let clafoutis thaw completely overnight in the refrigerator and then reheat in the oven at 350F (180C) for 5 to 10 minutes before serving.
Adapted from: Joy of Baking
This recipe was originally post in Dec 2014, but I’ve updated it to include newer photos, process shots, clearer instructions, as well as tweaked the recipe slightly to make it dairy-free.
- Prep Time: 5 mins
- Cook Time: 25 mins
- Category: Dessert
- Method: Baking
- Cuisine: French


I only have a 10 inch cast iron skillet, how much longer to bake?
Hi, you can bake it for another 3-5 minutes, until the clafoutis is puffed and golden brown on the edges.
Made this with strawberries! It was so tasty, will definitely make again ❤️ An amazing dessert when I’m craving a baked good 😊
Hi Siobhan! So happy to hear you enjoyed it with strawberries too 😉 Love how versatile this dessert is! See you on the blog again sometime soon!
So there’s no butter must be a typo I guess
Butter & batter are easily confused , but it’s not mentioned in the ingredients so hoping it’s not intended
Hi Kay! Thanks for the note, it was a typo indeed 🙂 No butter in this recipe. Totally dairy-free 🙂
Hi Felicia,
I swapped cherries with blueberries and the clafoutis turns out heavenly.
This is indeed a great treats to enjoy with family and friends over tea!
Have a blessed day ahead!
With love,
Mum
Hi Mummy, blueberry clafoutis is also very delicious. Glad you enjoyed this recipe. Love you too!
Do you use the butter/coconut oil in the batter or in the cooking of the cherries process. The recipe says both, but does not specify the qty of the butter/coconut oil to use in each process. If it’s in both parts, what quantity should be used for each part of the recipe. If it’s a typo and it should just be used in the batter or in the cherries, please advise which.
Thanks.
Hi Aileen, thanks for your note! If you look at the ingredients list in the recipe card, you’ll see that the ingredients are divided into the 3 parts – Batter, Cherries and Topping. Under each part is the amount of ingredients for each. For batter, you’ll need 1 tablespoon coconut oil, and for the cherries you’ll need another 1 tablespoon coconut oil. Hope this clarifies!
Looks wonderful. Could thi s also be made with peaches?
Hi Bonnie, thank you so much! Glad you enjoyed this recipe, and yes, you can definitely make this clafoutis with peaches too!
Thank you Felicia for revisiting this simple and yet wonderful recipe (originally posted in Dec 2014) with more enhancements to it to improve your blog 🙂
Great job – keep it up !
We appreciate what you are currently doing and may God continues to bless the works of your hand in 2021.
Lots of love from home in SG
Mum
Hi mummy! So glad you find the improvements helpful 🙂 My goal is to be the best possible resource for gluten-free & dairy-free recipes, so I’m going to keep improving all the recipes on the blog!