Easy Pear Custard Pie (Gluten-Free, Dairy-Free)
This easy pear custard pie is heaven in a skillet. Think creamy custard interlaced with sweet slices of baked pears, all cooked in one single skillet. This uncomplicated but gorgeous dessert goes straight from oven to table, and you can eat it directly from the skillet too, no one’s judging! Gluten-free and dairy-free too.
")
Want to save this recipe?
Enter your email & I’ll send it to your inbox. Plus, get great new recipes from me every week!
Jump to:
- My Love for the Cast Iron Skillet
- Super Simple Pear Custard Pie
- Why This Recipe Works:
- Ingredients You’ll Need:
- Recipe Notes + Substitutions:
- How to Make Pear Custard Pie (Step by Step):
- Dish by Dish Tips/Tricks:
- Recipe FAQs:
- Other Cast Iron Recipes You’ll Enjoy:
- Gluten-Free Dessert Recipes to Indulge In:
- Pear Custard Pie Recipe (Gluten-Free, Dairy-Free)
My Love for the Cast Iron Skillet
I fell in love with cooking with a cast iron skillet many years ago, but it was only this year that I’ve really put my cast iron skillet to good use. At first I only used it for savory foods – chicken skillets, frying eggs, or making garlic naan.
Savory Cast Iron Skillet Recipes:
- Easy Garlic Naan (Gluten-Free, Dairy-Free)
- Chickpea Flatbread (Gluten-Free, Vegan)
- Sweet Potato and Kale Skillet (Gluten-Free, Dairy-Free)
- Crustless Spinach Quiche (Gluten-Free, Dairy-Free)
But then I realized that the cast iron skillet isn’t just good for savory meals. In fact, I’ve found that it’s also perfect for making sweet treats and desserts.
Sweet Cast Iron Skillet Recipes:
")
Super Simple Pear Custard Pie
I made this custard pie on a whim a few weeks back, simply because the CSA basket we’d ordered brought along a small bag of beautiful organic pears. These lovely pears sat on our kitchen counter for a few days after their arrival, and each day I would see them just begging to be eaten.
One afternoon, my husband Juan (who has a terribly sweet tooth) threw the ball into my court and asked if I could make a dessert with pears. While we love wine-poached pears, I didn’t exactly want to be spending hours laboring at the stove, nor did Juan want to wait hours to eat his dessert.
I’d also made a pear galette a few years ago which was a huge hit, but this time I wanted to try something different.
When I saw the cast iron skillet at the corner of our kitchen, I decided that I wanted to make a dessert of some sort in the skillet, and after a bit of internet research, I decided to go with this ridiculously easy and foolproof pear custard pie that is both gluten-free and dairy-free.
Pear fans, you’re in for a treat!
")
Why This Recipe Works:
- Simple Ingredients: All you need for this easy gluten-free custard pie recipe is a handful of ingredients that are easily accessible at the grocery store (nothing fancy required)!
- Super Easy to Make: If you’ve never made custard before, don’t fret. This is about one the easiest custard pie you can ever make. Plus, it’s extremely forgiving with substitutions.
- No Crust Required: Because this is a crustless pear custard pie, there’s not fiddling with pie crust or par-baking any pie shell beforehand! Plus, no crust means less calories too.
- Highly Versatile: This dessert recipe is very flexible. if you don’t have pears, simple swap them out for other fruits such as apples, cherries, berries, peaches or nectarines. Fresh is best if you’re using pears and apples. But if you don’t have fresh fruit on hand, equal amounts of frozen fruit will do too.
- Totally Gluten-Free and Dairy-Free: The best part is that this crustless pear pie recipe is 100% gluten-free and dairy-free, which means that even those with Celiac disease or gluten and lactose intolerances can enjoy it without worries.
Ingredients You’ll Need:
Here’s a visual overview of the ingredients required for this dreamy pear custard pie recipe.
(For exact measurements, please scroll down to the printable recipe card at the bottom of this post.)
")
Recipe Notes + Substitutions:
- Pears: If fresh pears are available where you are, you can also swap out the pears for apples. Other fruits you can use include peaches, nectarines, or berries. It’ll be just as delicious!
- Coconut Oil: I like using refined coconut oil (which has a neutral taste), as opposed to extra virgin coconut oil (that has a stronger flavor and smell). You may also use equal amounts of vegan butter if you prefer. Alternatively, if you are not lactose-intolerant, you can also use normal melted butter or ghee.
- Eggs: The eggs are necessary to bind the ingredients together and create the custardy texture in this pear custard pie, so make sure you do not omit them (I have not tried making this recipe egg-free, so I don’t know how that will turn out).
- Almond Milk: I like using an unsweetened version of my 5-minute homemade almond milk. You may also use another non-dairy milk (such cashew milk, rice milk, coconut milk, or sunflower seed milk). Alternatively, if you are not lactose-intolerant, feel free to use whole milk if you prefer.
- Sugar: I used white sugar, but you may also use cane sugar, light brown sugar or dark brown sugar or coconut sugar if you prefer (just bear in mind that the darker in color the sugar used, the darker the batter will turn out). If you are diabetic or insulin-resistant, I highly recommend that you use granulated monkfruit sweetener (a 1:1 sugar substitute that is zero glycemic index and will not cause your blood sugar to spike).
- Gluten-Free All-Purpose Flour: I recommend using a good-quality gluten-free all-purpose flour blend that is made up of lighter flours/starches (such as rice flour, tapioca starch, corn starch, or potato starch) for a lighter texture. I do NOT recommend using a gluten-free flour blend that includes denser flours (such as garbanzo bean flour) as that will result in a denser texture. Alternatively, you can also use rice flour, corn starch, or tapioca starch in equal amounts.
- Vanilla Extract: I like adding a bit of vanilla extract for extra flavor. However, feel free to leave it out if you do not have it on hand, or simply prefer not to use it.
- Shredded Coconut: I like sprinkling this gluten-free custard pie with finely shredded coconut to add texture and a touch of natural sweetness. Alternatively, you may also use powdered sugar (confectioner’s sugar) if you prefer. If you are diabetic or insulin-resistant, I highly recommend using powdered monkfruit sweetener (a 1:1 powdered sugar substitute that is zero glycemic index and will not raise your blood sugar).
How to Make Pear Custard Pie (Step by Step):
1. Preheat and Grease
Preheat the oven to 350F and grease a 9-inch cast iron skillet with cooking spray.
2. Slice Pears
Wash and then cut the pears into even slices, making sure to remove the stems.
")
3. Combine Batter Ingredients
In a large mixing bowl, combine the melted coconut oil, beaten eggs, almond milk, sugar, and gluten-free flour. Whisk well until you get a smooth, pale yellow batter (the batter will be rather liquid).
")
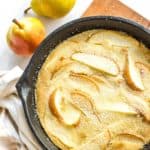
4. Arrange Pear Slices
Arrange the sliced pears to fill the cast iron skillet evenly.
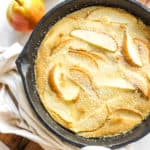
5. Pour Batter Over Pears and Bake
Pour the custard mixture batter over the pear slices and bake for 45 minutes until the custard is golden and firm to the touch.
")
6. Garnish and Serve
Once the custard is ready, sprinkle the finely shredded coconut evenly over the top of the pie. Serve this crustless pear pie warm and enjoy!
")
Dish by Dish Tips/Tricks:
- Firmer Pears for Better Shape: I like to use firmer pears for this dessert to ensure that once they are baked and the custard fully cooked, the pears aren’t totally disintegrated. I find that the firmer the pear slices are before cooking, the better they keep their shape, which makes for a gorgeous presentation once the dessert is done.
- From Oven to Table: The beautiful thing about this skillet pear dessert recipe is that you can take it straight from the oven and place it on the table (the dessert looks gorgeous that way). If you have guests and want to serve them in individual bowls or plates, you can scoop out the portions and serve individually. However, in our house, we like to eat this crustless pie straight out of the pan, which retains the heat and keeps the pear custard pie warm as we eat it.
- Cast Iron Skillet: If you don’t have a cast iron skillet, you can also bake this in a glass baking dish, a ceramic casserole dish or a pie dish. It’ll taste just as good.
- Prefer a Crust? If you want to eat this pear custard pie with a crust, you can use this gluten-free pie crust.
- Serve and Eat Warm: The great thing about this pear custard pie is that it’s best eaten warm, so you don’t have to wait for it to cool down before digging into this incredible mix of creamy custard and tender pear slices.
- Eat This With: While this beautiful dessert is worthy of being eaten on its own, you can make it even more decadent with a scoop of dairy-free vanilla ice cream or a dollop of whipped cream. You can also sprinkle a little dusting of ground cinnamon if you like.
Recipe FAQs:
For this crustless custard pie recipe, you can use Bosc pears, Bartlett pears, Anjou pears, Asian pears or any type of pears you have access to.
To store, cover any leftovers with plastic wrap or aluminum foil, or place in an airtight container and store in the refrigerator for up to 3 days. Reheat in the oven to warm it up before serving. I do NOT recommend freezing this custard pear pie.
In the US, pears are usually in season from August through October. More than 95% of the US-grown pears coming from states along the West Coast such as Washington, Oregon and California. The most commonly available pears are the Bosc, Bartlett and Anjou varieties.
")
Other Cast Iron Recipes You’ll Enjoy:


Gluten-Free Dessert Recipes to Indulge In:


Pear Custard Pie Recipe (Gluten-Free, Dairy-Free)
- Total Time: 50 minutes
- Yield: 4 servings 1x
- Diet: Gluten Free
Description
This easy pear custard pie is heaven in a skillet. Think creamy custard interlaced with sweet slices of baked pears, all cooked in one single skillet. This uncomplicated but gorgeous dessert goes straight from oven to table, and you can eat it directly from the skillet too, no one’s judging! Gluten-free and dairy-free too.
Ingredients
- 3 firm pears, sliced thinly and stems removed
- 1/4 cup melted coconut oil, plus more for greasing
- 3 eggs, beaten
- 3/4 cup unsweetened almond milk
- 1/3 cup sugar
- 1/3 cup gluten-free all-purpose flour
- 2 teaspoons vanilla extract
- 1 tablespoon finely shredded coconut, for topping (optional)
Instructions
- Preheat and Grease: Preheat oven to 350F. Grease a 9-inch cast iron skillet with coconut oil or nonstick cooking spray.
- Slice Pears: Wash and then cut the pears into even slices, making sure to remove the stems.
- Combine Batter Ingredients: In a large mixing bowl, combine the melted coconut oil, beaten eggs, almond milk, sugar, and gluten-free flour. Whisk well until you get a smooth, pale yellow batter (batter will be rather liquid).
- Arrange Pear Slices: Arrange the pear slices to fill the cast iron skillet evenly.
- Pour Batter Over Pears and Bake: Pour the batter over the pear slices and bake for 45 minutes until the custard is golden and firm to the touch.
- Garnish and Serve: Once the custard is ready, sprinkle the finely shredded coconut evenly over the top of the pear custard pie, then serve warm and enjoy!
Notes
Pears: If fresh pears are available where you are, you can also swap out the pears for apples. Other fruits you can use include peaches, nectarines, or berries. It’ll be just as delicious!
Coconut Oil: I like using refined coconut oil (which has a neutral taste), as opposed to extra virgin coconut oil (that has a stronger flavor and smell). You may also use equal amounts of vegan butter if you prefer. Alternatively, if you are not lactose-intolerant, you can also use normal melted butter or ghee.
Eggs: The eggs are necessary to bind the ingredients together and create the custardy texture in this pear custard pie, so make sure you do not omit them (I have not tried making this recipe egg-free, so I don’t know how that will turn out).
Almond Milk: I like using an unsweetened version of my 5-minute homemade almond milk. You may also use another non-dairy milk such cashew milk, rice milk, coconut milk, or sunflower seed milk. Alternatively, if you are not lactose-intolerant, feel free to use whole milk if you prefer.
Sugar: I used white sugar, but you may also use cane sugar, light brown sugar or dark brown sugar or coconut sugar if you prefer (just bear in mind that the darker in color the sugar used, the darker the batter will turn out). If you are diabetic or insulin-resistant, I highly recommend that you use granulated monkfruit sweetener (a 1:1 sugar substitute that is zero glycemic index and will not cause your blood sugar to spike).
Gluten-Free All-Purpose Flour: I recommend using a good-quality gluten-free all-purpose flour blend that is made up of lighter flours/starches (such as rice flour, tapioca starch, corn starch, or potato starch) for a lighter texture. I do NOT recommend using a gluten-free flour blend that includes denser flours (such as garbanzo bean flour) as that will result in a denser texture. Alternatively, you can also use rice flour, corn starch, or tapioca starch in equal amounts.
Vanilla Extract: I like adding a bit of vanilla extract for extra flavor. However, feel free to leave it out if you do not have it on hand, or simply prefer not to use it.
Shredded Coconut: I like sprinkling this gluten-free custard pie with finely shredded coconut to add texture and a touch of natural sweetness. Alternatively, you may also use powdered sugar (confectioner’s sugar) if you prefer. If you are diabetic or insulin-resistant, I highly recommend using powdered monkfruit sweetener (a 1:1 powdered sugar substitute that is zero glycemic index and will not raise your blood sugar).
Cast Iron Skillet: If you don’t have a cast iron skillet, you can also bake this in a glass baking dish or a ceramic casserole dish. It’ll taste just as good.
Storing: To store, cover any leftovers with plastic wrap or aluminum foil, or place in an airtight container and store in the refrigerator for up to 3 days. Reheat in the oven to warm it up before serving. I do NOT recommend freezing this custard pear pie.
Adapted from: Dinner at the Zoo
- Prep Time: 5 mins
- Cook Time: 45 mins
- Category: Desserts
- Method: Baking
- Cuisine: Western
Amazing recipe!!!! I followed all your explanation and voila!!! excellent !!!
thank you so much for sharing it!
genny
Hi Genny! So happy to hear you enjoyed this pear custard pie! Thanks for sharing how it went, and I hope to see you around the blog again sometime soon!
xx,
Felicia
I just want to make sure I am reading this correctly…I’m place of the gluten free flour, I can use tapioca starch correct? And if I use a glass dish an 8×8 could work? Thank you!
Hi Lisa, yes, since this recipe uses very little GF all-purpose flour, replacing it with tapioca starch is fine. And yes, an 8×8 glass dish should work just fine. Adjust the baking time accordingly if you think it needs to cook a little more.
DELICIOUS! I am also sugar free (following anti inflammatory) so I used coconut sugar instead. the colour was dark but I’m not bothered by that at all. it was easy to chuck together and we all loved it. will definitely be trying with other seasonal fruits throughout the year. 45min cooking time a bit too long for me for some reason so will try lesser cooking time. fabulous recipe 🙂 thanks :):):)
YAY! So happy to hear you loved this pear custard pie dear!
I added a dash of nutmeg, a pinch of ground ginger, and a 1/2 tsp of cinnamon. When it came out of the oven, I had drizzled some salted caramel over it before serving. My brother now thinks me a rock star of cooking!
Hi Mary so happy to hear that your brother thinks you a rock star at cooking! Glad you and your brother both enjoyed this pear custard pie, and thank you for sharing the additions you made! That drizzle of salted caramel on top sounds heavenly!
Thank you Felicia for reposting this recipe which I have already pinned it as one of my favourite desserts.
It is always so deliciously yummy to enjoy it with a cup of coffee anytime.
Love you lots,
Mum
Glad you enjoy this pear custard pie mummy!
Hi , can this custard be baked into a prepared pie crust if I don’t have an iron skillet?
Hi Tabitha! yes you can do that instead! Pour the custard and the pears into the prepared pie crust and bake 🙂 Enjoy! And hope to see you around the blog again sometime soon!
YUM! We were given fresh pears off of a friends tree and I searched pear recipes and decided to try this! Glad I did! I made it before dinner and now I can’t stop eating it I’m going to spoil my appetite! I’m so happy this is dairy free and gluten-free, very impressed! I added cinnamon over my pears and then I toasted some walnuts to top after instead of the coconut! Perfection!
Hi Heather!! YAY! So happy that you loved it!! (And yum to all those fresh pears off your friend’s tree, send some here? LOL.) Great tip on adding cinnamon and walnuts, maybe next time I’ll try that instead of coconut 😉 Glad to have you here, hope to see you around sometime again soon!
Hello Felicia,
Just looking at the photo of your cooked pear pie custard makes me salivating for a quick dig in with you guys.
How blessed is Juan and I can imagine how he enjoys his dessert to his heart contents.
Love you both!
Sending you lots of hugs and kisses from SG
Mum
Hi Mummy! This is really easy to make! Maybe you can make it one day too, try using a bit less sugar (or coconut sugar which has higher-fiber content so doesn’t spike the blood sugar so high). Really really easy!! Can use apples as well.