Easy Gluten-free Coffee Cake (Dairy-Free)
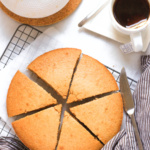
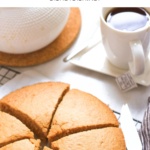
A lightly-sweetened, gluten-free coffee cake that’s flavored with cinnamon, has a tender and moist crumb, and is perfect for cozying up to on cooler days with a warm cup of coffee or tea. Great for breakfast, an anytime snack or even a light dessert. Ready in just 30 minutes, this cinnamon coffee cake recipe is also dairy-free too.
")
Want to save this recipe?
Enter your email & I’ll send it to your inbox. Plus, get great new recipes from me every week!
Jump to:
- A Slice of Cake and Tea
- Some of My Favorite Cakes:
- Why This Recipe Works:
- Ingredients Notes + Substitutions:
- How to Make Gluten-Free Coffee Cake (Step by Step):
- Dish by Dish Tips/Tricks:
- Recipe FAQs:
- Other Gluten-Free Cakes You’ll Love:
- Gluten-Free Desserts to Enjoy:
- Gluten-free Coffee Cake Recipe (Dairy-Free)
A Slice of Cake and Tea
During sweater weather, one of my favorite things to do is to snuggle up with a steeping cup of tea (or coffee) and snack on a slice of cake.
It’s comforting, cozy, and feels just like coming home.
Some of My Favorite Cakes:
- Easy Apple Cake (Gluten-Free, Dairy-Free)
- Delicious Banana Cake (Gluten-Free, Dairy-Free)
- Lemon Blueberry Cake (Gluten-Free, Dairy-Free)
- Lemon Yogurt Cake (Gluten-Free, Dairy-Free Option)
- Blood Orange Cake (Gluten-Free, Dairy-Free Option)
- Coconut Flour Chocolate Cake (Gluten-Free, Dairy-Free)
And today, we’re making this gluten-free coffee cake recipe (that is a cinch to bake, tastes delicious and is perfectly moist!).
")
Why This Recipe Works:
- Simple Ingredients: All you need for this gluten-free breakfast cake is a handful of simple ingredients that are easily accessible at the local grocery store. (In fact, you might already have most of the ingredients at home).
- Easy to Make: Making this gluten-free coffee cake batter is as easy as mixing the dry ingredients with the wet ingredients, and all you need to do is bake the cake until ready!
- Perfect Texture: Tender and moist, this lovely gluten-free cinnamon cake is great for accompany a hot cup of tea or coffee.
- Totally Gluten-Free & Dairy-Free: The best part is that this classic coffee cake recipe is 100% gluten-free and dairy-free, which means that even those with Celiac disease or gluten intolerance can enjoy it without issues!
Ingredients Notes + Substitutions:
Here’s an overview of the ingredients required for this gluten-free coffee cake recipe.
(For exact measurements, please scroll down to the printable recipe card at the bottom of this post.)
- Sugar: I used light brown sugar, but you may also use dark brown sugar, cane sugar or coconut sugar instead (just bear in mind that the darker the color of the sugar used, the darker the color of the batter and the final cake). If you are diabetic or insulin-resistant, I highly recommend using granulated monkfruit sweetener (a 1:1 sugar substitute that is zero glycemic index and will not raise your blood sugar).
- Coconut Oil: I prefer using refined coconut oil (because it has a more neutral taste), as opposed to extra virgin coconut oil (which has a stronger coconut smell and flavor). You may also use vegan butter. Alternatively, you may also use melted butter instead.
- Egg: The egg helps to bind the ingredients better together. I personally have not made this recipe without the egg, but if you are allergic to eggs or would simply prefer to keep this recipe egg-free, you may try using acquafaba or an egg-replacer. (If you do make this recipe without eggs, please let me know how it goes in the comments below, I’d love to hear!)
- Almond Milk: I like using my homemade almond milk, but you may also use another non-dairy milk (such as cashew milk, walnut milk, rice milk, soy milk, tigernut milk, coconut milk). Alternatively, if you are not lactose-intolerant, feel free to use normal milk instead.
- Gluten-Free All-Purpose Flour: I recommend using a good-quality gluten-free all-purpose flour blend which includes lighter flours/starches (such as rice flour, tapioca starch, corn starch or potato starch) to ensure a lighter and fluffier final texture. I do NOT recommend using a gluten-free flour blend that includes heavier flours (such as garbanzo bean flour) as that will result in a denser final texture.
- Xanthan Gum: Xanthan gum is a replacement for gluten in gluten-free flours, so make sure to include it in if your flour blend does not already have it.
- Baking Powder: Baking powder is the only leavening agent in this gluten-free coffee cake recipe, so make sure you include it. If you are Celiac or gluten-intolerant, make sure to use certified gluten-free baking powder.
- Ground Cinnamon: Adding ground cinnamon adds a beautiful flavor to this coffee cake. You may add more or less cinnamon depending on how strong you prefer the taste.
")
How to Make Gluten-Free Coffee Cake (Step by Step):
1. Preheat and Grease
Preheat the oven to 350F (175C). Grease an 8-inch round cake pan and line it with parchment paper.
(TIP: You may also use a springform pan if you prefer.)
2. Beat Sugar and Oil
In a large mixing bowl, beat the sugar and oil together until you get a light and fluffy mixture.
3. Add Egg and Milk
Add the beaten egg and almond milk to the sugar-oil mixture and mix well until you get a homogeneous brown liquid mixture.
4. Whisk Dry Ingredients
In a separate large bowl, sift the gluten-free all-purpose flour, xanthan gum (if using), baking powder and ground cinnamon. Whisk well to combine.
5. Form Batter
Add the dry ingredients to the bowl with the wet ingredients and stir well until you get a homogeneous liquid batter.
6. Transfer Batter to Prepared Pan
Pour the batter into prepared baking pan and use a spatula to smooth out the top of the batter.
7. Bake Until Golden
Bake for 20 minutes or until a toothpick inserted in the middle of the cake comes out clean.
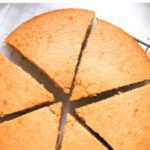
8. Cool Completely Before Slicing
Let the gluten-free cinnamon cake cool completely at room temperature before running a butter knife along the edges of the cake to remove it. Slice and enjoy!

Dish by Dish Tips/Tricks:
- Use a Metal Pan: I recommend using a metal pan as opposed to a ceramic or glass pan because metal conducts heat better.
- Optional Add-Ins: You can sprinkle chopped walnuts or other types of nuts on top of the coffee cake batter before baking. Alternatively, you can also fold blueberries into the batter to make a gluten-free blueberry coffee cake.
- Make a Loaf Cake: If you prefer a loaf shape as opposed to a round cake, feel free to pour the batter into a metal loaf pan before baking instead.
- Streusel Topping: If you wish, you may also top the batter with an even layer of cinnamon streusel crumb topping (using a mix of almond flour, chopped pecans and melted coconut oil).
Recipe FAQs:
To store, place the cooled gluten-free cinnamon cake in an airtight container and store in the refrigerator for up to 5 days.
To freeze, wrap the gluten-free coffee cake in a few layers of plastic wrap and store in the freezer for up to 2 months.
")
Other Gluten-Free Cakes You’ll Love:


Gluten-Free Desserts to Enjoy:


Gluten-free Coffee Cake Recipe (Dairy-Free)
- Total Time: 30 mins
- Yield: 6 servings 1x
Description
A lightly-sweetened, gluten-free coffee cake that’s flavored with cinnamon, has a tender and moist crumb, and is perfect for cozying up to on cooler days with a warm cup of coffee or tea. Great for breakfast, an anytime snack or even a light dessert. Ready in just 30 minutes, this cinnamon coffee cake recipe is also dairy-free too.
Ingredients
- 1/2 cup light brown sugar
- 1/2 cup coconut oil, melted
- 1 egg, beaten
- 1/2 cup unsweetened almond milk
- 1 cup gluten-free all purpose flour
- 1/4 teaspoon xanthan gum (omit if your gluten-free flour blend does not already include it)
- 3 teaspoons baking powder
- 1 teaspoon ground cinnamon
Instructions
- Preheat and Grease: Preheat the oven to 350F (175C). Grease an 8-inch round baking pan and line it with parchment paper.
- Beat Sugar and Oil: In a large mixing bowl, beat the sugar and oil together until you get a light and fluffy mixture.
- Add Egg and Milk: Add the beaten egg and almond milk to the sugar-oil mixture and mix well until you get a homogeneous brown liquid mixture.
- Whisk Dry Ingredients: In a medium bowl, sift the gluten-free all-purpose flour, xanthan gum (if using), baking powder and ground cinnamon. Whisk well to combine.
- Add Dry Ingredients to Wet Ingredients to Form Batter: Add the dry ingredients to the bowl with the wet ingredients and mix well until you get a homogeneous liquid batter.
- Transfer Batter to Pan: Pour the batter into prepared baking pan and use a spatula to smooth out the top of the batter.
- Bake Until Golden: Bake for 20 minutes or until a toothpick inserted in the middle of the cake comes out clean.
- Cool Completely Before Slicing: Allow the cake to cool completely before slicing it into pieces.
Notes
Sugar: I used light brown sugar, but you may also use dark brown sugar, cane sugar or coconut sugar instead (just bear in mind that the darker the color of the sugar used, the darker the color of the batter and the final cake). If you are diabetic or insulin-resistant, I highly recommend using granulated monkfruit sweetener (a 1:1 sugar substitute that is zero glycemic index and will not raise your blood sugar).
Coconut Oil: I prefer using refined coconut oil (because it has a more neutral taste), as opposed to extra virgin coconut oil (which has a stronger coconut smell and flavor). You may also use vegan butter. Alternatively, you may also use melted butter instead.
Egg: The egg helps to bind the ingredients better together. I personally have not made this recipe without the egg, but if you are allergic to eggs or would simply prefer to keep this recipe egg-free, you may try using acquafaba or an egg-replacer. (If you do make this recipe without eggs, please let me know how it goes in the comments below, I’d love to hear!)
Almond Milk: I like using my homemade almond milk, but you may also use another non-dairy milk (such as cashew milk, walnut milk, rice milk, soy milk, tigernut milk, coconut milk). Alternatively, if you are not lactose-intolerant, feel free to use normal milk instead.
Gluten-Free All-Purpose Flour: I recommend using a good-quality gluten-free all-purpose flour blend which includes lighter flours/starches (such as rice flour, tapioca starch, corn starch or potato starch) to ensure a lighter and fluffier final texture. I do NOT recommend using a gluten-free flour blend that includes heavier flours (such as garbanzo bean flour) as that will result in a denser final texture.
Xanthan Gum: Xanthan gum is a replacement for gluten in gluten-free flours, so make sure to include it in if your flour blend does not already have it.
Baking Powder: Baking powder is the only leavening agent in this gluten-free coffee cake recipe, so make sure you include it. If you are Celiac or gluten-intolerant, make sure to use certified gluten-free baking powder.
Ground Cinnamon: Adding ground cinnamon adds a beautiful flavor to this coffee cake. You may add more or less cinnamon depending on how strong you prefer the taste.
Storing/Freezing: To store, place the cooled gluten-free coffee cake in an airtight container and store in the refrigerator for up to 5 days. To freeze, wrap the cinnamon coffee cake in a few layers of plastic wrap and store in the refrigerator for up to 2 months.
Adapted from: Mindy’s Quick Coffee Cake in Issue 8 of Edible DC
This recipe was originally published in 2015, but has since been republished to include clearer step-by-step instructions, ingredient notes and substitutions.
- Prep Time: 10 mins
- Cook Time: 20 mins
- Category: Dessert
- Method: Baking
- Cuisine: Gluten-free
Well done Felicia!
The coffee cake made from this simple and easy recipe is so gorgeously yummy and goes best with a hot aromatic coffee any time of the day.
Have a blessed day ahead!
Mum
Happy to hear you enjoy it mummy 🙂
I need to find my motto for next year, maybe “don’t hold back”? Not user yet, but what I do know is that I need to try this simple but heavenly cake! I can’t believe how few ingredients there are!
Hey Bethany! I like “don’t hold back”…! I’m thinking along the lines of “fear less” because sometimes I don’t try doing certain things because of fear! Back to this cake, you HAVE TO try it! I promise you’ll love it!
This cake is absolutely gorgeous! I love how nice and easy it is 🙂
Thanks for dropping by Nic! This cake is really super easy to make! And tastes incredibly good for the little effort that it requires!