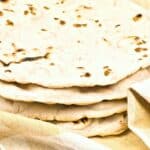
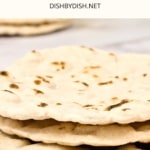
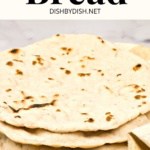
Gluten-Free Pita Bread Recipe (Dairy-Free, Vegan)
This gluten-free pita bread recipe is a delicious and satisfying gluten-free alternative to traditional pita bread. Chewy and flexible, these gluten-free pitas are perfect for eating with hummus, baba ganoush or other favorite dips, making sandwiches or wraps, or enjoying on its own! Totally dairy-free and vegan too.
")
Want to save this recipe?
Enter your email & I’ll send it to your inbox. Plus, get great new recipes from me every week!
Jump to:
What is Pita Bread?
With origins in the Middle East and Greece, pita bread is a family of a round, yeast-leavened flatbreads that is usually made from wheat flour.
The most commonly-known type of pita bread is probably the one with an interior pocket (pita pockets), in which ingredients can be tucked into and eaten as a sandwich. However, pita can also come without the pocket (“pocket-less pita”), and can be dipped in sauces or dips, or folded around ingredients to make a wrap.
Is Pita Bread Gluten-Free?
Traditionally, pita bread is made with wheat flour (which contains gluten) and hence is not gluten-free, and not safe for Celiacs or those with gluten allergies or intolerances.
However, today, we’re making a gluten-free and vegan version of this arabic flatbread that you’re going to love!
")
Why This Recipe Works:
- Simple Ingredients: The ingredients required for this easy gluten-free pita bread recipe are easily accessible at the local grocery store (nothing fancy required!).
- Easy to Make: Preparing the gluten free pita bread dough is a matter of mixing the ingredients together, kneading the dough and letting it rise, before rolling out the dough and cooking!
- Totally Gluten-Free, Dairy-Free & Vegan: The best part is that this gluten-free flatbread recipe is 100% gluten-free, dairy-free and vegan, which means that even those with Celiac disease or gluten or lactose intolerances, or those simply on a vegan diet or gluten-free diet can enjoy them without issues!
")
Ingredients You’ll Need:
Here’s an overview of the ingredients required for this gluten-free vegan pita bread recipe.
(For exact measurements, please scroll down to the printable recipe card at the bottom of this post.)
")
Recipe Notes + Substitutions
- All Purpose Gluten-Free Flour: I recommend using a good-quality gluten-free all-purpose flour blend made up of lighter flours/starches (such as rice flour, tapioca starch, corn starch or potato starch). I do NOT recommend using a gluten-free flour blend made up of heavier flours (such as garbanzo flour) as that will result in a denser texture. Alternatively, you may also use rice flour instead.
- Tapioca Starch: Also known as tapioca flour, this is a gluten-free flour made from the starchy root of the cassava plant. It is often used in gluten-free baking because it helps to give baked goods a chewy texture. Alternatively, if you don’t have tapioca starch, you can substitute it with arrowroot starch (also known as arrowroot flour or arrowroot powder) instead.
- Psyllium Husk Powder: Psyllium husk powder is a fiber supplement made from the seeds of the Plantago ovata plant. It is often used as a binding agent in gluten-free baking, as it helps to give baked goods a more elastic texture. Make sure to add it in so you get flexible pitas. If you only have access to whole psyllium husks, you can grind the whole psyllium husks in a coffee grinder or high-speed blender to get a fine powder.
- Olive Oil: I like using extra virgin olive oil, but you can also use avocado oil, flaxseed oil, melted coconut oil, melted vegan butter, or another vegetable oil (such as sunflower oil or canola oil) instead.
- Yeast: Yeast is used as a leavening agent to help the bread rise, so much sure you add it in. You can either use fresh yeast (a moist, crumbly block of yeast that is typically used in professional bakeries), or active dry yeast (a granular form of yeast that is more commonly used in home baking).
- Cane Sugar: Sugar is used to feed the yeast, which will then produce the gases that make the bread dough rise. I used cane sugar, but you can also use white sugar, light brown sugar or dark brown sugar.
- Warm Water: Make sure to use warm water that is between 105F to 115F (the warmth is required for the yeast to be activated, but if the water is too hot, the high heat will kill the yeast).
How to Make Gluten-Free Pita Bread (Step by Step)
1. Activate Yeast
Combine the yeast, sugar and lukewarm water and stir with a spoon until well-combined. Set it aside for 5 minutes to proof the yeast – if it becomes frothy, the yeast is active and can be used.
")
2. Whisk Dry Ingredients
In a large mixing bowl, whisk together the dry ingredients (gluten-free all-purpose flour, tapioca flour, psyllium husk powder, and salt).
")
3. Add Wet Ingredients to Dry Ingredients
Once the yeast mixture is foamy, pour the yeast mixture and olive oil into the bowl with the dry ingredients and stir until everything is evenly combined.

4. Knead Dough
Work the dough with your hands until you get an elastic and smooth dough, then return it to the mixing bowl.
")
5. Let Dough Rise
Cover the bowl tightly with cling film and move it to a warm, draft-free area. Leave it for 60 minutes or until the dough ball has visibly expanded and risen.

6. Divide Dough Into Equal Portions
Once the gf pita dough has risen, divide it into 5 equal pieces (around 90 grams each) and shape them into balls.
Place the balls on a baking sheet lined with a piece of parchment paper.
")
7. Roll Out Dough
Dust your rolling pin with gluten-free flour and gently flatten each ball of dough into a circular shape (approximately 1/4-inch thick).
")
8. Heat Up Skillet and Cook Dough
Heat up a nonstick skillet or cast iron skillet over medium-high heat for a few minutes until it’s hot.
Place one of the rolled-out circles of dough into the hot pan and cook it for about a minute, or until bubbles start to form on the surface.
")
9. Flip Pita
Flip the pita over and cook it for another minute or two on the other side, until it’s golden brown and slightly puffed up.

10. Repeat Until All Dough is Used
Repeat this process with the remaining circles of dough, making sure to keep the cooked pitas covered with a kitchen towel to keep them warm.
")
Recipe FAQs:
Allow the gluten-free pitas to cool completely before storing it. Place the cooled gf pita bread in a plastic bag or airtight container, and store the pita bread at room temperature for up to 2 days.
Yes you can. To freeze this gluten-free dairy-free pita bread, wrap the cooled gluten-free dairy-free pita bread tightly in plastic wrap and place it in a freezer bag or container. It will keep for up to 3 months in the freezer. When you’re ready to eat the frozen pita bread, simply let it thaw at room temperature for a few hours or microwave it for a few seconds to warm it up. Avoid storing this gluten-free vegan pita bread in the refrigerator, as the cool temperature can cause it to dry out and become stale.
")
What to Serve with Pita Bread:


Other Favorite Gluten-Free Bread Recipes:


P.S. If you try this recipe, I’d love for you to leave a star rating below, and/or a review in the comment section further down the page. I always appreciate your feedback. Be sure to check out my entire Recipe Index for all the recipes on the blog. You can also follow me on Pinterest, Facebook or Instagram! Sign up for my Email List to get fresh recipes in your inbox each week!
Gluten-Free Pita Bread (Dairy-Free, Vegan)
- Total Time: 1 hour 32 minutes
- Yield: 5 pitas 1x
- Diet: Gluten Free
Description
This gluten-free pita bread recipe is a delicious and satisfying gluten-free alternative to traditional pita bread. Chewy and flexible, these gluten-free pitas are perfect for eating with hummus, baba ganoush or other favorite dips, making sandwiches or wraps, or enjoying on its own! Totally dairy-free and vegan too.
Ingredients
- 1 cup gluten-free all-purpose flour
- 2/3 cup tapioca starch
- 2 teaspoons psyllium husk powder
- 1/2 teaspoon salt
- 2 teaspoons olive oil
- 1 teaspoon active dry yeast (or 10g fresh yeast)
- 1 1/2 teaspoons cane sugar
- 3/4 cup + 2 tablespoons warm water (between 105-115F)
Instructions
- Activate Yeast: Combine the yeast, sugar and warm water and stir with a spoon until well-combined. Set it aside for 5 minutes to proof the yeast – if it becomes frothy, the yeast is active and can be used.
- Whisk Dry Ingredients: In a large mixing bowl, whisk together the dry ingredients ; gluten-free all-purpose flour, tapioca flour, psyllium husk powder, and salt.
- Add Yeast Mixture to Dry Ingredients: Pour the yeast mixture and olive oil into the bowl with the dry ingredients and stir until everything is evenly combined.
- Knead Dough: Work the dough with your hands until it’s smooth and elastic, then return it to the mixing bowl.
- Let Dough Rise: Cover the bowl tightly with cling film and move it to a warm, draft-free area. Leave it for 60 minutes or until the dough has visibly expanded and risen.
- Divide Dough into Portions: Once the dough has risen, divide it into 5 equal portions (around 90 grams each) and shape them into balls.
- Roll Out Dough: Dust your rolling pin with rice flour (or other gluten-free flour blend) and gently flatten each ball of dough into a circular shape. *(1/4-inch thick)
- Heat Up Skillet and Cook Dough: Heat up a skillet over medium-high heat for a few minutes until it’s hot. Place one of the rolled-out circles of dough into the skillet and cook it for about a minute, or until bubbles start to form on the surface.
- Flip Pita: Flip the pita over and cook it for another minute or two on the other side, until it’s golden brown and slightly puffed up.
- Repeat Until All Dough is Used: Repeat this process with the remaining circles of dough, making sure to keep the cooked pitas covered with a kitchen towel to keep them warm.
Notes
Gluten-Free All-Purpose Flour: I recommend using a good-quality gluten-free all-purpose flour blend made up of lighter flours/starches (such as rice flour, tapioca starch, corn starch or potato starch). I do NOT recommend using a gluten-free flour blend made up of heavier flours (such as garbanzo flour) as that will result in a denser texture. Alternatively, you may also use rice flour instead.
Tapioca Starch: Also known as tapioca flour, this is a gluten-free flour made from the starchy root of the cassava plant. It is often used in gluten-free baking because it helps to give baked goods a chewy texture. Alternatively, if you don’t have tapioca starch, you can substitute it with arrowroot starch (also known as arrowroot flour or arrowroot powder) instead.
Psyllium Husk Powder: Psyllium husk powder is a fiber supplement made from the seeds of the Plantago ovata plant. It is often used as a binding agent in gluten-free baking, as it helps to give baked goods a more elastic texture. Make sure to add it in so you get flexible pitas. If you only have access to whole psyllium husks, you can grind the whole psyllium husks in a coffee grinder or high-speed blender to get a fine powder.
Olive Oil: I like using extra virgin olive oil, but you can also use avocado oil, flaxseed oil, melted coconut oil, melted vegan butter, or another vegetable oil instead.
Yeast: Yeast is used as a leavening agent to help the bread rise, so much sure you add it in. You can either use fresh yeast (a moist, crumbly block of yeast that is typically used in professional bakeries), or active dry yeast (a granular form of yeast that is more commonly used in home baking).
Cane Sugar: Sugar is used to feed the yeast, which will then produce the gases that make the bread dough rise. I used cane sugar, but you can also use white sugar, light brown sugar or dark brown sugar.
Warm Water: Make sure to use warm water that is between 105F to 115F (the warmth is required for the yeast to be activated, but if the water is too hot, the high heat will kill the yeast).
Storing/Freezing: Allow the gluten-free pitas to cool completely before storing it. Place the cooled pita bread in a plastic bag or airtight container, and store the pita bread at room temperature for up to 2 days. To freeze the pita bread, wrap the cooled pita bread tightly in plastic wrap and place it in a freezer bag or container. It will keep for up to 3 months in the freezer. When you’re ready to eat the frozen pita bread, simply let it thaw at room temperature for a few hours or microwave it for a few seconds to warm it up. Avoid storing pita bread in the refrigerator, as the cool temperature can cause it to dry out and become stale.
- Prep Time: 20 mins
- Rising Time: 1 hour
- Cook Time: 12 mins
- Category: Bread
- Method: Stovetop
- Cuisine: Middle Eastern


Better than expected. Kids loved them too
Hi Lauren! So happy to hear that you and the kids love this pita bread!! 🙂 Thanks for your feedback, and I hope to see you around the blog again sometime soon!
xx,
felicia
first gluten free pita bread that really turned out absolutely delicious !!!! thanks a thousand. for sharing
YAY! so happy to hear that Susanne!! Thanks for letting me know how it went, and I hope to see you around the blog again sometime soon!
YES to this recipe!!! I just made this last night. I wanted larger pitas so I made 4 with the recipe. The texture is AMAZING!! I didn’t knead them on a board, I just mixed with a rubber spatula by hand until it was smooth and they still came out great. I don’t bake with psyllium husk often and I think that’s the key to the texture of this bread. Everyone (non gluten-free) loved them. I’m definitely adding this to my cook book of staple recipes I use. THANK YOU!!! (Also so easy to put together)
Hi Ashley!! YAY! Thanks so much for your lovely comment! So happy to hear you enjoyed these pitas – and yes, I agree that the psyllium husk powder definitely makes a big difference in texture to the bread. Glad to have you here and I hope to see you around the blog again sometime soon!
xx,
Felicia