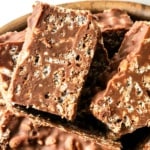
No-Bake Peanut Butter Crunch Bars (Gluten-Free, Vegan)
These 5-ingredient peanut butter crunch bars are super easy to make, and no baking is required! Filled with the flavors of peanut butter and chocolate, with an amazingly crunchy texture, these homemade crunch bars are the perfect snack or dessert! Totally gluten-free, dairy-free and vegan too.
")
Want to save this recipe?
Enter your email & I’ll send it to your inbox. Plus, get great new recipes from me every week!
Jump to:
- What are Crunch Bars?
- Easy Homemade Crunch Bars
- Why This Recipe Works
- Ingredients You’ll Need:
- Recipes Notes + Substitutions
- How to Make Peanut Butter Crunch Bars (Step by Step)
- Dish by Dish Tips/Tricks:
- Recipe FAQs:
- Peanut Butter Recipes to Love:
- Other Gluten-Free Dessert Bars You’ll Enjoy:
- Gluten-Free Sweet Treats to Make
- No-Bake Peanut Butter Crunch Bars (Gluten-Free, Vegan)
What are Crunch Bars?
If you remember Crunch Bars from your childhood, which come in the familiar blue package and the words “CRUNCH” in red letters against a white background, I’m with you.
Produced globally under the Nestlé brand, and in the US under the Ferrara Candy Company (a Ferrero subsidiary), Crunch bars are a favorite sweet treat for many.
They are made mainly with milk chocolate and crisped rice, but since the bars may also contain wheat (as indicated by the ingredients label on the package), they are NOT safe for Celiacs or those with gluten allergies or intolerances.
")
Easy Homemade Crunch Bars
Today, we’ll be making our own version, and adding peanut butter to the mix (so peanut butter lovers, this one’s for you!). Plus, our version is gluten-free and vegan too!
These chocolate peanut butter cereal bars makes an amazing sweet treat, or anytime snack for those with a sweet tooth! The whole family’s gonna love this fun treat!
Why This Recipe Works
- Simple Ingredients: Just five ingredients are needed for this easy treat, and they are easily accessible at the local grocery store (nothing fancy required!).
- Very Easy to Make: With the help of a microwave to melt down the ingredients, all you need to do is mix them together before pressing the mixture into a dish, and then letting it chill in the refrigerator until firm. No baking here!
- Amazing Taste: Full of rich chocolate and peanut butter flavor, these no bake crunch bars are the perfect combination of peanut butter and chocolate!
- Totally Gluten-Free, Dairy-Free and Vegan: The best part is that these homemade chocolate peanut butter crunch bars are 100% gluten-free, dairy-free and vegan too! This means that even those with Celiac disease or lactose and dairy intolerances can enjoy these no bake bars without worries!
")
Ingredients You’ll Need:
Here’s a visual overview of the ingredients required for these homemade peanut butter crunch bars recipe.
(For exact measurements and quantities, please scroll down to the recipe card at the bottom of this post.)
")
Recipes Notes + Substitutions
- Rice Crispy Cereal: If you are Celiac or gluten-intolerant, make sure to use gluten-free rice crispy cereal. The brand Rice Krispie’s cereal is not gluten-free as it contains barley ingredients, so Celiacs beware!
- Chocolate Chips: I used vegan semi-sweet chocolate chips to keep this recipe dairy-free and vegan. However, if you are not lactose-intolerant, feel free to use normal chocolate chips instead.
- Peanut Butter: I like using smooth peanut butter, but feel free to use a chunkier texture if you prefer. Alternatively, you may also use other nut butters such as almond butter, sunflower seed butter, or cashew butter.
- Maple Syrup: I used maple syrup as a natural sweetener and to keep this recipe vegan. You may also use another liquid sweetener such as agave nectar if you prefer, or if you are not vegan, feel free to use honey instead. If you are diabetic or lactose intolerant, I highly recommend using maple-flavored monkfruit sweetener syrup.
- Coconut Oil: I personally prefer using refined coconut oil (which has a neutral flavor) as opposed to extra virgin coconut oil that has a more pronounced coconut taste and smell. You may also use vegan butter. Alternatively, if you are not vegan or lactose-intolerant, feel free to use normal melted butter or ghee instead.
How to Make Peanut Butter Crunch Bars (Step by Step)
1. Line Baking Dish
Line an 8″ x 8″ square baking dish with parchment paper and set aside.
2. Combine Chocolate, Peanut Butter, Maple Syrup and Coconut Oil
Place the chocolate, peanut butter, maple syrup and coconut oil in a microwave-safe bowl.
")
3. Heat Ingredients and Mix Well
Then heat up the ingredients in the microwave at 30 second intervals, stirring in between until you get a smooth glossy chocolate mixture.
(TIP: If you don’t have a microwave, you can use a double boiler to melt chocolate chips and then mix the melted chocolate with the peanut butter and coconut oil, stirring well until you get a homogeneous mixture.)
")
4. Pour Chocolate Mixture over Rice Cereal
In a large mixing bowl, measure the 3 cups of crispy rice cereal. Pour melted mix over the rice cereal.
")
5. Mix to Combine
Mix the rice cereal and melted chocolate mixture very well until combined and you have a homogeneous mixture.
")
6. Transfer Mixture to Baking Dish
Place the peanut butter crunch bar mixture into the parchment-lined baking dish and smooth out evenly.
")
7. Chill Until Firm
Let firm in the refrigerator for at least an hour or until the surface of the mixture is no longer shiny, but more matte.
")
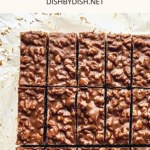
8. Cut into Bars
Lift up the parchment paper and place the hardened crunch mixture on a cutting board, and then use a sharp smooth knife to cut the peanut butter crunchy bars into rectangles (or shape of choice) and enjoy!
")
Dish by Dish Tips/Tricks:
- Storing: To store, place the chocolate peanut butter crunch bars in an airtight container and store them in the refrigerator for up to 2 weeks.
- For Sharp Edges: For perfectly rectangular shapes and sharp edges, use a sharp knife to cut away the edge of each side of the pan of crunch mixture after hardened and unwrapped from the parchment paper.
- No Microwave? Don’t Worry! If you don’t have a microwave, you can use a double boiler to melt chocolate chips and then mix the melted chocolate with the peanut butter and coconut oil, stirring well until you get a homogeneous mixture.
Recipe FAQs:
Store-bought crunch bars, which come in the familiar blue package and the words “CRUNCH” in red letter against a white background, are NOT gluten-free. According to the ingredients label on the package, the bars may contain wheat, so if you are Celiac or gluten-intolerant, do NOT buy storebought crunch bars.
")
Peanut Butter Recipes to Love:
- 4-Ingredient Peanut Butter Cups (Gluten-Free, Vegan)
- Peanut Butter Fudge (Gluten-Free, Vegan)
- Peanut Butter Buckeye Balls (Gluten-Free, Vegan)
- Flourless Peanut Butter Cookies (Gluten-Free, Dairy-Free)
- 10-Minute Creamy Peanut Butter (Gluten-Free, Vegan)
Other Gluten-Free Dessert Bars You’ll Enjoy:
- Strawberry Crumble Bars (Gluten-Free, Dairy-Free)
- Raspberry Oatmeal Bars (Gluten-Free, Vegan)
- Crunch Granola Bars (Gluten-Free, Vegan)
- Moist Pumpkin Bars (Gluten-Free, Dairy-Free)
Gluten-Free Sweet Treats to Make


P.S. If you try this recipe, I’d love for you to leave a star rating below, and/or a review in the comment section further down the page. I always appreciate your feedback. Be sure to check out my entire Recipe Index for all the recipes on the blog. You can also follow me on Pinterest, Facebook or Instagram! Sign up for my Email List to get fresh recipes in your inbox each week!
No-Bake Peanut Butter Crunch Bars (Gluten-Free, Vegan)
- Total Time: 1 hour 20 minutes
- Yield: 18 servings 1x
- Diet: Vegan
Description
These 5-ingredient peanut butter crunch bars are super easy to make, and no baking is required! Filled with the flavors of peanut butter and chocolate, with an amazingly crunchy texture, these homemade crunch bars are the perfect snack or dessert! Totally gluten-free, dairy-free and vegan too.
Ingredients
- 3 cups gluten-free rice crispy cereal
- 1 1/2 cups vegan semi-sweet chocolate chips
- 1 cup smooth peanut butter
- 1/2 cup pure maple syrup
- 1/4 cup coconut oil
Instructions
- Line Baking Dish: Prepare an 8″ x 8″ square baking dish with parchment paper and set aside.
- Combine Chocolate, Peanut Butter, Maple Syrup and Coconut Oil: Place the chocolate, peanut butter, maple syrup and coconut oil in a microwave-proof mixing bowl.
- Heat Ingredients and Mix Well: Heat up the ingredients in the microwave at 30 second intervals, stirring in between until you get a smooth glossy chocolate mixture.
- Pour Chocolate Mixture Over Rice Cereal: In a large mixing bowl, measure the 3 cups of crispy cereal. Pour melted mix over the rice cereal.
- Mix to Combine: Mix the rice cereal and melted chocolate mixture very well until combined and you have a homogeneous mixture.
- Transfer Mixture to Baking Dish: Place mixture into the parchment-lined baking dish and smooth out evenly.
- Chill Until Firm: Let firm in the refrigerator for at least an hour.
- Cut into Bars: Cut the bars into rectangles (or shape of choice) and enjoy!
Notes
Rice Crispy Cereal: If you are Celiac or gluten-intolerant, make sure to use gluten-free rice crispy cereal.
Chocolate Chips: I used vegan chocolate chips to keep this recipe dairy-free and vegan. However, if you are not lactose-intolerant, feel free to use normal chocolate chips instead.
Peanut Butter: I like using smooth peanut butter, but feel to use a chunkier texture if you prefer. Alternatively, you may also use other nut butters such as almond butter, sunflower seed butter, or cashew butter.
Maple Syrup: I used maple syrup as a natural sweetener and to keep this recipe vegan. You may also use agave nectar if you prefer. If you are not vegan, feel free to use honey instead. If you are diabetic or lactose intolerant, I highly recommend using maple-flavored monkfruit sweetener syrup.
Coconut Oil: I personally prefer using refined coconut oil (which has a neutral flavor) as opposed to extra virgin coconut oil that has a more pronounced coconut smell and taste. You may also use vegan butter. Alternatively, if you are not vegan or lactose-intolerant, feel free to use normal melted butter or ghee instead.
Storing: To store, place the chocolate peanut butter crunch bars in an airtight container and store them in the refrigerator for up to 2 weeks.
For Sharp Edges: For perfectly rectangular shapes and sharp edges, use a sharp knife to cut away the edge of each side of the pan of crunch mixture after hardened and unwrapped from the parchment paper.
- Prep Time: 20 mins
- Chilling Time: 1 hour
- Category: Desserts
- Method: No-Bake
- Cuisine: American

I am making comments on all your recipes enjoy them all. But I don’t see calorie count on recipes. keep up the good work
Glad to hear you enjoy these! As for calorie count, you can find it at the bottom of the recipe (which is at the bottom of the post). Thanks for your lovely comments!
Thank you Felicia for this super easy to make “no-bake peanut butter crunch” which is well loved by peanut butter lover like me!
Because the chocolate tends to melt so quickly in our hands in tropical SG, I like to cut my “no-bake peanut butter crunch” into bite-size for my enjoyment. In this way, I just pop each piece into my mouth without smearing my fingers with melted chocolate.
This is a great snack for any time of the day!
Love,
Mum
Good idea about cutting the bars into smaller pieces!