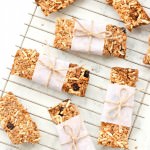
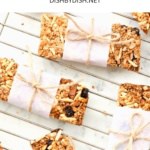
Crunchy Gluten-free Granola Bars (Dairy-Free, Vegan)
Amazingly crunchy, these gluten-free granola bars are sweet, delicious and filling. These homemade granola bars make a fun breakfast or quick snack on the go and are a great way to begin the day! Totally gluten-free, dairy-free and vegan too.
")
Want to save this recipe?
Enter your email & I’ll send it to your inbox. Plus, get great new recipes from me every week!
Jump to:
Starting the Day with a Delicious Breakfast
Nothing beats waking up to a great breakfast in the morning (even if your morning doesn’t start at the crack of dawn).
While I’m not particularly one to wake up bright and early, on the days that I do, I find that fueling myself with a good breakfast means I get the energy needed to accomplish the tasks on the to-do list, or simply enjoy the day.
Our Favorite Breakfast Recipes:
Here are some breakfast recipes that we enjoy, and so will you!
- Easy Maple Oatmeal Porridge (Gluten-Free, Vegan)
- Creamy Breakfast Polenta Porridge (Gluten-Free, Vegan)
- Easy Flaxseed Muffins (Gluten-Free, Dairy-Free)
- Super Moist Banana Bread (Gluten-Free, Dairy-Free)
In the meantime, I wanted to share this lovely and easy recipe for crunchy gluten-free granola bars that you can easily make at home.
")
Why This Recipe Works:
- Simple Ingredients: The simply and healthy ingredients required for these delicious homemade granola bars are easily accessible at the local grocery store (nothing fancy required)!
- Easy to Make: Preparing these delicious gluten free granola bars is way easier than you’d think, and even if this is your first time making them, you can make them without any issues!
- Super Crunchy Texture: The amazingly texture of these crunchy granola bars will make you want to eat this healthy snack over and over again!
- Totally Gluten-Free, Dairy-Free and Vegan: The best part is that these healthy homemade granola bars are 100% gluten-free, dairy-free and vegan, which means that even those with Celiac disease or gluten or lactose intolerances can enjoy a snack bar without issues. Plus, it doesn’t have the conservatives and artificial flavors that store-bought granola bars tend to have, nor does it use unhealthy high-fructose corn syrup for sweetening!
")
Ingredients You’ll Need + Notes/Substitutions:
Here’s an overview of the ingredients required for making these homemade granola bars recipe.
(For exact measurements and quantities, please scroll down to the recipe card at the bottom of this post.)
- Puffed Rice Cereal: I like using puffed rice for a crunchy effect, but you can also use other types of crunchy gluten-free cereal (such as puffed quinoa or rice krispies) if you prefer. You can also add gluten-free oats to the mix if you like.
- Cashews: I used unsalted raw cashews, but you may also use unsalted roasted cashews if you prefer. Alternatively, you can also use other types of unsalted nuts (such as almonds, walnuts, peanuts, pistachios, macadamias, etc.).
- Sesame Seeds: I used white sesame seeds, but feel free to go ahead and use a mix of multi-colored sesame seeds if you prefer.
- Sunflower Seeds: I like adding unsalted sunflower seeds, but you may substitute it with a mix of other seeds (such as pumpkin seeds, chia seeds, flax seeds, hemp seeds, etc.).
- Apples: Apples add a nice sweetness to these granola bars, but this recipe will turn out just as well with pears or quinces too.
- Cinnamon: A touch of ground cinnamon always adds a beautiful flavor to these gluten-free granola bars, so I highly recommend including it. Alternatively, you may substitute it with pumpkin pie spice if you prefer.
- Vegan Butter: I used vegan butter to keep this recipe dairy-free and vegan, but you may go ahead and use coconut oil if you prefer (for baking, I recommend using refined coconut oil (which has a neutral flavor), as opposed to extra virgin coconut oil (which has a more pronounced taste and flavor). Alternatively, if you are not lactose-intolerant, feel free to use normal butter or ghee instead.
- Maple Syrup: I used maple syrup as a natural sweetener and to keep the recipe vegan. You may also use brown rice syrup or agave nectar if you prefer. Alternatively, if you are not vegan, feel free to use honey instead. If you are diabetic or insulin-resistant, I highly recommend using Lakanto maple-flavored syrup (a maple syrup substitute that is low glycemic index).
")
How to Make Gluten-Free Granola Bars:
1. Preheat Oven
Preheat oven to 350F (175C).
2. Grease Baking Tray
Grease a large rectangular baking tray with vegan butter or nonstick cooking spray and line it with a piece of parchment paper or a silpat.
3. Mix Dry Ingredients
In a large mixing bowl, place the puffed rice cereal, chopped cashew nuts, sesame seeds, sunflower seeds, diced apples, and ground cinnamon. Mix well until ingredients are homogeneously distributed.
4. Add Wet Ingredients
Whisk melted vegan butter and maple syrup together, then pour over the dry mixture. Mix well until dry ingredients are fully-coated with the vegan butter-maple syrup mixture.
5. Transfer Granola Mixture to Baking Tray
Transfer the granola mixture into the previously greased baking pan, and spread it out until the granola mixture covers the entire surface area. Use the back of a slotted spoon to press the mixture down and compact it as evenly as possible.
6. Bake Until Golden
Bake the granola mixture in the oven for 30 to 35 minutes.
7. Press Granola
Straight after removing the baking tray from the oven, use the back of a spoon to compact the mixture even further.
8. Cool Completely Before Slicing
Let granola mixture cool completely (wait 30 to 40 minutes) before lifting up the parchment paper or silpat with the granola mixture from the baking dish and placing it on a cutting board. Cut the granola mixture with a sharp knife into rectangle bars of your liking.
")
Dish by Dish Tips/Tricks:
- Line Tray to Prevent Granola From Sticking: To ensure easy removal of the granola bars, make sure to line the tray with either parchment paper or a silpat.
- Cut Bars into Shape of Choice: In this recipe, I cut the granola bars into rectangles, but you can always cut them into squares as well.
- Add Dried Fruits or Chocolate Chips: Feel free to add in a handful of dried fruits (such as raisins, dried blueberries, or dried cranberries) or dark chocolate chips to these healthy granola bars for extra flavor.
Recipe FAQs:
To store, place these gluten-free homemade granola bars in an airtight container at room temperature for up to 5 days.
")


")
P.S. If you try this recipe, I’d love for you to leave a star rating below, and/or a review in the comment section further down the page. I always appreciate your feedback. Be sure to check out my entire Recipe Index for all the recipes on the blog. You can also follow me on Pinterest, Facebook or Instagram! Sign up for my Email List to get fresh recipes in your inbox each week!

Crunchy Gluten-free Granola Bars
- Total Time: 45 minutes
- Yield: 12 granola bars 1x
- Diet: Gluten Free
Description
Amazingly crunchy, these gluten-free granola bars are sweet, delicious and filling. These homemade granola bars make a quick breakfast or healthy snack on the go and are a great way to begin the day! Totally gluten-free, dairy-free and vegan too.
Ingredients
- 5 cups puffed rice
- 1/4 cup raw cashews, chopped into small pieces
- 1/4 cup sesame seeds
- 1/4 cup unsalted sunflower seeds
- 1/2 cup apples, diced
- 1 teaspoon ground cinnamon
- 2/3 cup vegan butter, melted
- 2/3 cup maple syrup
Instructions
- Preheat Oven: Preheat oven to 350F (175C).
- Grease Baking Tray: Grease a large rectangular baking tray with vegan butter or nonstick cooking spray (and line tray with parchment paper or a silpat).
- Mix Dry Ingredients: In a large mixing bowl, place the puffed rice cereal, chopped cashew nuts, sesame seeds, sunflower seeds, diced apples, and ground cinnamon. Mix well until ingredients are homogeneously distributed.
- Add Wet Ingredients: Whisk melted vegan butter and maple syrup together, then pour over the dry ingredients. Mix well until dry ingredients are fully-coated with the vegan butter-maple syrup mixture.
- Transfer Granola Mixture to Baking Tray: Transfer the granola mixture into the previously greased baking tray, and spread it out until the granola mixture covers the entire surface area. Use the back of a slotted spoon to press the mixture down and compact it as evenly as possible.
- Bake Until Golden: Bake the granola mixture in the oven for 30 to 35 minutes.
- Press Granola: Straight after removing the baking tray from the oven, use the back of a spoon to compact the mixture even further.
- Cool Completely Before Slicing: Let granola mixture cool completely (wait 30 to 40 minutes) before cutting with a sharp knife into bars of your liking.
Notes
Puffed Rice Cereal: I like using puffed rice for a crunchy effect, but you can also use other types of crunchy gluten-free cereal (such as puffed quinoa) if you prefer.
Cashews: I used unsalted raw cashews, but you may also use unsalted roasted cashews if you prefer. Alternatively, you can also use other types of unsalted nuts (such as almonds, walnuts, peanuts, pistachios, macadamias, etc.).
Sesame Seeds: I used white sesame seeds, but feel free to go ahead and use a mix of multi-colored sesame seeds if you prefer.
Sunflower Seeds: I like adding unsalted sunflower seeds, but you may substitute it with a mix of other seeds (such as pumpkin seeds, chia seeds, flax seeds, hemp seeds, etc.).
Apples: Apples add a nice sweetness to these granola bars, but this recipe will turn out just as well with pears or quinces too.
Cinnamon: A touch of ground cinnamon always adds a beautiful flavor to these gluten-free granola bars, so I highly recommend including it. Alternatively, you may substitute it with pumpkin pie spice if you prefer.
Vegan Butter: I used vegan butter to keep this recipe dairy-free and vegan, but you may go ahead and use coconut oil if you prefer (for baking, I recommend using refined coconut oil (which has a neutral flavor), as opposed to extra virgin coconut oil (which has a more pronounced taste and flavor). Alternatively, if you are not lactose-intolerant, feel free to use normal butter or ghee instead.
Maple Syrup: I used maple syrup as a natural sweetener and to keep the recipe vegan. You may also use agave nectar if you prefer. Alternatively, if you are not vegan, feel free to use honey instead. If you are diabetic or insulin-resistant, I highly recommend using Lakanto maple-flavored syrup (a maple syrup substitute that is low glycemic index).
Storing: To store, place these gluten-free homemade granola bars in an airtight container at room temperature for up to 5 days.
This recipe was originally posted in 2015, but has since been republished to include clearer step-by-step instructions, as well as recipe notes and substitutions.
- Prep Time: 10 mins
- Cook Time: 35 mins
- Category: Breakfast
- Method: Baking
- Cuisine: Western

Good morning Felicia!
Thank you for these crunchy granola bar recipes!
The granola bars are healthy snacks which I can easily bring along with me wherever I go to keep them handy as and when I need to snack on something in between my meals.
Have a great day ahead!
Love,
Mum
Yep! Perfect snacks for bringing around when Lauren can start to eat granola! 😉
Love your food photography and details, really helps,
thank you so much for sharing
Thanks for dropping by Heghineh! So glad you enjoy the photos I take – I constantly try to improve my food photography with each post I write, so your comment made my day! Hope to see you around again!
Oh Flea! I can’t wait to read your book! It will be a lovely addition to my ibooks on my iPad.
Enjoy every bit of the writing and the journey. This is the first step you’re taking towards fulfilling your dream of becoming a full-time writer! So, so proud of you, my best friend.
JIN. your words mean so much to me!!
Definitely enjoying every step of the way… writing and self-publishing a book sure is a whole new learning journey!! So grateful for people like you cheering me on!
Hi Felicia,
I am so glad that you are moving on fine through this journey of writing your very own first cookbook. The book, when it is done and ready to be shared with others, may just be the end product, however the lessons and experiences you have gathered along this journey are just so invaluable and they are indeed beyond measures.
Therefore, I urge you to keep on living the most fulfilled life God in His divine nature has ordained for you.
I love you! I am looking eagerly forward to the impending “Birth” of your first cookbook 🙂
Cheers!
Mum
Mummy!! You’re right. the journey and the lessons learnt are extremely invaluable!! I’ve learnt so much in this process, and I believe the book will be worth the time and effort put it! 🙂