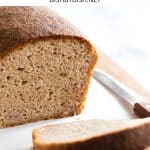
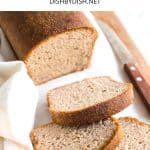
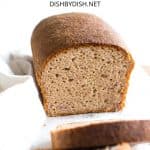
Soft, Fluffy Brown Rice Bread (Gluten-Free, Dairy-Free)
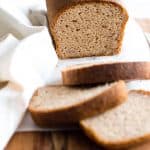
This soft and fluffy brown rice bread is simple to make, and is great for making sandwiches, or toasting and spreading with butter and jam. Made with brown rice flour for extra fiber, this easy yeast bread is totally gluten-free and dairy-free too.
")
Want to save this recipe?
Enter your email & I’ll send it to your inbox. Plus, get great new recipes from me every week!
Jump to:
- My Love for Homemade Bread
- Super Easy Brown Rice Bread
- Why This Recipe Works
- Make Your Own Brown Rice Flour
- Ingredients You’ll Need:
- Ingredient Notes/Substitutes:
- How to Make Brown Rice Bread (Step by Step)
- Dish by Dish Tips and Tricks
- Recipe FAQs:
- Other Bread Recipes You’ll Love:
- Soft, Fluffy Brown Rice Bread (Gluten-Free, Dairy-Free)
My Love for Homemade Bread
Of all the baked goods out there, homemade bread is definitely my favorite to bake.
While quick breads such as this wildly popular easy honey oat bread or this low-carb coconut flour bread are simpler to throw together and bake, baking yeast breads has become almost therapeutic for me, and watching the yeast work its magic to make the dough double in size has never ceased to amaze me.
I’ve baked plenty of yeast breads over the years. In particular, my husband Juan and I love enjoying toast with jam in the mornings, so I literally make a loaf of bread every week.
Sometimes it’s this foolproof soft, fluffy gluten-free bread, other times it’s a more fiber-rich buckwheat bread, and most recently, it’s been this easy brown rice bread.
")
Super Easy Brown Rice Bread
When I say this loaf of gluten-free bread is super easy to make, I’m really not kidding. It’s all a matter of mixing wet ingredient with dry ingredients and then letting the dough rise before baking.
This recipe is also completely gluten-free and dairy-free, which means that even those who are Celiac or have gluten or lactose intolerances can enjoy a large slice of homemade bread!
")
Why This Recipe Works
Unlike breads with gluten, in this gluten-free yeast bread recipe there’s no kneading involved, no double rise required, and trust me when I say that this bread always comes out great. Plus, it has a beautiful dome shape that I absolutely love!
Even if you don’t have access to affordable gluten-free flour blends, you can still make this recipe, because no flour blend is required! The only flour you’ll need in this recipe is brown rice flour.
")
Make Your Own Brown Rice Flour
One of the key ingredients in this recipe is brown rice flour, and it’s really simple to make your own in just minutes! All you need is brown rice, a high-speed blender, and a fine-mesh sieve.
Check out my easy tutorial on how to make brown rice flour and learn to make your own homemade rice flour today!
")
Ingredients You’ll Need:
This is a visual overview of the ingredients you’ll need. For the specific quantities and measurements, please refer to the recipe card at the bottom of this post.
")
Ingredient Notes/Substitutes:
- Brown Rice Flour: I like making my own 5-minute homemade brown rice flour, but you can easily buy it online instead. Since this recipe is specifically to make brown rice bread, I wouldn’t recommend swapping it with white rice flour, as the textures are different (white rice flour is starchier than brown rice flour). If you would like to make this with other gluten-free flours with a texture similar to brown rice flour, you can use millet flour or sorghum flour in equal quantities.
- Sunflower Oil: I used sunflower oil because that’s what I always have on hand. Alternatively, you can use any neutral vegetable oil.
- Psyllium Husk Powder: Psyllium husk powder is essential in the recipe for binding the ingredients and creating the beautiful dome-shape loaf, and I do NOT recommend substituting it with any other ingredient. If you have psyllium husks, you can grind very finely to get a fine psyllium husk powder.
- Sugar: Sugar is required as food for the yeast to feed on so the yeast will be activated and make the bread rise. Do not leave it out.
- Instant Yeast: I like using instant yeast because it doesn’t need to be activated beforehand.
- Xanthan Gum: Since this is a gluten-free recipe, xanthan gum is required as a replacement for gluten to help bind the ingredients together.
- Baking Powder: In addition to the yeast, baking powder helps to give the loaf a little more rise to make it fluffier.
- Eggs: I have not tested this recipe with an egg-replacer, so I don’t know how it will turn out. (If you do try it without eggs, please leave a comment letting me know how it goes, thank you!)
How to Make Brown Rice Bread (Step by Step)
1. Grease
Grease an 8″x4″ metal loaf pan.
")
2. Whisk Dry Ingredients
In a large mixing bowl, whisk the brown rice flour, psyllium husk powder, instant yeast, sugar, baking powder, xanthan gum, and salt together.
")
3. Add Liquid Ingredients to Form Dough
Add the warm water, sunflower oil, and eggs to the dry ingredients and mix well to get a wet and shaggy dough (the dough is supposed to be shaggy, so don’t worry).
")
4. Transfer to Pan
Transfer the dough to the greased loaf pan and smooth out the top with a wet spatula.
")
5. Let Dough Rise
Cover the dough pan with a kitchen towel and let the dough rise approximately 30 to 40 minutes in a warm, draft-free place until it has almost doubled in size. (Tip: I like to place the loaf pan in my microwave with the power off – it creates the perfect draft-free and warm environment for rising dough).
")
6. Preheat Oven
During the last 10 minutes of the dough rising, preheat oven to 350F and adjust the oven rack to the middle position.
7. Bake
Bake the dough for 40 to 50 minutes until bread has turned dark brown on top and the loaf sounds hollow when tapped. Remove loaf from the oven.
")
8. Cool Completely Before Slicing
Let the loaf cool for 10 minutes in the loaf pan, before removing and letting it cool completely on the wire rack. Slice only once the loaf has completely cooled.
")
Dish by Dish Tips and Tricks
- Use a Metal Pan: I highly recommend using a metal loaf pan as it will ensure that the bottom and sides of your loaf will be uniformly brown, and that the bottom of the bread is fully-cooked does not stick to the pan (which may happen if you use a glass loaf pan).
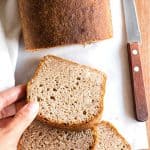
- Use a Serrated Knife to Slice: Make sure to use a serrated bread knife (a knife with ridges) to slice the loaf to prevent the loaf from being squashed (which will happen if you use a knife with smooth edges).
- Slice and Freeze: A tip to ensure you have sliced bread ready always is to slice the bread and then wrap it in plastic wrap and freeze. Whenever the craving strikes for homemade bread, simply remove a slice or two and toast!
Recipe FAQs:
Since this recipe is specifically to make brown rice bread, I wouldn’t recommend swapping it with white rice flour, as the textures are different (white rice flour is starchier than brown rice flour). If you would like to make this with other gluten-free flours with a texture similar to brown rice flour, you can use millet flour or sorghum flour in equal quantities.
To store this bread, simply place the bread in an airtight container and store in the refrigerator for up to 5 days.
Yes, of course you can freeze this gluten-free rice bread. Simple wrap the cooled loaf in plastic wrap and then freeze for up to 3 months. Let the bread thaw completely overnight in the refrigerator before slicing.
")
Other Bread Recipes You’ll Love:


P.S. If you try this recipe, I’d love for you to leave a star rating below, and/or a review in the comment section further down the page. I always appreciate your feedback. Be sure to check out my entire Recipe Index for all the recipes on the blog. You can also follow me on Pinterest, Facebook or Instagram! Sign up for my Email List to get fresh recipes in your inbox each week!
Soft, Fluffy Brown Rice Bread (Gluten-Free, Dairy-Free)
- Total Time: 1 hour 40 minutes
- Yield: 12 servings 1x
- Diet: Gluten Free
Description
This soft and fluffy brown rice bread is simple to make, and is great for making sandwiches, or toasting and spreading with butter and jam. Made with brown rice flour for extra fiber, this easy yeast bread is totally gluten-free and dairy-free too.
Ingredients
- 2 cups brown rice flour
- 1 3/4 cups warm water (approximately 105F – 115F)
- 1/4 cup sunflower oil
- 1/4 cup psyllium husk powder
- 1 tablespoon instant yeast
- 2 tablespoons sugar
- 3/4 teaspoons xanthan gum
- 2 eggs, room temperature
- 1 teaspoon baking powder
- 1/2 teaspoon salt
Instructions
- Grease: Grease an 8″x4″ metal loaf pan.
- Whisk Dry Ingredients: In a large mixing bowl, whisk the brown rice flour, psyllium husk powder, instant yeast, sugar, baking powder, xanthan gum, and salt together.
- Add Liquid Ingredients: Add the warm water, sunflower oil, and eggs to the dry ingredients and mix well to get a wet and shaggy dough (the dough is supposed to be shaggy, so don’t worry).
- Transfer to Pan: Transfer the dough to the greased loaf pan and smooth out the top with a spatula.
- Let Dough Rise: Cover the dough pan with a kitchen towel and let the dough rise approximately 30 to 40 minutes in a warm, draft-free place until it has almost doubled in size. (Tip: I like to place the loaf pan in my microwave with the power off – it creates the perfect draft-free and warm environment for rising dough).
- Preheat Oven: During the last 10 minutes of the dough rising, preheat oven to 350F and adjust the oven rack to the middle position.
- Bake: Bake the dough for 40 to 50 minutes until bread has turned dark brown on top and the loaf sounds hollow when tapped. Remove loaf from the oven.
- Cool Completely: Let the loaf cool for 10 minutes in the loaf pan, before removing and letting it cool completely on the wire rack. Use a serrated bread knife to slice once the loaf has completely cooled.
Notes
- Brown Rice Flour: I like making my own 5-minute homemade brown rice flour, but you can easily buy it online instead. Since this recipe is specifically to make brown rice bread, I wouldn’t recommend swapping it with white rice flours, as the textures are different (white rice flour is starchier than brown rice flour). If you would like to make this with other gluten-free flours with a texture similar to brown rice flour, you can use millet flour or sorghum flour in equal quantities.
- Warm Water: Make sure your water is between 105F – 115F. The water needs to be warm enough to activate the yeast, but not so hot that it kills the yeast.
- Sunflower Oil: I used sunflower oil because that’s what I always have on hand. Alternatively, you can use any neutral vegetable oil.
- Psyllium Husk Powder: Psyllium husk powder is essential in the recipe for binding the ingredients and creating the beautiful dome-shape loaf, and I do NOT recommend substituting it with any other ingredient. If you have psyllium husks, you can grind very finely to get a fine psyllium husk powder.
- Sugar: Sugar is required as food for the yeast to feed on so the yeast will be activated and make the bread rise. Do not leave it out.
- Instant Yeast: I like using instant yeast because it doesn’t need to be activated beforehand.
- Xanthan Gum: Since this is a gluten-free recipe, xanthan gum is required as a replacement for gluten to help bind the ingredients together.
- Baking Powder: In addition to the yeast, baking powder helps to give the loaf a little more rise to make it fluffier.
- Eggs: I have not tested this recipe with an egg-replacer, so I don’t know how it will turn out. (If you do try it without eggs, please leave a comment letting me know how it goes, thank you!)
- Use a Serrated Knife to Slice: Make sure to use a serrated bread knife (a knife with ridges) to slice the loaf to prevent the loaf from being squashed (which will happen if you use a knife with smooth edges).
- Storing/Freezing: To store, place the loaf in an airtight container and store in the refrigerator for up to 5 days. To freeze, wrap the cooled loaf in plastic wrap and freeze for up to 3 months. Let frozen loaf thaw completely in the refrigerator overnight before slicing.
- Adapted from: Eat Beautiful
- Prep Time: 10 mins
- Rising Time: 40 mins
- Cook Time: 50 mins
- Category: Bread
- Method: Baking
- Cuisine: American
First GF baking attempt – FAIL.
But I won’t give up. This HAS to work. I have had to research GF baking because my husband can’t tolerate corn in any form (incl maize) which is in everything gluten free. However our one go to bread at market has been repackaged with new ingredients of 2 types of corn in it. My husband was having a meltdown – because what’s he going to eat now.
I went on Pinterest and found this recipe brown rice flour bread.
I bought all the ingredients yesterday so not expired and I ground my own rice (but I only have a nutribullet) it took ages. Might go buy that if I can find it. GF creativity in South Australia is still very much developing. I also found tapioca flour which is in his old bread. Have to see if there is a recipe that includes that.
Anyway I followed this recipe to the letter.
But The mixture was incredibly wet. That is far too much water in the recipe. It seems like a mistype that amount can’t be right. I thought about lessening the amount of water but as I’ve never cooked GF I thought I’d better follow the recipe. Mixture was just too wet. Not at all shaggy (had to Google that term).
The dough did rise however – above my loaf tin so therefore it got stuck to the kitchen towel (tea towel) covering it. So I think as I had to scrape it off the towel and fix the top this was a mistake. It did take a lot longer too to rise.
So when I put it in the oven to bake it seems the mixture is just too wet and the top has hardened and gone dark but it’s fallen in the middle. I love baking and am not used to a cake sinking in the middle. So this was rather disappointing. But it has to be the amount of water. I wanted to stop at 1 cup of water! But I was following the recipe. Why is there so much water in this?? Also when the loaf was cooling there was condensation in the tin – it literally poured out. It has to be the water content.
I may have to try again and just use my judgement for the water amount.
Thanks
Hi Merissa, thanks for sharing your feedback. Sorry to hear that your husband’s favorite supermarket bread now has corn and he can’t eat it. Let’s try to troubleshoot so you can make this brown rice bread work for him. From what you mentioned, yes it does seem that your dough a little too wet. That can be due to the humidity in the place where you live (and if you’re in summer or winter). Also, you can reduce the amount of water to 1 1/4 cup first, and then add more if necessary. Reducing the amount of water will help the bread rise a little slower but have better structure so it doesn’t sink after baking.
Hope this helps, and happy holidays!
Hi again. I have experimented with this recipe several ways making it 5 times now. But every single time the loaf sinks in the middle -every time. Less water. More water. Longer proofing. Taller loaf tin. Different humidity areas for the proofing. Different coverings over the tin for proofing. I follow the recipe to the letter – I’m back at about 1&1/2 cup water. But always once it gets in the oven and close to end of baking it sinks in the middle. Once it comes out of oven it’s baked and crusty but the middle is sunken in always. There is no nice rounded dome top. What is wrong with it? Is there a different recipe you could suggest? I prefer to use instant yeast as it’s already activated. This recipe is so easy I just wish it worked. I’d love to add a photo of it but I don’t think I can.
Hi Merissa, I’m not sure why it didn’t work for you, but here’s a recipe you can try that works well for many readers. Buckwheat bread: https://www.dishbydish.net/soft-fluffy-buckwheat-bread/ (feel free to swap out the buckwheat flour for brown rice flour if you prefer).
I did this recipe and the bread rose higher than the one shown on your picture !!! I’ m very happy. So far, so Gooood !!!
Hi Mike! So happy to hear that your bread rose well! Thanks for sharing how it went, and hope to see you around the blog again sometime soon!
Finally after literally years of trying rice bread recipes that only rose a little, I have had success with this recipe. As it says, it is soft and fluffy. I substituted flax seed meal for psyllium husks. Thank you for the recipe.
YAY! So happy to hear that Nancy!! Glad you loved this brown rice bread recipe, see you on the blog again sometime soon! 🙂
Can this bread be made in a bread machine using the gluten free program?
Hi Joan! Sorry for the late reply, it’s been a busy few weeks! Yes, you can make this in the bread machine using the gluten-free setting 🙂 Hope you enjoy it!
I tried making this recipe overall it needed a longer proof time but, I baked them off and when I cut into them I found the middle to be a lovely shade of purple, Is that normal I followed the recipe almost exactly, I used fresh yeast instead of instant, and avocado oil. it tastes fine but just a weird color change during the baking process. thanks for your time 🙂
Hi Justin! Depending on the psyllium husk powder you used, it might have caused the bread to turn purple. Some brands of psyllium husk powder do that for some weird reason. I recommend the brand NOW psyllium husk powder as I know it doesn’t turn breads or baked goods purple. Hope this helps!
This is an excellent recipe, by far the best gluten free loaf- type recipe I’ve tried. Easy to make and relatively inexpensive. I make it weekly now. And thanks for the tip on using the microwave as a proving drawer!
Hi Heather! So happy to know you enjoy this brown rice bread and that it’s your weekly loaf! Thanks for letting me know how it went, and hope to see you around the blog again sometime soon!
Hi Felicia, I tried this last night and so badly wanted it to
turn out but it was completely wet. I tried lowering the temp after the initial 50 minutes and letting it bake longer, but it never hardened. Is it really 1 3/4 cups water? I live in Taiwan, maybe the humidity and amount of water was too much? Wondering if you have had this issue before? Thanks!
Hi Sara, this could depend on the type of GF flour blend, humidity etc. But it does sound like your bread dough was very wet, so you can try reducing the amount of water to just 1 1/2 cups instead. Hope this helps!
I’m in the UK, cup measures don’t usually work for me, but this recipe worked brilliantly! First time I’ve successfully made gluten free bread, even my partner enjoyed it, which is rare. This is definitely on our regular baking list. Thank you!
So happy to hear that the cup measures worked for you Shana! Glad you and your partner enjoyed this brown rice bread. Hope to see you around the blog again sometime soon!
xx,
Felicia
I tried this bread and it came out very wet and bitter tasting. It tasted like yeast. Any ideas of what could have gone wrong? This is my first gluten free bread attempt.
Hi Kelsey, seems like your dough was very wet (that may be affected on the humidity where you live and season you’re in). I suggest reducing the amount of water by 1/4 cup. You may also want to bake your bread for another 10 minutes if you find that it’s not fully cooked when you take it out.
This recipe restored my faith in gluten free baking. The bread is moist, springy and a bit chewy. I like it way better than Udi’s! Not only is the result is great, it’s easy enough that I will actually do it properly, instead of trying to cut corners. I loved not having to fuss over complicated flour blends.
The psyllium husk was a bit expensive, but I’m glad I used it. Overall, making this recipe is a lot less expensive than buying pre-made gluten-free bread.
I soaked some flax seeds in water, mixed then with oil, and spread that on top of the bread after rising, and I liked how that came out.
Hi RA, glad to hear that you enjoyed this gluten-free brown rice bread 🙂 Makes me so happy to know that it restored your faith in GF baking 🙂 Thanks for sharing the tip about adding flax seeds on top of the loaf, sounds beautiful!
Hope to see you around the blog again sometime soon!
I tried this recipe and followed it to the letter and mine too came out very cakey, slightly sweet and very heavy and dense. I used everything as per the recipe and followed the instructions. How do you get air in to make it light and how long do you mix the ingredients for?
Hi Carol, let’s troubleshoot. Did you use yeast? And did the dough rise? Sometimes depending on the humidity (or lack of) and room temperature of where you live, the dough might take a longer time to rise. If you are in winter, your dough might take up to double the amount of time to rise before it should be baked. I usually mix the ingredients by hand, maybe 1-2 minutes.
So what am I doing wrong this loaf whilst tastes OK it is quite heavy and is more cake like its definitely not breadlike? I’ve tried the oat one and this rice flour one but am not doing very well to be honest! I’m looking for something that toasts well and something that I can make a sandwich out ofthe oat one fell to bits on toasting Help! I too am at the beginning of my journey into wheat free due to stomach issues and reducing my carbs due to diabetes
Hi Jo, let’s troubleshoot.
For the brown rice bread, it’s definitely NOT like cake at all… Do you know if your yeast was expired? Check if your yeast is working by combining the yeast, warm water and sugar in a small bowl and mix well, then let it sit for 5 minutes in a warm place. If the yeast is working, the mixture should be foamy after 5 minutes, if not, throw out the yeast and get a new packet.
Regarding the honey oat bread, may I know which gluten-free flour blend you used? I recommend Cup4Cup gluten-free flour (it’s a 1:1 gf flour that substitutes normal wheat flour exactly). Also, make sure that the blend you use has xanthan gum (which is a replacement for gluten and helps to bind the ingredients together). If your flour blend doesn’t include xanthan gum, it could be the reason that your bread didn’t hold together. Use 1/4 teaspoon of xanthan gum for each cup of gluten-free flour when baking.
Hope this helps!
I substituted the eggs for flax eggs to make the recipe vegan and have to say out of the many bread recipes I’ve tried, this is by far one of the best bread recipes ever. My bread is soft and moist!
Hi Chris! So happy to hear that this recipe worked so well with flax eggs too. Thanks for letting me know, and I hope to see you around the blog again sometime soon!
xx,
Felicia
Absolutely brilliant, soft tasty ,morish and light. Love this recipe. Thank you so much.
Hi Dawn! So happy to hear you enjoyed this brown rice bread, and thanks for your lovely feedback! Hope to see you around the blog again sometime soon!
xx,
Felicia
I will try this recipe without egg whites (I am intolerant to egg whites.)
I would just point out that a recipe containing eggs is NOT dairy free so this is misleading
Hi Linda, the definition of dairy is anything that contains milk, and eggs are not milk. This recipe is definitely dairy-free, but it is not egg-free.
Hi, I tried this twice today. Once with flax egg and once with Aquafaba. I misread how much yeast in the teybwith the flax egg so there was no rise at all. oops….. the 2nd try with the aquafaba, had a great rise but fell in the oven. I am not sure what happened…. it is soft and slightly chewy and the 6 year old will eat it. So for now this works! Thank you!
Hi Annie! Glad to have you here, and to hear that this brown rice bread recipe worked with the aquafaba (YAY that the 6 year old will eat it!). From what you mentioned about it having a great rise but falling in the oven, it sounds like your bread dough might be too wet. So my suggestion would be to reduce the amount of water/liquid used by 1/4 cup. With the reduction in liquid, the dough will take a little longer to rise, but it should hold its domed shape. Hope this helps!
xx,
Felicia
Hi Felicia! I too am just staring my Gluten Free and Dairy Free journey…. I am wondering if at some point you could experiment with measurements to fit 9×5 loaf pans with the same beautiful domed shape? I , for one, would certainly appreciate it !!! THANKS !!!
Hi Kristin, thanks for your feedback! I’ll try to experiment with measurements that fit a 9×5 loaf pan in the future. Glad to have you here and hope to see you on the blog again sometime soon!
My family and I are just starting a gluten free diet because of health issues so I hope you can please help me out… I’ve tried at least 10 different recipes for bread and they have ALL turned out gritty, like eating sand 🙁 I’ve tried different flours and methods and I really don’t know what to do since most of the recipes say it’s the “best” bread. My chickens have been enjoying the breads, LOL, instead of my family!
So, with all that said, does this recipe gave a gritty taste? I just don’t want to waste more ingredients. Than you for your help ahead of time!
Hi Mary! So sorry to hear going GF hasn’t been easy. I know that it’s a journey with a steep learning curve. This bread recipe definitely does not have a gritty taste, and it results in a soft and fluffy loaf. You can read other comments to see what others say about it. I hope you enjoy it as much as we do!!