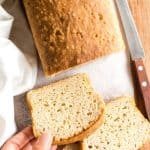
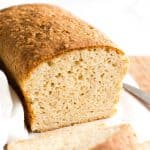
Soft, Fluffy Sorghum Bread (Gluten-Free, Dairy-Free)
Incredibly soft, tender and fluffy, this easy sorghum bread is perfect for making sandwiches or toast. We love spreading it with homemade jam, or making avocado toast with it. Totally gluten-free and dairy-free, but no one would know. You’ll be making this delicious yeast bread recipe on repeat, so bake a loaf or two and freeze to enjoy homemade bread anytime!
")
Want to save this recipe?
Enter your email & I’ll send it to your inbox. Plus, get great new recipes from me every week!
Homemade Bread is the Best
I’m a BIG fan of making homemade bread – and at least once a week, we bake a loaf of bread.
Sometimes we bake quick breads such as this super popular easy honey oat bread, this low-carb almond flour bread, or this easy coconut flour bread.
Other times we bake yeast breads such as this favorite soft gluten-free white bread, this tender brown rice bread, or this fluffy buckwheat bread, or this tasty rosemary focaccia bread.
Mostly, I’m always testing and developing new bread recipes to try, because baking bread is my passion. And this time, we’re making sorghum flour bread.
")
What is Sorghum?
If you’ve never heard of sorghum (also known as ‘jowar’) before, here’s a quick background of this grain.
An ancient cereal grain that belongs to the Poaceae plant family, sorghum is the fifth most-produced cereal crop in the world.
Although it is still relatively uncommon in the western world, sorghum is highly popular in Australia, India and other Southeast Asian countries.
Is Sorghum Gluten-Free?
Given that sorghum is naturally gluten-free, it makes it a great grain alternative for those with Celiac disease or have gluten intolerances or allergies.
")
Making Gluten-Free Bread with Sorghum Flour
In its whole grain form, sorghum can be cooked in the same way as rice or quinoa. Alternatively, sorghum is often milled to produce sorghum flour (jowar flour), which is a great alternative gluten-free flour for making gluten-free baked goods.
From cookies and muffins, to cakes and even breads, there are just so many different ways to bake with sorghum flour.
I made these gluten-free sorghum graham crackers with sorghum flour a long time ago, and this time, I decided to bake a loaf of bread with sorghum flour. After testing this recipe, I’m so happy to share it with you! It’s become a favorite bread recipe at home, and I’m sure you’ll enjoy it too!
")
Why You’ll Love This Recipe:
- Simple Ingredients: The ingredients required for making this sorghum flour bread are easily accessible at the local grocery stores.
- Super Easy to Make: All you need to do is mix the dry ingredients together before adding the wet ingredients to form a dough, which is allowed to rise before baking.
- Perfect Fluffy Texture: For me, the perfect gluten-free bread must be soft and fluffy (and we know many store-bought gluten-free breads are usually hard, dense and way too expensive!). Fortunately, this easy jowar bread recipe always results in a light and tender loaf that we love eating in sandwiches, or toasting and spreading with homemade jam.
- Totally Gluten-Free & Dairy-Free: The best part is that this sorghum bread recipe is totally gluten-free and dairy-free too, which means that even those with Celiac disease or gluten or lactose intolerances can enjoy it without issues!
")
Ingredients You’ll Need:
Here’s a visual overview of the ingredients required for making this easy sorghum bread recipe.
(For exact measurements, please scroll down to the printable recipe card at the bottom of this post.)
")
Ingredient Notes + Substitutions:
- Gluten-Free All-Purpose Flour: I recommend that you use a good-quality gluten-free flour blend that is made up of lighter flours/starches (such as rice flour, tapioca starch, corn starch or potato starch) as this result in a lighter and fluffier texture. I do NOT recommend using flour blends that include heavier flours such as garbanzo bean flour (as this will result in a denser texture).
- Xanthan Gum: Xanthan gum is what replaces gluten in gluten-free flours, and is necessary for binding the ingredients and giving the flour more elasticity. If your gluten-free flour blend does not already include xanthan gum, make sure you use it.
- Psyllium Husk Powder: Psyllium husk powder is basically whole psyllium husks that have been ground into a fine powder. This gives the bread more elasticity and helps it hold its shape after rising. If you don’t have access to psyllium husk powder, you can make your own by grinding whole psyllium husks in a high-speed blender or coffee grinder until very fine.
- Sorghum Flour: In this case, sorghum flour is the star ingredient in this sorghum bread recipe. However, you can also make other bread variations by substituting the sorghum flour with buckwheat flour, quinoa flour, brown rice flour, or amaranth flour in equal quantities.
- Baking Powder: Baking powder helps to give the dough a little more lift as it bakes in the oven. Make sure to use gluten-free baking powder if you’re Celiac or gluten-intolerant.
- Instant Yeast: I like using instant yeast as no activation time is required. If you don’t have instant yeast, make sure to activate the yeast beforehand.
- Sugar: The sugar is required as food for the yeast to feed on and be activated, so do not leave it out!
- Sunflower Oil: I use sunflower oil because I always have a bottle of it on hand. However, you may also use other neutral-flavored oils in equal quantities instead.
- Apple Cider Vinegar: The acidity from the apple cider vinegar in combination with baking powder creates a reaction that results in more lift in the dough. If you don’t have ACV, feel free to use other types of edible vinegar instead.
- Warm Water: Make sure to use warm water with a temperature between 105 to 115F. The yeast requires a warm environment to be activated, but if the water is too hot it may kill the yeast.
- Eggs: Eggs help to better bind the ingredients as well as give the bread more lift. I personally haven’t tried making this bread recipe without eggs or using an egg-substitute. If you do so, please let me know how it goes!
How to Make Sorghum Bread (Step by Step):
Prepare Sorghum Bread Dough and Transfer to Pan

Grease Pan: Grease an 8″x4″ metal loaf pan.
")
Whisk Dry Ingredients: In a large mixing bowl, whisk the gluten-free all-purpose flour, xanthan gum (if using), sorghum flour, psyllium husk powder, baking powder, salt, instant yeast, and sugar together until combined.

Add Wet Ingredients: Add the sunflower oil, apple cider vinegar, warm water, and eggs. Beat well to combine for a minute or two until you get a dough that resembles thick cake batter (the dough will be sticky and wet, but that’s completely normal for gluten-free bread dough).

Transfer Dough to Loaf Pan: Transfer the sorghum bread dough to the previously greased loaf pan and smooth out the top with the back of a wet spatula.
Let Dough Rise and Bake Until Golden

Let Dough Rise and Preheat Oven: Cover the pan with a kitchen towel and let the dough rise for 30 to 40 minutes in a warm, draft-free place until the dough has roughly doubled in size. Towards the end of the rise, preheat the oven to 350F and arrange the oven rack to the middle position. .

Bake Until Golden Brown: Once the dough has doubled in size, bake it in the preheated oven for 40 to 50 minutes until the top is golden brown and the bread sounds hollow when tapped.

Let Loaf Cool Completely Before Slicing: Allow the sorghum bread to cool for 10 minutes in the pan before removing and then let it fully cool on a wire rack before slicing with a ridged knife.
Dish by Dish Tips/Tricks:
- Use a Metal Loaf Pan: I recommend using a metal loaf pan to ensure that all sides of the sorghum flour bread get cooked evenly and have a nice golden brown color. I do NOT recommend baking this bread in a glass pan as the bottom of the loaf may not cook properly and may end up sticking to the pan.
- Smooth the Top: Once the dough is in the pan, you can use the back of a wet spatula to smooth it out, or dip your fingers in water and smooth the dough out with wet fingertips.
- Allow Bread to Cool Completely: When the sorghum flour bread is done baking, make sure to let it cool completely as it will continue cooking for a few minutes with the residual heat. Cooling the gluten-free bread completely will also ensure you do not get a gummy middle.
- Use a Ridged Knife for Slicing: The best knife for slicing bread is a bread knife (a knife with a ridged edge). I do NOT recommend using a smooth knife as it will cause the bread to be flattened when you try to cut it.
")
Recipe FAQs:
To store, place this gluten-free sorghum flour bread in an airtight container and store in the refrigerator for up to 5 days.
Yes, you can freeze this bread. To freeze, wrap the sorghum flour bread (jowar flour bread) in plastic wrap and then freeze for up to 3 months. Let the bread thaw completely in the refrigerator overnight before slicing.

Other Yeast Bread Recipes You’ll Enjoy:
- Soft Gluten-Free White Bread (Dairy-Free)
- Fluffy Buckwheat Bread (Gluten-Free, Dairy-Free)
- Millet Bread (Gluten-Free, Dairy-Free)
- Teff Bread (Gluten-Free, Dairy-Free)
- Tender Brown Rice Bread (Gluten-Free, Dairy-Free)
- Rosemary Focaccia Bread (Gluten-Free, Vegan)
- Soft, Fluffy Dinner Rolls (Gluten-Free, Dairy-Free)
Gluten-Free Bread Recipes to Bake:


Soft, Fluffy Sorghum Bread (Gluten-Free, Dairy-Free)
- Total Time: 1 hour 35 minutes
- Yield: 12 slices 1x
- Diet: Gluten Free
Description
Incredibly tender and fluffy, this easy sorghum bread recipe is perfect for making sandwiches or toast. We love spreading this bread with homemade jam, or making avocado toast with it. Totally gluten-free and dairy-free, you’ll be making this delicious sorghum flour bread on repeat. Bake a loaf or two and freeze to enjoy homemade bread anytime!
Ingredients
- 1 3/4 cups gluten-free all-purpose flour
- 1 teaspoon xanthan gum (omit if your gluten-free flour blend already includes it)
- 1/2 cup sorghum flour
- 2 tablespoons psyllium husk powder
- 1 teaspoon baking powder
- 2 1/4 teaspoons instant yeast
- 2 tablespoons granulated white sugar
- 1 teaspoon salt
- 1/3 cup sunflower oil
- 1 teaspoon apple cider vinegar
- 1 1/2 cups warm water (approximately 105 – 115F)
- 2 large eggs, room temperature, beaten
Instructions
- Grease the Pan: Grease an 8″x4″ metal loaf pan.
- Whisk Dry Ingredients: In a large mixing bowl, whisk the gluten-free all-purpose flour, xanthan gum (if using), sorghum flour, psyllium husk powder, baking powder, salt, instant yeast, and sugar together until combined.
- Add Wet Ingredients: Add the sunflower oil, apple cider vinegar, warm water, and eggs. Beat well to combine for a minute or two until you get a dough that resembles thick cake batter (the dough will be sticky and wet, but that’s completely normal for gluten-free bread dough).
- Transfer Dough to Pan: Transfer the bread dough to the previously greased loaf pan and smooth out the top with the back of a wet spatula.
- Let Dough Rise: Cover the pan with a kitchen towel and let the dough rise for 30 to 40 minutes in a warm, draft-free place until the dough has roughly doubled in size.
- Preheat Oven: While the dough rises, preheat the oven to 350F and arrange the oven rack to the middle position.
- Bake Until Golden Brown: Once the dough has doubled in size, bake it in the preheated oven for 40 to 50 minutes until the top is golden brown and the bread sounds hollow when tapped.
- Let Cool Completely: Allow the loaf to cool for 10 minutes in the pan before removing and then let it fully cool on a wire rack before slicing with a ridged knife.
Notes
- Gluten-Free All-Purpose Flour: I recommend that you use a good-quality gluten-free flour blend that is made up of lighter flours/starches such as rice flour, tapioca starch, corn starch or potato starch (as this result in a lighter and fluffier texture). I do NOT recommend using flour blends that include heavier flours such as garbanzo bean flour (as this will result in a denser texture).
- Xanthan Gum: Xanthan gum is what replaces gluten in gluten-free flours, and is necessary for binding the ingredients and giving the flour more elasticity. If your gluten-free flour blend does not already include xanthan gum, make sure you use it.
- Psyllium Husk Powder: Psyllium husk powder is basically whole psyllium husks that have been ground into a fine powder. This gives the bread more elasticity and helps it hold its shape after rising. If you don’t have access to psyllium husk powder, you can make your own by grinding whole psyllium husks in a high-speed blender or coffee grinder until very fine.
- Sorghum Flour: In this case, sorghum flour is the star ingredient as we’re making sorghum bread. However, you can also make other bread variations by substituting the sorghum flour with buckwheat flour, quinoa flour, brown rice flour, or amaranth flour in equal quantities.
- Baking Powder: Baking powder helps to give the dough a little more lift as it bakes in the oven. Make sure to use gluten-free baking powder if you’re Celiac or gluten-intolerant.
- Instant Yeast: I like using instant yeast as no activation time is required. If you don’t have instant yeast, make sure to activate the yeast beforehand.
- Sugar: The sugar is required as food for the yeast to feed on and be activated, so do not leave it out!
- Sunflower Oil: I use sunflower oil because I always have a bottle of it on hand. However, you may also use other neutral-flavored oils in equal quantities instead.
- Apple Cider Vinegar: The acidity from the apple cider vinegar in combination with baking powder creates a reaction that results in more lift in the dough. If you don’t have ACV, feel free to use other types of edible vinegar instead.
- Warm Water: Make sure to use warm water with a temperature between 105 to 115F. The yeast requires a warm environment to be activated, but if the water is too hot it may kill the yeast.
- Eggs: Eggs help to better bind the ingredients as well as give the bread more lift. I personally haven’t tried making this bread recipe without eggs or using an egg-substitute. If you do so, please let me know how it goes!
- Storing/Freezing: To store, place the bread in an airtight container and store in the refrigerator for up to 5 days. To freeze, wrap the bread in plastic wrap and then freeze for up to 3 months. Let the bread thaw completely in the refrigerator overnight before slicing.
- Prep Time: 5 mins
- Rising Time: 40 mins
- Cook Time: 50 mins
- Category: Bread
- Method: Baking
- Cuisine: American


I’ve made this recipe several times and is it all time favorite! im curious though. could I use this recipe to make hot dog and hamburger buns?
Hi Kimberlee! Yay! So happy to hear that you love this Sorghum bread, and yeah, I definitely think you could use hot dog bun molds and round hamburger molds to make hot dog buns and hamburger buns! You might have to reduce the baking time a little though.
Hi, do you think I could use spelt and/or rye flour instead of the flour blend?I have to avoid corn/maize (as my doc says it contains gluten!) and most gf flour blends available in the UK contain maize/corn? Thank you 🙂
Hi Emma, if you have a gluten intolerance or allergy or Celiac disease, DO NOT use spelt or rye flour (both contain gluten!). Corn and maize are naturally gluten-free, which is why gluten-free flour blends use corn/maize, and unless you have an allergy to corn, you will be able to take them perfectly. I don’t understand why your doctor says that corn contains gluten, which is definitely not the case. Happy baking, and I wish you all the best in your GF journey!
Not sure yet. It rose in the pan before baking. Now it’s overflowing the 8” x 4” pan all over. I put a pan below it to catch most of the flow.
Hi Cookin, it seems like your dough might have been too wet (this will depend on the humidity of where you live, the season you’re in etc), but it could also depend on the gluten-free flour blend you use. What you can do if you bake it again is to reduce the amount of water by 1/4 cup so that you get a thicker dough that will take a longer time to rise, but will definitely not spill over from the pan. Also, with GF baking, it’s usually a matter of rise, not a matter of time, so if you’re in a more humid, hotter environment, the dough will rise way faster than if you’re in a dry and cool environment.
For me, it can take anytime between 30 minutes to 1 hour depending on the season I’m in.