Soft Gluten-Free Dinner Rolls (Dairy-Free)
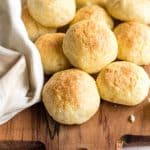
These gluten-free dinner rolls are soft and tender, super easy to make (no kneading required!), come out perfect every single time, and are also dairy-free, but nobody would know! Make these gluten-free yeast rolls for your Thanksgiving dinner, holiday gathering, or anytime you want to tear into a warm, homemade roll. Great with butter, olive oil, or even on their own!
")
Want to save this recipe?
Enter your email & I’ll send it to your inbox. Plus, get great new recipes from me every week!
Jump to:
- Baking Homemade Gluten-Free Bread
- The Search for Perfect Gluten-Free Yeast Rolls
- At Long Last – A Roll Recipe that Works Wonders!
- Why This Recipe Works
- Ingredients You’ll Need:
- Ingredient Notes/Substitutions:
- How to Make Gluten-Free Dinner Rolls (Step by Step)
- Dish by Dish Tips/Tricks:
- Recipe FAQs:
- Other Gluten-Free Breads You’ll Love:
- Gluten-Free Appetizers to Enjoy:
- Soft Gluten-Free Dinner Rolls (Dairy-Free)
Baking Homemade Gluten-Free Bread
I’ve spent the better part of this year baking plenty of gluten-free bread recipes, and have developed a few recipes that Juan and I have come to love and use frequently – from gluten-free no knead bread, to easy gluten-free naan bread, to rosemary focaccia bread and soft fluffy gluten-free sandwich bread.
You can literally say that I’m on a bread roll. (LOL. Pun totally intended).
All this while, I’ve also developed a few yeast breads that I’m mighty proud of (and have become favorites on the blog).
They include our popular soft buckwheat bread, this fluffy brown rice bread, and this delicious sorghum bread, and this lovely yeast quinoa bread.
The Search for Perfect Gluten-Free Yeast Rolls
In particular, I’ve been dead set on making the perfect gluten-free dinner rolls.
In fact, I’ve been obsessed with developing a roll recipe that is soft, light and fluffy, and actually looks and feels like a real white bread roll, as opposed to a hard ball of dough that you could play ping pong or go putting on the green with.
I can’t even remember how many failed roll recipes I’ve tried and thrown away immediately, or how many packets of yeast I’ve bought and used in my bread experiments.
")
At Long Last – A Roll Recipe that Works Wonders!
This little obsession of mine has been going on for months on end, and I have recipe notes written and scratched out, batches that went straight into the bin after coming out the oven, and other batches that were passable. But mostly, nothing to write home about.
Until now. I want to shout this from the rooftops, because I am over the moon about this amazing recipe for the best gluten-free dinner rolls ever!
This means that at the next holiday meal (whether during Thanksgiving, Christmas or Easter), those of us on a gluten-free diet can also enjoy a fluffy bread roll too!
If you can tell how excited I am about these fluffy gf dinner rolls, it’s because I am ECSTATIC that after more than half a year of recipe-testing, I’ve finally found THE RECIPE worth sharing with you.
")
Why This Recipe Works
- Easy to Make: This is possibly one of the simplest recipes I’ve made, so that means you don’t have to be an experienced gluten-free baker to get it right.
- Short Hands-On Time: Making these gluten-free bread rolls only requires 15-minutes of hands-on time, including shaping the dough (which if you’ve baked gluten-free bread before, you’ll know isn’t always easy).
- Quick Rise Time: Once shaped, all the dough needs is a single short 30-minute rise (no kneading required!), and into the hot oven it goes!
- Soft, Fluffy and Golden: Every single time I make these gluten-free soft dinner rolls, they come out golden brown and perfect – with the tender and fluffy texture worthy of earning their keep at any table.
- Totally Gluten-Free & Dairy-Free: Most importantly, these dinner rolls are totally gluten-free and dairy-free, since we’re using gluten-free flour instead of wheat flour, and using coconut oil instead of butter. This means even those who have Celiac disease or gluten and lactose intolerances can still enjoy a proper fluffy dinner roll.
")
Ingredients You’ll Need:
Here’s a visual overview of the ingredients required to make these gluten-free dinner rolls.
(For exact measurements, please scroll down to the printable recipe card at the bottom of this post.)
")
Ingredient Notes/Substitutions:
- Gluten-Free All-Purpose Flour: For this gluten-free dinner rolls recipe, I highly recommend using a gluten-free flour blend that is made up of lighter flours/starches (such as rice flour, corn starch, tapioca starch, or potato starch). This will ensure that you get a lighter and fluffier texture. I do NOT recommend blends that use heavier and denser flours such as garbanzo bean flour as it will result in a denser texture.
- Xanthan Gum: I use an extra teaspoon of xanthan gum even though the flour blend already contains xanthan gum, because this replaces the role of gluten as a binder and helps the flours to bind better and creates better texture.
- Baking Powder: I use baking powder in addition to yeast to give the rolls extra rise, which helps them to be a little lighter and fluffier in texture. If you are Celiac or gluten-intolerant, make sure to use certified gluten-free baking powder.
- Sugar: The sugar is required for the yeast to work, as it acts as the “food” for the yeast feed on so it will be activated and produce the gases needed to make the dough rise. In this case, I’ve used light brown sugar, but you can also use white sugar, cane sugar or dark brown sugar if you prefer.
- Instant Dry Yeast: I like using instant dry yeast in my baking because no proofing or activation is required. If you don’t have instant dry yeast (similar to rapid rise yeast), you can use active yeast, but make sure you dissolve the yeast in a mixture of warm water and sugar to activate it before using.
- Warm Water: Make sure the water you use is between 105F to 115F. (It’s important that the water is neither too hot nor too cold. The warmth is required to activate the yeast, but if the water is too hot it will kill the yeast.) Alternatively, you may also use warm milk instead of water if you prefer.
- Egg: This recipe requires the egg, without which it will come out dense and heavy. I haven’t tried it with egg replacers so I can’t guarantee it will work if you replace the egg.
- Apple Cider Vinegar: Since yeast usually likes an acidic environment, adding apple cider vinegar (ACV) will help the yeast work better and give the bread a better rise. If you don’t have ACV, you can use any other vinegar you have.
- Coconut Oil: I prefer using refined coconut oil for cooking because it has a more neutral taste (as opposed to extra virgin coconut oil which has a stronger coconut taste and smell). You may also use melted vegan butter if you prefer. Alternatively, if you are not lactose-intolerant, feel free to use melted butter in equal amounts.
- Egg Wash: Brushing egg wash over the rolls before baking them will ensure that they turn out golden brown and have a nice shine. To make egg wash, beat an egg with 1 teaspoon of water and mix well. Alternatively, you can also brush the rolls with olive oil.
How to Make Gluten-Free Dinner Rolls (Step by Step)
1. Mix Dry Ingredients
In a large mixing bowl, combine the gluten-free all-purpose flour, xanthan gum, salt, baking powder, sugar and instant dry yeast. Whisk well to combine.
")
2. Add Wet Ingredients
Add the warm water, beaten egg, apple cider vinegar and melted coconut oil to the large bowl and mix very well until you get a thick and homogeneous mixture (which will look more like cake batter instead of normal bread dough).

3. Divide Dough into Portions
Grease a 10″ x 7″ glass baking pan with nonstick cooking spray (I don’t find it necessary to use parchment paper, but if you wish, you can do so).
Use a large cookie scoop to scoop 12 equal portions of dough and place them in rows in the baking pan.

4. Shape Dough
Use greased hands to shape each portion of dough into small balls and place them in rows. Smooth the top of each dough ball with wet fingers.
")
5. Let Rise
Cover the pan with a kitchen towel or plastic wrap and let the dough rise for approximately 30 minutes in a warm place, until it has roughly doubled in size.
In the meantime, as the dough rises, preheat the oven to 350F and adjust rack to the middle position.
")
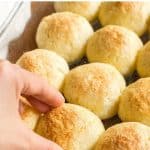
6. Brush Rolls and Bake
Once the dough has risen, brush the tops of the rolls with egg wash. Bake for 30 minutes until tops of the dinner rolls are golden brown.

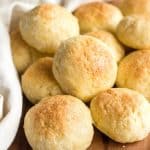
7. Cool and Enjoy
Remove from the oven and let the gluten-free bread rolls cool for at least 15 minutes before serving.
")
Dish by Dish Tips/Tricks:
- Grease Your Hands for Shaping Dough: Since this dough will be wet and sticky (as most gluten-free dough is and should be), make sure to grease your hands with oil before rolling the dough to prevent the dough from sticking to the palms of your hands. Greased hands also make rounder balls and gets the job done faster and easier.
- Smooth Tops of Dough Balls: If the dough balls are not completely smooth once you’re done shaping them, simply dip your fingers in water and smooth out the tops of the dough balls.
- Let the Rolls Cool Before Eating: As with all gluten-free baked goods, you’ll have to let these gluten-free rolls cool for at least 15 minutes before eating. If you don’t let it cool sufficiently, the starches in the bread won’t have time to set up properly, and you’ll end up with gummy bread (not good!). So patience is required, but you’ll be dearly rewarded.
- For Extra Fiber: If you want a bit more of fiber, feel free to substitute 1/2 cup of gluten-free all-purpose flour with brown rice flour. You can also add in 1/4 teaspoon of psyllium husk powder.
")
Recipe FAQs:
If not eating these gluten-free rolls immediately, place the gf dinner rolls in an airtight container or ziplock bag and store them in the fridge for up to 5 days. Reheat the rolls for a few seconds in the microwave before serving or eating.
Yes of course you can freeze these rolls! Simply wrap them in plastic wrap and freeze for up to 3 months. Heat up the bread rolls slightly in the microwave to thaw them before serving.
")
Other Gluten-Free Breads You’ll Love:
- Gluten-Free Artisan Bread (Dairy-Free)
- Soft, Fluffy Gluten-Free Bread (Dairy-Free)
- Pumpkin Dinner Rolls (Gluten-Free, Dairy-Free)
- Buckwheat Bread (Gluten-Free, Dairy-Free)
- Brown Rice Bread (Gluten-Free, Dairy-Free)
- Sorghum Bread (Gluten-Free, Dairy-Free)
- Yeast Quinoa Bread (Gluten-Free, Dairy-Free)
- Soft, Fluffy Low Carb Buns (Gluten-Free, Paleo)
- Super Easy Gluten-Free Pizza Crust (Dairy-Free)
- The Best Gluten-Free Focaccia (Dairy-Free)
Gluten-Free Appetizers to Enjoy:


P.S. If you try this recipe, I’d love for you to leave a star rating below, and/or a review in the comment section further down the page. I always appreciate your feedback. Be sure to check out my entire Recipe Index for all the recipes on the blog. You can also follow me on Pinterest, Facebook or Instagram! Sign up for my Email List to get fresh recipes in your inbox each week!
Soft Gluten-Free Dinner Rolls (Dairy-Free)
- Total Time: 1 hour 15 minutes
- Yield: 12 dinner rolls 1x
- Diet: Gluten Free
Description
These gluten-free dinner rolls are soft and tender, super easy to make (no kneading required!), come out perfect every single time, and are also dairy-free, but nobody would know! Make these gluten-free yeast rolls for your Thanksgiving dinner, holiday gathering, or anytime you want to tear into a warm, homemade roll. Great with butter, olive oil, or even on their own!
Ingredients
- 2 3/4 cups gluten-free all-purpose flour
- 1 teaspoon xanthan gum
- 1 teaspoon salt
- 1 teaspoon baking powder
- 1 1/2 tablespoons light brown sugar
- 2 1/4 teaspoons instant dry yeast
- 1 1/4 cups warm water (approximately 105F to 115F)
- 1 large egg, beaten
- 1 teaspoon apple cider vinegar
- 2 tablespoons melted coconut oil
- Egg wash, for brushing (optional)
Instructions
- Mix Dry Ingredients: In a large mixing bowl, combine the gluten-free all-purpose flour, xanthan gum, salt, baking powder, sugar and instant dry yeast. Whisk well to combine.
- Add Wet Ingredients: Add the warm water, beaten egg, apple cider vinegar, melted coconut oil, and mix very well until you get a thick and homogeneous mixture (which will look more like cake batter instead of normal bread dough).
- Shape Dough: Grease a 10″ x 7″ glass baking pan with nonstick cooking spray. Use a large cookie scoop to scoop 12 equal portions of dough and place them in rows in the baking pan. Use greased hands to shape each portion of dough into small balls and place them in rows. Use wet fingertips to smooth the tops of each ball of dough.
- Let Rise: Cover the pan with a kitchen towel or plastic wrap and let the dough rise for approximately 30 minutes in a warm, draft-free place, until it has roughly doubled in size. In the meantime, as the dough rises, preheat the oven to 350F and adjust rack to the middle position.
- Brush: Once the dough has risen, brush the tops of the rolls with egg wash.
- Bake: Bake for 30 minutes until tops of the dinner rolls are golden brown.
- Cool: Remove from the oven and let the bread rolls cool on a wire rack for at least 15 minutes before serving.
Notes
Gluten-Free All-Purpose Flour: For this gluten-free dinner rolls recipe, I highly recommend using a gluten-free flour blend that is made up of lighter flours/starches such as rice flour, corn starch, tapioca starch, or potato starch. This will ensure that you get a lighter and fluffier texture. I do NOT recommend blends that use heavier and denser flours such as garbanzo bean flour as it will result in a denser texture.
Xanthan Gum: I use an extra teaspoon of xanthan gum even though the flour blend already contains xanthan gum, because this replaces the role of gluten and helps the flours to bind better and creates better texture.
Baking Powder: I use baking powder in addition to yeast to give the rolls extra rise, which helps them to be a little lighter and fluffier in texture. If you are Celiac or gluten-intolerant, make sure to use certified gluten-free baking powder.
Sugar: The sugar is required for the yeast to work, as it acts as the “food” for the yeast feed on so it will be activated and produce the gases needed to make the dough rise. In this case, I’ve used light brown sugar, but you can also use white sugar, cane sugar or dark brown sugar if you prefer.
Instant Dry Yeast: I like using instant dry yeast in my baking because no proofing or activation is required. If you don’t have instant dry yeast, you can use active yeast, but make sure you dissolve the yeast in a mixture of warm water and sugar to activate it before using.
Warm Water: Make sure the water you use is between 105F to 115F. (It’s important that the water is neither too hot nor too cold. The warmth is required to activate the yeast, but if the water is too hot it will kill the yeast.) Alternatively, you may also use warm milk instead of water if you prefer.
Egg: This recipe requires the egg, without which it will come out dense and heavy. I haven’t tried it with egg replacers so I can’t guarantee it will work if you replace the egg.
Apple Cider Vinegar: Since yeast usually likes an acidic environment, adding apple cider vinegar (ACV) will help the yeast work better and give the bread a better rise. If you don’t have ACV, you can use any other vinegar you have.
Coconut Oil: I prefer using refined coconut oil for cooking because it has a more neutral taste (as opposed to extra virgin coconut oil which has a stronger coconut taste and smell). You may also use melted vegan butter if you prefer. Alternatively, if you are not lactose-intolerant, feel free to use melted butter in equal amounts.
Egg Wash: Brushing egg wash over the rolls before baking them will ensure that they turn out golden brown and have a nice shine. To make egg wash, beat an egg with 1 teaspoon of water and mix well. Alternatively, you can also brush the rolls with olive oil.
Storing/Freezing: To store, place the gf dinner rolls in an airtight container or ziplock bag in the fridge for up to 5 days. To freeze, wrap the gluten-free bread rolls in plastic wrap and freeze for up to 3 months. Heat up the rolls slightly in the microwave to thaw them before serving.
This recipe was originally published in November 2020, but has since been updated to include clearer step-by-step instructions.
Adapted from: Gluten-Free Baking
- Prep Time: 45 mins
- Cook Time: 30 mins
- Category: Bread
- Method: Baking
- Cuisine: American

Can you use buckwheat flour for this recipe? And can you omit the xanthum gum in place of psylium husk?
Hi Yining, you can replace the xanthan gum with the same amount of psyllium husk powder (I recommend powder form as opposed to whole psyllium husks). If you want to add some buckwheat flour, you could swap out 3/4 cup of the GF all purpose flour with buckwheat flour, but I do NOT recommend replacing all the GF AP flour. This is because buckwheat flour on its own is very dense, and you will not get the fluffy texture required for dinner rolls).
Happy baking, and I hope you enjoy them!
Hello,
Can this recipe be made to a point the day before you would like to serve the rolls and placed in the refrigerator for baking the next day?
Thank you
Hi Linda! I don’t think that would be a good idea as the dough will likely dry out in the refrigerator. I believe it’s best to bake it immediately once the dough balls have risen.
Hi,
can I use Avocado oil instead of coconut oil for these?
Hi Anna, you can try using avocado oil, but since avocado oil doesn’t turn solid at room temperature, you may need to add a little bit more flour if you find that the dough is too wet and hard to shape.
Hello,
Your comment I use an extra teaspoon of xanthan gum even though the flour blend already contains xanthan gum, because this replaces the role of gluten and helps the flours to bind better and creates better texture. The King Arthur All-purpose flour doesn’t have xanthan gum so it is confusing to me how much to use?
Hi Fran! You can use 1/4 teaspoon xanthan gum for each cup of gluten-free flour 🙂 Hope that helps!
I will be trying this recipe tomorrow, I do not have xanthan gum, can you omit this since it’s in my GF flour.
Hi Susan! Sorry for the late reply! If it’s in your GF flour you can omit the xanthan gum. Hope you had a lovely thanksgiving!