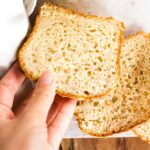
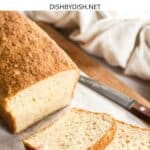
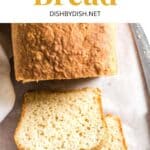
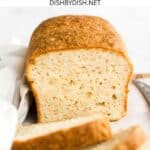
Soft, Fluffy Millet Bread (Gluten-Free, Dairy-Free)
This delicious millet bread is soft, tender and fluffy, and is perfect for making sandwiches, french toast, avocado toast, or simply toasted with jam. It’s totally gluten-free and dairy-free too!
")
Want to save this recipe?
Enter your email & I’ll send it to your inbox. Plus, get great new recipes from me every week!
My Love for Homemade Bread
Those who know me know that I have a passion for making homemade bread.
Nothing beats watching bread dough rise, baking it and then pulling the finished loaf out from the oven. Feeling the heat from the oven on my face and the aroma of freshly baked bread filling the house is something I still find joy in, no matter how many loaves I’ve baked.
Some of our favorite gluten-free breads include this hugely popular buckwheat bread, our favorite gluten-free white bread, this soft brown rice bread, this tender sorghum bread, this delicious potato bread and a beautiful quinoa bread.
")
What is Millet?
Naturally gluten-free, millet is one of the world’s ancient grains, and has a slightly sweet and nutty flavor.
Millet is a pseudo-grain. What this means is that while millet is technically a seed, it functions like a whole grain in that it can be cooked just like grains such as rice.
For example, you can cook this creamy millet porridge or this warm millet bowl with mushrooms and kale.

How to Make Millet Flour at Home
Alternatively, whole millet can be ground into a fine flour and used in baked goods.
While you can easily buy millet flour from from the store, I find that grinding it at home is so easy and effortless that I rather do it myself. Plus it’s also cheaper to make your own homemade millet flour, especially if you’re using it on a regular basis.
All you need is hulled organic millet, a high-speed blender and a fine-mesh sieve! Learn how to grind millet flour at home (in just a few minutes)!

Why This Recipe Works:
- Easy to Make: This millet bread recipe is really simple – mix the dry ingredients and then add the wet ingredients to get the dough. Let the dough rise and then bake! How much simpler can it get?
- Perfectly Fluffy Texture: This delicious millet flour bread is incredibly soft and tender, and once you’ve tried this gluten-free bread recipe, you’ll never go back to buying store-bought gluten-free bread again (since most store-bought GF bread tends to be hard, dry, tasteless and expensive!).
- Flexible: You can use this delicious millet flour bread to make sandwiches, french toast, avocado toast, or toast it and spread it with our favorite mixed berry chia seed jam, or even eat it on its own!
- Totally Gluten-Free and Dairy-Free: Best of all, this recipe for millet bread is 100% gluten-free and dairy-free too, which means that those with Celiac disease or have gluten or lactose intolerances can still enjoy it without worries!
")
Ingredients You’ll Need:
Here’s a visual overview of the ingredients required to make this millet bread recipe.
(For exact measurements and quantities, please scroll down to the printable recipe card at the bottom of this post.)
")
Ingredient Notes/Substitutions:
- Gluten-Free All-Purpose Flour: I recommend using a good quality gluten-free flour blend that is made up of lighter flours/starch (such as rice flour, potato starch, corn starch or tapioca starch), to ensure a lighter final texture. I do NOT recommend gluten-free blends that include heavier flours (such as garbanzo bean flour) as that may result in a denser final texture.
- Xanthan Gum: Xanthan gum acts as a substitute for gluten in gluten-free flours, and helps the ingredients to bind better together. If your gluten-free flour blend does not already include it, make sure to add it in.
- Millet Flour: Since this is a millet bread recipe, millet flour is essential. You can either make your own homemade millet flour or use store-bought millet flour. If you would like to make this bread with another type of whole grain flour such as buckwheat flour, brown rice flour, amaranth flour, sorghum flour, or quinoa flour, feel free to replace the millet flour in a 1:1 ratio of the flour you wish to replace it with.
- Psyllium Husk Powder: In this recipe, the psyllium husk powder helps the ingredients to bind better together and allows it to dome properly. If you only have whole psyllium husks, you can grind the husks into a super fine powder with a coffee grinder. I do NOT recommend that you swap out the psyllium husk powder with any other ingredient.
- Baking Powder: In addition to the yeast, baking powder helps the bread to rise a little more. If you are Celiac or gluten-intolerant, make sure you use certified gluten-free baking powder.
- Instant Yeast: I like using instant dry yeast because there is no pre-activation period required.
- Sugar: The sugar is required as food for the yeast to feed on so the yeast activates and produced the gases required to make the dough rise. Do not leave out the sugar – the bread will not taste sweet as the sugar will be consumed by the yeast.
- Sunflower Oil: I like using sunflower oil because I always have a bottle of it on hand. However, feel free to use another vegetable oil such as olive oil, avocado oil, coconut oil if you prefer.
- Apple Cider Vinegar: The apple cider vinegar (ACV) helps to create an acidic environment and reacts with the baking powder to help the bread dough rise more. If you don’t have ACV, you may also use white vinegar or wine vinegar in equal quantities.
- Warm Water: Make sure the water is between 105F – 110F as the warmth is required to activate the yeast, but if the water is too hot, it will kill the yeast. I use water because it’s the easiest, but you can also use warm non-dairy milk such as almond milk or cashew milk if you want to add more flavor. If you are not lactose-intolerant, feel free to use normal milk instead.
- Eggs: The eggs give the bread more rise and taste, and I personally haven’t tried making this bread without eggs. However, if you are allergic to eggs or want to keep this recipe totally vegan, feel free to substitute the eggs with aquafaba or an egg-replacer.
")
How to Make Millet Bread (Step by Step):
Prepare Millet Bread Dough
")
Combine Dry Ingredients: In a large mixing bowl, whisk the gluten-free all-purpose flour, xanthan gum (if using), millet flour, psyllium husk powder, baking powder, salt, instant yeast, and sugar together.

Add Wet Ingredients: Add the oil, apple cider vinegar, warm water, and mix well until combined. Add the beaten eggs and mix for another minute until you get a dough that resembles thick cake batter (the dough will be sticky and wet, but that’s perfectly fine).
Transfer Millet Bread Dough to Pan and Let Rise
")
Transfer Dough to Pan: Grease a 8″ x 4″ nonstick metal loaf pan (or line it with parchment paper) and preheat the oven to 350F. Arrange the oven rack to the middle position. Transfer the bread dough to the prepared loaf pan and use a wet spatula to smooth out the top of the dough.

Let Dough Rise: Cover the pan with a kitchen towel and let the dough rise for the next 30 minutes in a warm, draft-free place until it has roughly doubled in size.
Bake Until Golden, and Let Cool Before Slicing
")
Bake: Bake the dough for 50 to 60 minutes until the bread is golden brown on top and the loaf sounds hollow when tapped.
")
Cool Completely Before Slicing: Allow the millet bread to cool for at least 10 minutes in the loaf pan, before removing it and cooling fully on a wire rack. Use a serrated bread knife to slice once the bread has fully cooled. Enjoy!
Dish by Dish Tips/Tricks:
- Use a Metal Loaf Pan: I recommend using a metal baking pan (as opposed to a glass or ceramic pan) because metal transmits heat more evenly all over, ensuring that the sides and bottom of the loaf are cooked evenly.
- Let Cool Fully Before Slicing: As with all gluten-free baked goods, the inside of this millet bread will continue cooking with the residual heat even after you remove it from the oven. If you cut the bread before it is fully cooled, it will may fall apart easily or may have a gummy texture. For best results let this gluten-free millet bread cool to room temperature before slicing (patience is key and it’ll be worth your wait)!
- Slice with a Serrated Knife: Make sure to use a serrated bread knife (a knife with ridged edges) to slice the bread. If you use a smooth knife, you may end up flattening the bread when you slice it.
- Optional Add-Ins: Feel free to mix it up and make this gluten-free sandwich bread recipe your own. To add more dietary fiber and flavor, feel free to mix in oats, sesame seeds, sunflower seeds, chia seeds, pumpkin seeds or whole flax seeds to the dough before rising.
- Storing: To store, place the cooled millet flour bread in an airtight container and store in the refrigerator for up to 5 days.
- Freezing: To freeze, wrap the cooled bread with a few layers of plastic wrap or place it in a freezer-safe container or ziplock bag and freeze for up to 3 months. Let the frozen loaf thaw completely overnight in the refrigerator before slicing. Alternatively, you can slice the bread beforehand and freeze it already sliced, so you can remove a slice at a time from the freezer and toast directly.
Other Gluten-Free Yeast Breads You’ll Love:
- Buckwheat Bread (Gluten-Free, Dairy-Free)
- Brown Rice Bread (Gluten-Free, Dairy-Free)
- Potato Bread (Gluten-Free, Dairy-Free)
- Sorghum Bread (Gluten-Free, Dairy-Free)
- Quinoa Yeast Bread (Gluten-Free, Dairy-Free)
- Soft Gluten-Free Dinner Rolls (Dairy-Free)
- Rosemary Focaccia (Gluten-Free, Vegan)
- Gluten-Free Pizza Crust (Gluten-Free, Vegan)
Bread Recipes to Enjoy:


P.S. If you try this recipe, I’d love for you to leave a star rating below, and/or a review in the comment section further down the page. I always appreciate your feedback. Be sure to check out my entire Recipe Index for all the recipes on the blog. You can also follow me on Pinterest, Facebook or Instagram! Sign up for my Email List to get fresh recipes in your inbox each week!
Soft, Fluffy Millet Bread (Gluten-Free, Dairy-Free)
- Total Time: 1 hour 40 minutes
- Yield: 12 servings 1x
- Diet: Gluten Free
Description
This delicious millet bread is soft, tender and fluffy, and is perfect for making sandwiches, french toast, avocado toast, or simply toasted with jam. It’s totally gluten-free and dairy-free too!
Ingredients
- 1 3/4 cup gluten-free all-purpose flour
- 1 teaspoon xanthan gum (leave this out if your GF flour blend already includes it)
- 1/2 cup millet flour
- 1/4 cup psyllium husk powder
- 1 teaspoon baking powder
- 2 1/4 teaspoons instant dry yeast
- 2 tablespoons sugar
- 1 teaspoon salt
- 1/3 cup sunflower oil
- 1 teaspoon apple cider vinegar
- 1 1/2 cups warm water (approx. 105 -110F)
- 2 large eggs, beaten (room temperature)
Instructions
- Grease and Preheat: Grease a 8″ x 4″ nonstick metal loaf pan and preheat the oven to 350F. Arrange the oven rack to the middle position.
- Combine Dry Ingredients: In a large mixing bowl, whisk the gluten-free all-purpose flour, xanthan gum (if using), millet flour, psyllium husk powder, baking powder, salt, instant yeast, and sugar together.
- Add Wet Ingredients: Add the oil, apple cider vinegar, warm water, and mix well until combined. Add the beaten eggs and mix for another minute until you get a dough that resembles thick cake batter (the dough will be sticky and wet, but that’s perfectly fine).
- Transfer Dough to Pan: Transfer the bread dough to the prepared loaf pan and use a wet spatula to smooth out the top of the dough.
- Let Dough Rise: Cover the pan with a kitchen towel and let the dough rise for the next 30 minutes in a warm, draft-free place until it has roughly doubled in size.
- Bake: Bake the dough for 50 to 60 minutes until the bread is golden brown on top and the loaf sounds hollow when tapped.
- Cool Completely: Allow the millet bread to cool for at least 10 minutes in the loaf pan, before removing it and cooling fully on a wire rack.
- Slice and Enjoy: Use a serrated bread knife to slice once the bread has fully cooled. Enjoy!
Notes
Gluten-Free All-Purpose Flour: I recommend using a good quality gluten-free flour blend that is made up of lighter flours/starch (such as rice flour, potato starch, corn starch or tapioca starch), to ensure a lighter final texture. I do NOT recommend gluten-free blends that include heavier flours (such as garbanzo bean flour) as that may result in a denser final texture.
Xanthan Gum: Xanthan gum acts as a substitute for gluten in gluten-free flours, and helps the ingredients to bind better together. If your gluten-free flour blend does not already include it, make sure to add it in.
Millet Flour: Since this is a millet bread recipe, millet flour is essential. You can either make your own homemade millet flour or buy it online. If you would like to make this bread with another type of whole grain flour such as buckwheat flour, brown rice flour, amaranth flour, sorghum flour, or quinoa flour, feel free to replace the millet flour in a 1:1 ratio of the flour you wish to replace it with.
Psyllium Husk Powder: In this recipe, the psyllium husk powder helps the ingredients to bind better together and allows it to dome properly. I do NOT recommend that you swap out the psyllium husk powder with any other ingredient.
Baking Powder: In addition to the yeast, baking powder helps the bread to rise a little more. If you are Celiac or gluten-intolerant, make sure you use certified gluten-free baking powder.
Instant Yeast: I like using instant dry yeast because there is no pre-activation period required.
Sugar: The sugar is required as food for the yeast to feed on so the yeast activates and produced the gases required to make the dough rise. Do not leave out the sugar – the bread will not taste sweet as the sugar will be consumed by the yeast.
Sunflower Oil: I like using sunflower oil because I always have a bottle of it on hand. However, feel free to use another vegetable oil such as olive oil, avocado oil, coconut oil if you prefer.
Apple Cider Vinegar: The apple cider vinegar (ACV) helps to create an acidic environment and reacts with the baking powder to help the bread dough rise more. If you don’t have ACV, you may also use white vinegar or wine vinegar in equal quantities.
Warm Water: Make sure the water is between 105F – 110F as the warmth is required to activate the yeast, but if the water is too hot, it will kill the yeast. I use water because it’s the easiest, but you can also use warm non-dairy milk such as almond milk or cashew milk if you want to add more flavor. If you are not lactose-intolerant, feel free to use normal milk instead.
Eggs: The eggs give the bread more rise and taste, and I personally haven’t tried making this bread without eggs. However, if you are allergic to eggs or want to keep this recipe totally vegan, feel free to substitute the eggs with aquafaba or an egg-replacer.
Storing/Freezing: To store, place the cooled millet bread in an airtight container and store in the refrigerator for up to 5 days. To freeze, wrap the cooled bread with a few layers of plastic wrap or place it in a freezer-safe container or ziplock bag and freeze for up to 3 months. Let the frozen loaf thaw completely overnight in the refrigerator before slicing. Alternatively, you can slice the bread beforehand and freeze it already sliced, so you can remove a slice at a time from the freezer and toast directly.
- Prep Time: 10 mins
- Rising Time: 30 mins
- Cook Time: 60 mins
- Category: Bread
- Method: Baking
- Cuisine: American
The bread recipe was great! As someone mentioned previously, I can finally eat sendwiches again!
Anyways I was wondering is it possible to make it without eggs? The First day it was great, but the next one it already tasted funny. Granted, I kept it room temperature but I don’t like keeping the bread in the refrigerator. I am guessing that was because of the eggs so I wonder if it could stay at room temperature without them 🙂
Hi Natasha, glad you can finally eat sandwiches again. Hmm, the bread shouldn’t taste funny the next day. I definitely recommend storing all GF breads in the fridge though, because they keep better that way. You can always toast the bread in the toaster to warm it up (I love my bread toasted). You can definitely try it without eggs (replace with acquafaba), but I personally feel that using the eggs helps the bread dough to bind better and rise better too.
Awesome recipe. Which kind of millet have you used for the recipe? Is it the foxtail millet? Plz reply. Thank you.
Hi, for grinding millet flour I used organic hulled millet. Alternatively, you can use storebought millet flour (no particular type).
I have been searching for a GF bread that didn’t taste like cardboard, well, this one does not. I have a gluten allergy and this was by far the best tasting one. Very fluffy and it freezes well. Thanks. I can have sandwiches again.
So happy to hear that you enjoyed this millet bread Debbie! Thanks for your feedback and I hope you enjoy baking and sandwiches again! See you around the blog sometime soon!
xx,
felicia
Hey Felicia, i can falow your soft milett bread recipe but ihane to leave out the yeast as i’am allergic to it,, i can perhaps add a couple teaspoons of baking powder to it and some egg white?
Hi Rose, if you are allergic to yeast the next best alternatively is to add another 2-3 teaspoons of baking powder, but bear in mind that the final result and texture will not be as fluffy as when you use yeast. It will be more of a quick bread that has a denser crumb. If you don’t mind that you could give it a try!
this bread was quite bitter
Hi Michelle, that’s weird that the bread turned out bitter. Could it be that your millet flour or the GF flour blend was expired?
Hi Felicia,
I love your recipes but am not gluten intolerant.
Is it ok to use just plain bread or Plain flour etc to bake your breads?
fact its not gluten free, then do i still have to use xanthum gum, or yeast is good enough.
thank you
Hi Georgia! If you’re not gluten intolerant, you can use regular wheat flour (don’t need the xanthan gum either, since xanthan gum is the replacement for gluten). 🙂
This bread is amazing. Highly recommended!!!
Thanks for your feedback Chris!! Glad to have you here!
I am new to baking bread – will try this recipe and let you know how it goes. I have ordered the ingredients and excited to try out this recipe.
Hi Charu! I hope you enjoy this millet bread 🙂 Let me know how it goes later!
Hello!I made this bread yesterday, with a small modification – I mixed millet flour with quinoa flour, added some poppy seeds and caraway seeds to the dough and sprinkled the top of the loaf with a mixture of sunflower and caraway seeds. The bread looks cute and freckled :D. I also had an occasion to use my measuring spoons of various volumes – 1 cup, 1/2 cup, etc. (in Poland, we use a metric system and so far I have usually used grams and mililitres). Anyway, the bread is great and I’m sure that it will become a part of my gluten-free diet. Regards from Poland!🥰
Hi Daria! YAY that you managed to use your measuring spoons and cups, and most importantly that your bread came out great! Thanks for letting me know how it went, and I hope to see you around the blog again sometime soon!
xx,
Felicia
Hi Felicia,
Made this today, substituting the Xantham Gum with Psyllium Husk Powder- the result is perfect.
I have a large capacity bread machine and will try making this in the machine, probably doubling the quantities
Your recipes always work-
Hi Leta, so happy to hear that! Thanks for sharing how it went 🙂 Hope to see you around the blog again sometime soon!
xx,
Felicia
I’ve leaned so much about the chemistry of bread making just by reading your recipe details. Thank you! P.s. I’m a newbie to gluten free, so, your explanations are appreciated!
Hi Karen, so glad to have you here, and welcome to this GF bread baking journey. There’s definitely a learning curve at first, but you’ll get used to it after a bit! Hope you enjoy the recipes here, and see you around the blog again sometime soon!
I need help….I’ve made this recipe twice with great hope. Both times it sunk I the middle while cooling in the pan.
Once cooled it looked uncooked at the bottom. The taste is wonderful and texture is great for bread. The color of the bread is not white like the picture but more brown, is that the psyllium husk? Anyway. I really want to get this recipe right so need some tips.
Hi Patty, thanks for writing. Let’s troubleshoot: the psyllium husk powder you use may or may not turn your bread brown (or purple). It’s often a matter of testing out different brands that you have available. I know the NOW brand psyllium husk powder that you can find on Amazon or health stores doesn’t turn bread/baked goods purple, so if you have access to that, that would be great!
Regarding the sinking in the middle – this often happens when the bread dough rose too much before baking, and the dough might have been too wet. To correct that, reduce the liquids by 1/4 cup and the dough will be slightly drier, and will rise slower, but this will ensure that it doesn’t sink after baking while cooling in the pan.
As for the bottom, what I like to do is remove the loaf from the pan once baked, then place it on a baking tray on one side, so the bottom of the loaf is exposed, and then let is bake for another 10 to 15 minutes until the bottom is cooked properly.
Hope this helps!!
Hi Felicia–I am confused as to which flour you are using. Sometimes you link to baking mix and sometimes you link to all purpose flour when you list all purpose flour in the ingredients and recipes. Do you find them interchangeable? I associate baking mixes with biscuits and pancakes, not breads, but I am very, very new to GF baking.
Hi TD, thanks for the note. It would be best to use the GF all-purpose flour (NOT the baking mix which as baking powder included). Sorry about the confusion!
This bread looks amazing! Is it possible to convert to a 1.5 lb loaf and make in a bread machine?
Hi Deb! Thank you for your kind note! I’ve never made it in a bread machine, but I would imagine it should work with the gluten-free bread setting. As for the loaf size, I would stick with the current measurements. Hope this helps!
Good morning Felicia!
This millet bread is so fluffy and taste so so good that I can enjoy it in any way I like. I usually like to eat it fresh from the oven with my favourite coffee cream spread and a hot beverage for breakfast.
For a fuller meal, I like to toast it and made a healthy sumptuous juicy sandwish to enjoy!
Thanks for this simple and yet great recipe for baking this soft and fluffy millet bread!
Love you lots!
Mum
Hi mummy!
Glad you enjoy this millet bread, we love it too!