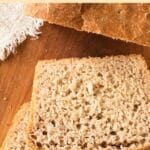
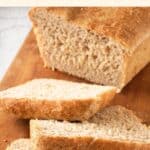
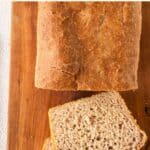
Fluffy Gluten-Free Beer Bread (Dairy-Free)
Soft, fluffy and tender, this gluten-free beer bread is delicious toasted with butter and jam, or for making sandwiches! Totally dairy-free too. Go bake a batch to enjoy homemade gluten-free bread today!
")
Want to save this recipe?
Enter your email & I’ll send it to your inbox. Plus, get great new recipes from me every week!
Jump to:
- Bread Baking Adventures
- Soft Tender Gluten-Free Beer Brad
- Why This Recipe Works:
- Ingredients You’ll Need:
- Recipe Notes + Substitutions:
- How to Make Gluten-Free Beer Bread (Step by Step):
- Dish by Dish Tips/Tricks:
- Recipe FAQs:
- Our Favorite Gluten-Free Yeast Breads:
- Gluten-Free Bread Recipes to Bake:
- Fluffy Gluten-Free Beer Bread (Dairy-Free)
Bread Baking Adventures
Baking gluten-free yeast bread has always been a passion project of mine, and every once in a while, I’m standing at my kitchen counter, mixing different ingredients together as I test and develop yet another gluten-free bread recipe.
I mean… is there anything more cozy and comforting than pulling out a loaf of fresh bread from your oven? And feeling the heat from the oven warm your face? Or breathing in the enticing aroma of the loaf wafting around your kitchen, making it smell like a bakery?
For years now, I’ve had beer bread on my “to-bake” list, but to be honest never got around to it until last month.
")
Soft Tender Gluten-Free Beer Brad
Traditionally, most beer breads are a type of quick bread with beer as the main ingredient acting as a leavening agent to replace yeast.
However, I’ve found that without yeast, the loaves come out dense (at least for gluten-free versions) and don’t have the soft, tender texture that I always try to achieve in gluten-free baking.
So after quite a few tries, I’ve finally come up with a recipe that is worth shouting from the rooftops! With just a 30-minute rising time involved, this light and tender beer bread is completely worth baking.
Trust me when I say it’s so delicious you’ll be eating all in all the ways possible – on its own, or toasted and smeared with butter and jam, or mashed avocado, or as a sandwich.
No matter how you eat it, you’re going to LOVE it.
")
Why This Recipe Works:
- Simple Ingredients: The ingredients required are easily accessible at the local grocery store (nothing fancy required – and you might already have them on hand)!
- Easy to Make: Preparing the dough for this gf beer bread recipe is just a matter or mixing the dry ingredients with the wet ingredients.
- Totally Gluten-Free & Dairy-Free: The good news is that this beer bread recipe is 100% gluten-free and dairy-free, which means that even those with Celiac disease or gluten or lactose intolerances can also enjoy it without issues!

Ingredients You’ll Need:
Here’s a visual overview of the ingredients required for making this easy gluten-free beer bread recipe.
(For exact measurements, please scroll down to the printable recipe card at the bottom of this post.)
")
Recipe Notes + Substitutions:
- Gluten-Free Flour: I strongly recommend using a good-quality gluten-free all-purpose flour that is made up of lighter flours/starches (such as rice flour, tapioca starch, corn starch or potato starch) as that will result in a lighter and fluffier final texture. I do NOT recommend using a gluten-free flour blend that is made up of heavier flours (such as garbanzo bean flour) as that will result in a heavier final texture.
- Xanthan Gum: Xanthan gum is the replacement for gluten in gluten-free flours and helps the ingredients to better bind together. If your gluten-free blend does not already include xanthan gum, make sure to add it in.
- Baking Powder: Baking powder adds additional rise to the dough. If you are Celiac or gluten-intolerant, make sure to use certified gluten-free baking powder.
- Psyllium Husk Powder: Psyllium husk powder adds elasticity and helps the bread to keep its rise. Make sure to use psyllium husk in powder form. If you only have whole psyllium husks, you can grind it with a coffee grinder until super fine.
- Instant Yeast: I used instant dry yeast which does not require pre-activation for the yeast to work. If you only have active yeast, make sure to activate the yeast first (by mixing it with warm water and sugar and letting it sit in a warm place for 5 minutes until it is foamy) before adding it to the rest of the ingredients.
- Sugar: The sugar is food for the yeast to feed on in order to be activated and create the air bubbles required for the dough to rise. I used white sugar, but cane sugar or brown sugar will work just as well.
- Beer: I used gluten-free beer to keep this beer bread gluten-free. However, if you are not Celiac or allergic to gluten, feel free to use regular beer instead. Alternatively, if you are not a beer drinker, you can also use non-alcoholic beer or another carbonated beverage such as ginger ale.
- Eggs: Eggs help to bind the ingredients better, as well as aids in the rise of the dough. If you are allergic to eggs, or would simply prefer to keep this recipe egg-free, you can try using acquafaba or an egg-replacer.
- Oil: I like using sunflower oil because I always have a bottle of it on hand. However, you can also use another other type of vegetable oil (such as canola oil, olive oil, avocado oil etc) or melted vegan butter. Or if you are not lactose-intolerant, go ahead and use regular melted butter instead.
How to Make Gluten-Free Beer Bread (Step by Step):
1. Grease
Grease a 9” x 5” metal loaf pan with nonstick baking spray.
(Alternatively, you can also line the loaf pan with parchment paper for easier removing of the loaf once baked and cooled.)
2. Whisk Dry Ingredients
In a large mixing bowl, combine the gluten-free all-purpose flour, xanthan gum (if using), baking powder, psyllium husk powder, instant dry yeast, sugar and salt. Whisk well to combine.

3. Add Wet Ingredients to Dry Ingredients
Add the gluten-free beer, eggs and vegetable oil to the bowl with the flour mixture. Mix well until you get a wet and shaggy dough that resembles cake batter.

4. Transfer Dough to Greased Loaf Pan
Transfer the gluten-free bread dough to the prepared loaf pan.
")
5. Let Dough Rise
Cover the pan with a clean kitchen towel and let the dough rise in a warm, draft-free area until it has roughly doubled in size (approximately 30 minutes). Make sure the dough doesn’t rise more than the top of the pan.
")
6. Preheat Oven
While dough is rising, preheat the oven to 350F.
7. Bake Until Golden Brown
Once the dough has risen to double its size, bake in the preheated oven for 60 minutes, until the loaf is golden brown on top and sounds hollow when tapped. Remove the loaf pan from the oven.

8. Cool Completely Before Slicing
It’s very important to let the gluten-free loaf cool for at least 30 minutes in the pan on a wire rack before removing the loaf from the pan and slicing.
(This is because the inside of the loaf will continue cooking with the residual heat even after you remove it from the oven.)

Dish by Dish Tips/Tricks:
- Use Metal Loaf Pan: For best results, I recommend using a metal loaf pan as metal conducts heat better and more evenly than glass or ceramic.
- Optional Add-Ins: If you like more texture in your bread, feel free to add in 1 cup of mixed seeds (pumpkin seeds, sunflower seeds, flax seeds, chia seeds, etc.).
- For Extra Fiber: If you want to add more fiber to this loaf, you can substitute 1 cup of gluten-free all-purpose flour with a higher-fiber flour such as brown rice flour, buckwheat flour, sorghum flour, teff flour, or millet flour.
- Do not Overproof: For gluten-free yeast breads, the proofing of the dough is more a matter of rise as opposed to time. In my experience, 30 minutes is usually enough time for the bread dough to approximately double in size (but this will depend on the humidity and temperature where you live – you may require a longer rising time during the colder winter months, and especially if you live in a drier climate). Make sure you don’t like the dough rise more than the top of the pan (overproofing it may cause it to collapse once baked).
- Cool Completely Before Slicing: It is VERY important that you let the gluten-free bread cool fully before slicing into as for the best texture. This is because even after you remove the loaf from the oven, the inside of the loaf will continue cooking with the residual heat from baking. If you slice into it before it is done cooling, you may get a gummy texture in the middle of the loaf.
- Use Serrated Knife: For best results, slice the loaf using a serrated bread knife (a knife with ridges) as opposed to a knife with a smooth edge (the smooth edge will cause the bread to flatten when you cut it).

Recipe FAQs:
To store, cover the cooled gluten free beer bread with plastic wrap or place it in an airtight container and store in the refrigerator for up to 1 week.
Yes you can! To freeze, cover the loaf with various layers of plastic wrap and freeze for up to 2 months in the freezer. (I recommend slicing the loaf into even slices before freezing so you can thaw slices as necessary).
I personally don’t own a bread machine, but I believe you should be able to make this gf beer bread recipe in a breadmaker using the “gluten-free bread” setting.

Our Favorite Gluten-Free Yeast Breads:
- Soft Gluten-Free White Bread (Dairy-Free)
- Easy Potato Bread (Gluten-Free, Dairy-Free)
- Fluffy Buckwheat Bread (Gluten-Free, Dairy-Free)
- Sorghum Bread (Gluten-Free, Dairy-Free)
- Teff Bread (Gluten-Free, Dairy-Free)
- 21 Fluffy Yeast Breads to Make on Repeat
Gluten-Free Bread Recipes to Bake:


P.S. If you try this recipe, I’d love for you to leave a star rating below, and/or a review in the comment section further down the page. I always appreciate your feedback. Be sure to check out my entire Recipe Index for all the recipes on the blog. You can also follow me on Pinterest, Facebook or Instagram! Sign up for my Email List to get fresh recipes in your inbox each week!

Fluffy Gluten-Free Beer Bread (Dairy-Free)
- Total Time: 1 hour 40 minutes
- Yield: 12 slices 1x
- Diet: Gluten Free
Description
Soft, fluffy and tender, this gluten-free beer bread is delicious toasted with butter and jam, or for making sandwiches! Totally dairy-free too! Go bake a batch to enjoy homemade gluten-free bread today!
Ingredients
- 3 cups gluten-free all-purpose flour
- 3/4 teaspoon xanthan gum (omit if your gluten-free flour blend already includes it)
- 1 teaspoon baking powder
- 2 tablespoons psyllium husk powder
- 2 1/4 teaspoons (10g) instant dry yeast
- 1 tablespoon white sugar
- 1 teaspoon salt
- 1 3/4 cup (approx. 14oz) gluten-free beer, room temperature
- 2 eggs, room temperature, beaten
- 1/4 cup vegetable oil
Instructions
- Grease: Grease a 9” x 5” metal loaf pan with nonstick baking spray.
- Whisk Dry Ingredients: In a large mixing bowl, combine the gluten-free all-purpose flour, xanthan gum (if using), baking powder, psyllium husk powder, instant dry yeast, sugar and salt. Whisk well to combine.
- Add Wet Ingredients: Add the gluten-free beer, eggs and vegetable oil. Mix well until you get a wet and shaggy dough that resembles cake batter.
- Transfer Dough to Pan: Transfer the gluten-free bread dough to the previously greased loaf pan.
- Let Dough Rise: Cover the pan with a clean kitchen towel and let the dough rise until roughly doubled in size in a warm, draft-free area (approximately 30 minutes). Make sure the dough doesn’t rise more than the top of the pan.
- Preheat Oven: While dough is rising, preheat the oven to 350F.
- Bake Until Golden: Once the dough has risen to double its size, bake in the preheated oven for 60 minutes, until the loaf is golden brown on top and sounds hollow when tapped. Remove loaf pan from the oven.
- Let Cool before Slicing: It’s very important to let the loaf cool for at least 30 minutes before slicing as the inside of the loaf will continue cooking with the residual heat even after you remove it from the oven.
Notes
Gluten-Free Flour: I strongly recommend using a good-quality gluten-free all-purpose flour that is made up of lighter flours/starches (such as rice flour, tapioca starch, corn starch or potato starch) as that will result in a lighter and fluffier final texture. I do NOT recommend using a gluten-free flour blend that is made up of heavier flours (such as garbanzo bean flour) as that will result in a heavier final texture.
Xanthan Gum: Xanthan gum is the replacement for gluten in gluten-free flours and helps the ingredients to better bind together. If your gluten-free blend does not already include xanthan gum, make sure to add it in.
Baking Powder: Baking powder adds additional rise to the dough. If you are Celiac or gluten-intolerant, make sure to use certified gluten-free baking powder.
Psyllium Husk Powder: Psyllium husk powder adds elasticity and helps the bread to keep its rise. Make sure to use psyllium husk in powder form. If you only have whole psyllium husks, you can grind it with a coffee grinder until super fine.
Instant Yeast: I used instant dry yeast which does not require pre-activation for the yeast to work. If you only have active yeast, make sure to activate the yeast first (by mixing it with warm water and sugar and letting it sit in a warm place for 5 minutes until it is foamy) before adding it to the rest of the ingredients.
Sugar: The sugar is food for the yeast to feed on in order to be activated and create the air bubbles required for the dough to rise. I used white sugar, but cane sugar or brown sugar will work just as well.
Beer: I used gluten-free beer to keep this beer bread gluten-free. However, if you are not Celiac or allergic to gluten, feel free to use regular beer instead.
Eggs: Eggs help to bind the ingredients better, as well as aids in the rise of the dough. If you are allergic to eggs, or would simply prefer to keep this recipe egg-free, you can try using acquafaba or an egg-replacer.
Oil: I like using sunflower oil because I always have a bottle of it on hand. However, you can also use another other type of vegetable oil (such as canola oil, olive oil, avocado oil etc).
Storing/Freezing: To store, cover the cooled gluten-free beer bread with plastic wrap or place it in an airtight container and store in the refrigerator for up to 1 week. To freeze, cover the loaf with various layers of plastic wrap and freeze for up to 2 months in the freezer. (I recommend slicing the loaf into even slices before freezing so you can thaw slices as necessary).
- Prep Time: 10 mins
- Rising Time: 30 mins
- Cook Time: 60 mins
- Category: Bread
- Method: Baking
- Cuisine: Western

I made this this evening on October 14th. it turned out absolutely phenomenal I made two substitutions I used flaxseed over psyllium husk and instead of using beer I used Mead (honey wine) that my neighbor brewed last year. it is delicious definitely going to make again . have wrote the recipe in the family cookbook. if you have made other gluten free bread and it was less then desirable please try this one. it’s simply Devine actually tasted like regular made beer bread and the texture was the same . if you were to bring me two slices of beer bread one gluten free and one not I would not have been able to tell you the difference not flavor or texture wise I couldn’t tell you. this is a most Superior gluten-free recipe. it is also the first gluten-free recipe that I have made that actually turned out perfectly the first go-round. I’m excited to try more of the gluten-free recipes from this page.
Hi Faythe! Thank you so much for your lovely comment!! So happy to hear that you enjoyed this gluten-free beer bread, and thanks for letting me know about the substitutions used (that honey wine your neighbor brewed sounds divine!). Such a great honor to have you write the recipe in your family cookbook!! There are plenty of other gluten-free yeast bread recipes on the blog too, so I hope you browse through them and find a few others that you love! Happy baking, and hope to see you around the blog again sometime soon!
xx,
Felicia
Looks good but is there anything else I could use instead of beer please? Would lemonade work? Thanks
Hi Rosemary, you can use any carbonated beverage – so ginger ale or jolly shandy would work too.