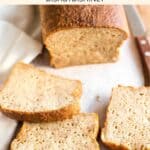
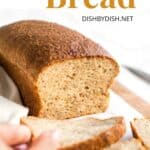
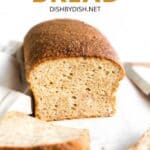
Soft, Fluffy Yeast Quinoa Bread (Gluten-Free, Dairy-Free)
Soft, tender and incredibly fluffy, this yeast quinoa bread comes together super easily. With a slightly nutty and earthy flavor, it tastes amazing and is perfect for making French toast, sandwiches, or avocado toast, or simply toasted and spread with jam! Totally gluten-free and dairy-free too, but no one would know! Bake a loaf or two and freeze so you can enjoy homemade gluten-free bread anytime!
")
Want to save this recipe?
Enter your email & I’ll send it to your inbox. Plus, get great new recipes from me every week!
Jump to:
- Homemade Bread is the Best
- What is Quinoa?
- Amazing Quinoa Bread with Yeast
- Why This Recipe Works
- Ingredients You’ll Need:
- Ingredient Notes/Substitutions:
- How to Make Yeast Quinoa Bread (Step by Step)
- Dish by Dish Tips/Tricks:
- Recipes FAQs:
- What to Eat with Quinoa Bread:
- Other Yeast Bread Recipes You’ll Love:
- Gluten-Free Bread Recipes to Bake:
- Soft, Fluffy Yeast Quinoa Bread (Gluten-Free, Dairy-Free)
Homemade Bread is the Best
Ever since I figured out how to make homemade gluten-free bread that actually tastes good, and is actually soft and fluffy the way a good loaf of bread should be, I’ve literally been on a gluten-free bread roll (pun intended).
It’s safe to say that we almost don’t buy store-bought gluten-free bread anymore (because hey, it’s usually crazy expensive, but worse of all, dry, dense and flavorless!).
When previously baking yeast breads seemed like a scary task to embark on, I now bake a loaf of yeast bread almost every week.
Some of our favorite gluten-free bread recipes include this crazy good gluten-free white bread, our super popular buckwheat bread, and most recently, this brown rice bread as well as this sorghum bread.
This time, I wanted to make yeast quinoa bread. I’ve already made a quick bread with quinoa flakes before, and now I wanted to use quinoa flour.
")
What is Quinoa?
If you don’t know what it is, quinoa (pronounced “KEEN-wah”) is basically a seed of the quinoa plant, which is part of the amaranth family.
While it is technically a seed, quinoa is also known as a pseudo-cereal because it is similar in nutrients and eaten in the same way as most grains. While there are over 3,000 types of quinoa, the three most commonly found types are white quinoa, red quinoa, or black quinoa.
Benefits of Quinoa
Quinoa is regarded by many as a superfood, because of the high levels of nutrients it contains, and because it’s a protein-packed food.
Is Quinoa Gluten-Free?
Quinoa is thankfully gluten-free, and is often used as a gluten-free alternative for rice and other grains. This means that Celiacs and those with gluten intolerances or allergies can enjoy quinoa without any worries (YAY)!
How is Quinoa Eaten?
- When the seed is cooked in a liquid (after first being rinsed to get rid of the bitter saponin compounds present in quinoa), it becomes fluffy and is similar to rice. It’s great for using in recipes as this warm quinoa salad with butternut, arugula and avocado, or this quinoa and minced beef stuffed bell peppers.
- Quinoa seeds can also be rolled into flakes (which can be used to make this creamy quinoa porridge or this honey quinoa bread).
- Quinoa seeds (usually the white variety) can also be ground into a fine quinoa flour, which has a nutty flavor and is perfect for gluten-free baking!
")
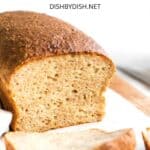
Amazing Quinoa Bread with Yeast
Basing this yeast quinoa bread recipe off my hugely popular buckwheat bread recipe, I used a mix of quinoa flour along with gluten-free all-purpose flour to create this yeast quinoa bread that is absolutely delicious!
We love just how fluffy, tender and moist it is (unlike most store-bought gluten-free breads that are expensive, hard, and dense), and how adding quinoa flour increases the amount of protein you get with each slice!
Why This Recipe Works
- Simple Ingredients: The ingredients required for this quinoa bread recipe are easily accessible at the grocery store or natural foods store (in fact, you may already have most of the ingredients in your kitchen!)
- Easy to Make: I’m not one for super complicated recipes, and that’s why this quinoa flour bread is easy to make – all you need to do is combine the dry ingredients, then add in the wet ingredients to get the dough. Once the dough is ready, transfer it to a pan and let it rise before baking till golden. Voila! How easy is that?
- Soft and Tender: With a fluffy texture, this quinoa flour bread has a delicious flavor that makes for a flavorful toast.
- Totally Gluten-Free and Dairy-Free: Best of all, this easy yeast quinoa bread recipe is 100% gluten-free, and dairy-free too, which means that even those with Celiac disease or gluten and lactose intolerances can still enjoy it without worries!
Ready to bake a loaf of this delicious quinoa bread? Let’s get to it!
")
Ingredients You’ll Need:
Here’s a visual overview of the ingredients required to make this gluten-free quinoa bread recipe.
(For exact measurements, please scroll down to the printable recipe card at the bottom of this post.)
")
Ingredient Notes/Substitutions:
- Gluten-Free All-Purpose Flour: I recommend using a good-quality gluten-free flour blend that is made up of a mix of lighter flours and starches (such as rice flour, corn starch, tapioca starch, or potato starch) to ensure you get a light and fluffy final texture. I do NOT recommend using flour blends that include heavier flours (such as garbanzo bean flour) as it will result in a denser texture.
- Xanthan Gum: Xanthan gum replaces the role of gluten in gluten-free flours, and is essential for binding the ingredients together. If your gluten-free flour blend does not include xanthan gum, make sure you add it in.
- Quinoa Flour: Since this is a recipe for quinoa bread, quinoa flour is the star here. However, if you don’t have it on hand, you can also use other whole grain flours instead (such as oat flour, sorghum flour, brown rice flour, millet flour, teff flour, buckwheat flour or amaranth flour).
- Psyllium Husk Powder: This helps the bread to keep its shape once it has risen and creates a beautiful dome shape that is otherwise hard to achieve with most gluten-free breads, so I do not recommend omitting it. Note that I use psyllium husk powder (which is basically ground whole psyllium husks). If you do not have the powder form on hand, simple grind whole psyllium husks in a coffee grinder or your high-speed blender until it is super fine.
- Baking Powder: In this recipe, baking powder (along with instant yeast) helps to give the bread extra lift and rise. If you are Celiac or gluten-intolerant, make sure you use gluten-free baking powder.
- Instant Yeast: I like using instant yeast because there’s no need to activate the yeast before hand and can simply mix all the dry ingredients together before adding the wet ingredients. If you do not have instant yeast, make sure you activate the yeast with the sugar and warm water before adding the rest of the ingredients.
- Sugar: I used white sugar but you can also use brown sugar if you prefer. The sugar in the recipe is used for feeding the yeast and giving it energy to activate and create air bubbles that will give the dough rise. Since the amount of sugar used is little and will be eaten up by the yeast, the bread will not be sweet.
- Sunflower Oil: I like using sunflower oil because I always have a bottle of sunflower oil on hand. Alternatively, you may also use another vegetable oil (such as olive oil, avocado oil, or melted coconut oil).
- Apple Cider Vinegar: The apple cider vinegar creates an acidic environment that reacts with the baking powder (an alkaline product) to create air bubbles and helps the bread to rise. If you don’t have apple cider vinegar, you may also use lemon juice or white wine vinegar.
- Water: Make sure the warm water is between 105 to 115F. The yeast requires the warmth to be activated, but if the water is too hot, it will kill the yeast. If you wish to add extra flavor, you may also use non-dairy milks (such as almond milk, cashew milk, rice milk or soy milk). Alternatively, if you are not lactose-intolerant, you may also use normal milk instead.
- Eggs: The eggs in this recipe helps the bread to rise and give it structure. I haven’t tried using any egg-replacements or alternatives, so I don’t know how it will turn out. However, if you are allergic to eggs or vegan, you could try using aquafaba or an egg-replacer. (Please let me know how it turns out in the comments if you do make this without eggs!).
How to Make Yeast Quinoa Bread (Step by Step)
1. Grease the Pan
Start off by greasing an 8″ x 4″ metal loaf pan.
")
2. Combine the Dry Ingredients
In a large bowl, combine the gluten-free all-purpose flour, xanthan gum (if using), quinoa flour, psyllium husk powder, baking powder, instant yeast, sugar, and salt. Whisk well to combine.
")
3. Add the Wet Ingredients to Create the Dough
Add the oil, apple cider vinegar, warm water and eggs, and whisk well for a couple of minutes until you get a dough that resembles cake batter (the dough will be sticky and wet, but it’s totally fine).
")
4. Transfer the Dough to the Pan
Transfer the dough to the previously greased loaf pan and smooth out the top with a wet spatula.
")
5. Let the Dough Rise
Cover the loaf pan with a kitchen towel and let the dough rise in a warm, draft-free place for 40 to 45 minutes until it has domed and has almost doubled in size.
")
6. Preheat the Oven
During the last 10 minutes of the rise, preheat the oven to 350F.
7. Bake Until Golden
Once the dough is done rising, bake it for 55 to 60 minutes, until the bread is golden brown and sounds hollow when tapped.
")
8. Cool Completely Before Slicing
Allow the bread to cool in the pan for 10 minutes before removing it, and then let it fully cool at room temperature on a wire rack before slicing into it with a serrated knife.
")
Dish by Dish Tips/Tricks:
- Use a Metal Pan: I strongly suggest using a metal loaf pan to ensure that the quinoa bread browns evenly on all sides. Using a glass pan or a ceramic pan will likely result in the bottom not browning well or even sticking to the pan.
- Pan Size Determines Loaf Height: I used an 8″x4″ loaf pan and I find that it’s the perfect pan size for this quinoa bread recipe. Bear in mind that if you use a wider loaf pan (such as a 9″x5″ loaf pan), it will result in a wider and flatter loaf.
- Use a Serrated Knife to Slice: Make sure to use a serrated bread knife (a knife with ridged edges) to slice the quinoa bread, as using a smooth knife will flatten the bread when cutting.
- Make Individual Buns: If you prefer, you can use a muffin pan to make individual quinoa yeast buns instead. Simple divide the dough between the muffin cups of a regular greased muffin pan and let the dough rise (till doubled in size) before baking at 350F for 30 minutes.
- Add Seeds for Extra Taste and Texture: To add flavor and texture, feel free to add in 3/4 cup of seeds such as sesame seeds, sunflower seeds, chia seeds, and flax seeds.
")
Recipes FAQs:
No, I do not recommend using only quinoa flour as the texture will be denser compared to when you use a mix of both gluten-free all-purpose flour and quinoa flour. This will create the soft, fluffy and tender texture that we are aiming for.
To store, place the gluten-free quinoa bread in an airtight container and keep in the refrigerator for up to a week.
Yes you can. To freeze, wrap the quinoa flour bread in various layers of plastic wrap or store it in a freezer-safe container and freeze for up to 3 months. Let the bread thaw completely overnight in the refrigerator before slicing into it.
Yes, quinoa is naturally gluten-free, so Celiacs and those with intolerances of allergies to gluten can enjoy it without any worries.
")
What to Eat with Quinoa Bread:
- Easy Plum Jam (Gluten-Free, Vegan)
- Apricot Jam (Gluten-Free, Vegan)
- Strawberry Chia Seed Jam (Gluten-Free, Vegan)
- Mixed Berry Chia Seed Jam (Gluten-Free, Vegan)
- Kumquat Marmalade (Gluten-Free, Vegan)
- Homemade Fig Jam (Gluten-Free, Vegan)
Other Yeast Bread Recipes You’ll Love:
- Soft, Fluffy Gluten-Free Bread (Dairy-Free)
- Buckwheat Bread (Gluten-Free, Dairy-Free)
- Brown Rice Bread (Gluten-Free, Dairy-Free)
- Sorghum Bread (Gluten-Free, Dairy-Free)
- Rosemary Focaccia Bread (Gluten-Free, Dairy-Free)
- Easy Gluten-Free No Knead Bread (Dairy-Free)
- Soft Gluten-Free Dinner Rolls (Dairy-Free)
- Potato Bread (Gluten-Free, Dairy-Free)
- Millet Bread (Gluten-Free, Dairy-Free)
- Teff Bread (Gluten-Free, Dairy-Free)
Gluten-Free Bread Recipes to Bake:


P.S. If you try this recipe, I’d love for you to leave a star rating below, and/or a review in the comment section further down the page. I always appreciate your feedback. Be sure to check out my entire Recipe Index for all the recipes on the blog. You can also follow me on Pinterest, Facebook or Instagram! Sign up for my Email List to get fresh recipes in your inbox each week!

Soft, Fluffy Yeast Quinoa Bread (Gluten-Free, Dairy-Free)
- Total Time: 1 hour 40 minutes
- Yield: 12 servings 1x
- Diet: Gluten Free
Description
Soft, tender and incredibly fluffy, this yeast quinoa bread comes together super easily. With a slightly nutty and earthy flavor, it tastes amazing and is perfect for making sandwiches, or avocado toast, or simply toasted and spread with jam! Totally gluten-free and dairy-free too, but no one would know! Bake a loaf or two and freeze so you can enjoy homemade gluten-free bread anytime!
Ingredients
- 1 3/4 cups gluten-free all-purpose flour
- 1 teaspoon xanthan gum (omit if your gluten-free flour blend already includes it)
- 1/2 cup quinoa flour
- 2 tablespoons psyllium husk powder
- 1 teaspoon baking powder
- 2 1/4 teaspoons instant yeast
- 2 tablespoons sugar
- 1 teaspoon salt
- 1/3 cup sunflower oil
- 1 teaspoon apple cider vinegar
- 1 1/2 cups warm water (approx. 105 to 115F)
- 2 large eggs, room temperature, beaten
Instructions
- Grease the Pan: Grease an 8″ x 4″ metal loaf pan.
- Combine Dry Ingredients: In a large bowl, combine the gluten-free all-purpose flour, xanthan gum (if using), quinoa flour, psyllium husk powder, baking powder, instant yeast, sugar, and salt. Whisk well to combine.
- Add Wet Ingredients to Get Dough: Add the oil, apple cider vinegar, warm water and eggs, and whisk well for a couple of minutes until you get a dough that resembles cake batter (the dough will be sticky and wet, but it’s totally fine).
- Transfer the Dough to the Pan: Transfer the dough to the prepared loaf pan and smooth out the top with a wet spatula.
- Let the Dough Rise: Cover the loaf pan with a kitchen towel and let the dough rise in a warm, draft-free place for 40 to 45 minutes until it has domed and has almost doubled in size.
- Preheat the Oven: During the last 10 minutes of the rise, preheat the oven to 350F.
- Bake Until Golden: Bake the bread for 55 to 60 minutes, until the bread is golden brown and sounds hollow when tapped.
- Cool Completely before Slicing: Allow the bread to cool in the pan for 10 minutes before removing it, and then let it fully cool on a wire rack before slicing into it.
Notes
Gluten-Free All-Purpose Flour: I recommend using a good-quality gluten-free flour blend that is made up of a mix of lighter flours and starches (such as rice flour, corn starch, tapioca starch, or potato starch) to ensure you get a light and fluffy final texture. I do NOT recommend using flour blends that include heavier flours (such as garbanzo bean flour) as it will result in a denser texture.
Xanthan Gum: Xanthan gum replaces the role of gluten in gluten-free flours, and is essential for binding the ingredients together. If your gluten-free flour blend does not include xanthan gum, make sure you add it in.
Quinoa Flour: Since this is a recipe for quinoa bread, quinoa flour is the star here. However, if you don’t have it on hand, you can also use other whole grain flours instead (such as oat flour, sorghum flour, brown rice flour, millet flour, teff flour, buckwheat flour or amaranth flour).
Psyllium Husk Powder: This helps the bread to keep its shape once it has risen and creates a beautiful dome shape that is otherwise hard to achieve with most gluten-free breads, so I do not recommend omitting it. Note that I use psyllium husk powder (which is basically ground whole psyllium husks). If you do not have the powder form on hand, simple grind whole psyllium husks in a coffee grinder or your high-speed blender until it is super fine.
Baking Powder: In this recipe, baking powder (along with instant yeast) helps to give the bread extra lift and rise. If you are Celiac or gluten-intolerant, make sure you use gluten-free baking powder.
Instant Yeast: I like using instant yeast because there’s no need to activate the yeast before hand and can simply mix all the dry ingredients together before adding the wet ingredients. If you do not have instant yeast, make sure you activate the yeast with the sugar and warm water before adding the rest of the ingredients.
Sugar: I used white sugar, but you can also use brown sugar if you prefer. The sugar in the recipe is used for feeding the yeast and giving it energy to activate and create air bubbles that will give the dough rise. Since the amount of sugar used is little and will be eaten up by the yeast, the bread will not be sweet.
Sunflower Oil: I like using sunflower oil because I always have a bottle of sunflower oil on hand. Alternatively, you may also use another vegetable oil (such as olive oil, avocado oil, or melted coconut oil).
Apple Cider Vinegar: The apple cider vinegar creates an acidic environment that reacts with the baking powder (an alkaline product) to create air bubbles and helps the bread to rise. If you don’t have apple cider vinegar, you may also use lemon juice or white wine vinegar.
Water: Make sure the warm water is between 105 to 115F. The yeast requires the warmth to be activated, but if the water is too hot, it will kill the yeast. If you wish to add extra flavor, you may also use non-dairy milks (such as almond milk, cashew milk, rice milk or soy milk). Alternatively, if you are not lactose-intolerant, you may also use normal milk instead.
Eggs: The eggs in this recipe helps the bread to rise and give it structure. I haven’t tried using any egg-replacements or alternatives, so I don’t know how it will turn out. However, if you are allergic to eggs or vegan, you could try using aquafaba or an egg-replacer. (Please let me know how it turns out in the comments if you do make this without eggs!).
Storing/Freezing: To store, place the bread in an airtight container and keep in the refrigerator for up to a week. To freeze, wrap the bread in various layers of plastic wrap or store it in a freezer-safe container and freeze for up to 3 months. Let the bread thaw completely overnight in the refrigerator before slicing into it.
Use a Metal Pan: I strongly suggest using a metal loaf pan to ensure that the bread browns evenly on all sides. Using a glass pan or a ceramic pan will likely result in the bottom not browning well and remaining wet or soggy or even sticking to the pan.
- Prep Time: 5 mins
- Rising Time: 40 mins
- Cook Time: 55 mins
- Category: Bread
- Method: Baking
- Cuisine: American
I can’t wait to try this! Just the recipe I have been searching for. Thank you so very much 🙂
Hope you enjoy this quinoa bread Catherine!
Hi Felicia, I made your soft quinoa bread today followed the directions exactly. When I took it out of the oven it had raised nicely, nice brow top. I had pizza stones in the oven so I sat the pullman pa on top of the stones. When the time was up I had to go out for a couple hours so I put it back in the oven, just with the parchment it had been baked in, not the pan, while the oven cooled. When I returned it had fallen to half its size an was very wet when I cut it. do you have any ideas? was it because I left it in the oven to cool?
Hi Janet, thanks for your note. Let’s troubleshoot – it seems that your dough is very wet (this could be due to humidity etc) and possibly the dough rose too much before baking (which is often the case when the loaf collapses). What I would suggest is that you reduce the amount of liquid by 1/4 the amount, this will make the dough a little drier, and hence take a little longer to rise too. Also, make sure that you don’t let the dough rise to more than the top of the pan (to prevent it from over-rising). This should solve the issue!
how can i add pumpkin puree?
Hi Indira, I’m not sure I understand your question. Do you mean that you want to add pumpkin puree to the bread dough?
Thanks so much for providing so many bread recipes! I can’t wait to try some of these for my daughter, who we recently learned needs to go gluten-free. I was wondering if I could sub in honey or coconut sugar or something else in place of the sugar? She is also not supposed to have refined sugar, so I’m trying to find a workaround. Thank you!
Hi Erin! You’re most welcome, I hope you enjoy these GF bread recipes as much as we do! Regarding substituting, yes, i believe it’s not a problem – the reason for the sugar is to give the yeast “food” to feed on. So as long as there’s some form of sugar, the yeast will be able to work and help the dough to rise.
Hi-
Can I use quinoa flakes instead of quinoa flour? I have some at hand.
Thanks
Hi Rosa, I would suggest that you grind the quinoa flakes into a fine flour (use a coffee grinder or a high-speed blender), and then use the amount of flour required.
Hope this helps!
Hi incase I want to use regular flour so I still need xantham gum?
Thanks
Hi Nandini, xanthan gum is only need for GF flours. However, I’m not sure how regular flour would work with this bread and how it will turn out (regarding the proportions etc). You can try though, and if so, please let me know how it goes!
I am so proud of you Felicia!
You do not just post your recipes on your blog but you also help to trouble-shoot with your reader as to the different possible factors that may have caused the diffferent outcome of the bread.
This sharing is really a great motivation to us which encourages us to want to try out all your different recipes in our learning journey with you.
God bless!
Mum
Hi Mummy, so happy you find the tips useful. 🙂 My goal is to help as many people eat well on the gluten-free diet as possible.
Recipe looks and sounds great!. I tried it but unfortunately for me , it came out soggy wet on the bottom 🙁
I am looking at your answer to others that have the same problem. Perhaps my oven temp is not correct? Although the thermometer does read 350.
Hi Ric, sorry to hear that your loaf came out soggy wet at the bottom. You might need to bake it for another 10-15 minutes, or the other thing you can do is to take the loaf out of the pan, turn it upside down on the baking sheet and bake it for another 10 minutes so the bottom cooks a little bit more. : )
Thanks for response. I tried it again. This time a little better result but still soggy and very oily. Should I reduce the amount of oil? I use olive oil
Hi Ric, you could reduce the amount of oil. But I highly recommend using a metal pan instead of a glass pan (since metal conducts heat better and will ensure that the bottom of the loaf is properly cooked). Also, you can take the loaf out and turn it upside down on the baking sheet and let it cook a little longer (10 minutes more or until it’s properly browned and no longer soggy).
Hi. I’ve tried this recipe 2 times. Both times the loaf came out flat and moist inside. I followed the recipe exactly. I used King Arthur flour so I omitted the xanathan gum. I have a convection oven and set the oven on 325 per oven instructions. The 2 nd time I extended the time to 55 min to see if that would help “dry” the loaf inside. I haven’t cut this one but I’m guessing it will be moist as well. Any suggestions?
Hi Renee,
Thanks for writing, let’s try to troubleshoot. If your loaf came out flat both times (as in it didn’t rise), then your yeast may be expired. If so, test the yeast with a little warm water and sugar and see if it foams. If it doesn’t, that means the yeast is no good and I would recommend that you throw it out and buy a new packet. As for the inside being uncooked/wet, you can definitely leave it in the oven for longer (maybe 10-15 minutes more if needed). Also, it’s important that you let the bread cool fully at room temperature before slicing into it (as GF baked goods will continue cooking with the residual heat even after being removed from the oven). Only once it is fully cooled, should you slice into it 🙂
Hope this helps, and happy new year!
Thank you very much for these great recipe!
Good morning Felicia,
I applaud you for your great effort of including additional information about what each ingredient in your recipe does for the final output. This information really helps us to know why certain ingredients must be included for the success of the recipe.
What I fully appreciate in most of your blog posts is your sharing with us as to what ingredients are indeed necessary differentiating from that which are optional ingredients and therefore such can be substituted by other equivalent ingredient type to vary the recipe for different flavours and tastes. Well done!
God bless and have a great week ahead!
Mum
Hi mummy,
So happy you find the information useful 🙂 I try my best to answer the questions I think someone looking for my recipes might have!
Love you lots,
felicia