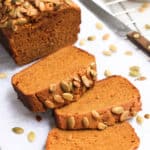
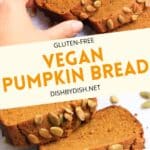
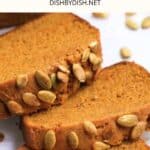
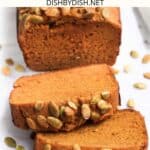
Easy Gluten-Free Vegan Pumpkin Bread
This easy gluten-free vegan pumpkin bread is super simple to make with a moist and firm crumb that you’ll love. The flavors of pumpkin, cinnamon and nutmeg in this easy quick bread are synonymous with fall, and the pumpkin seeds on top of the bread give a savory, crunchy contrast. The perfect breakfast or snack for fall!

Want to save this recipe?
Enter your email & I’ll send it to your inbox. Plus, get great new recipes from me every week!
Jump to:
- Fall Means Pumpkin Season!
- Cooking with Pumpkins
- Why This Recipe Works
- Ingredients You’ll Need:
- Ingredient Notes/Substitutions:
- Making Homemade Pumpkin Puree
- How to Make Gluten-Free Pumpkin Bread (Step by Step)
- Dish by Dish Tips and Tricks:
- Recipe FAQs:
- More Gluten-Free Pumpkin Recipes You’ll Love:
- Other Fall Recipes to Enjoy:
- Gluten-free Vegan Pumpkin Bread
Fall Means Pumpkin Season!
We lived in Washington DC during the fall season in 2015, and it was the first time we lived in the US, and also the first time we tried pumpkin.
During that period, we came to the realization that in the US, fall isn’t fall unless there’s pumpkin involved.
And that fall in D.C. was filled with pumpkins everywhere – on our neighbors’ porches; piled in front of our neighborhood Trader Joe’s; or on any restaurant menu.
Cooking with Pumpkins
I experimented with cooking for the first time for the first time back then, and I’ve got to say that pumpkin has its charm. I’m pretty much hooked.
From snack recipes such as these gluten-free pumpkin scones and pumpkin muffins, to decadent pumpkin desserts like this no-bake pumpkin cheesecake and crustless pumpkin pie, to savory recipes such as creamy pumpkin soup, easy pumpkin gnocchi and hearty pumpkin risotto, there are just so many pumpkin recipes to experiment with!
Of course, pumpkin bread is no exception. If you love making quick breads and all things pumpkin, get ready for this delicious and easy pumpkin bread!
The flavors of pumpkin puree, cinnamon and nutmeg make this the perfect fall recipe, and the toasted pumpkin seeds add a rich contrast in flavor and texture. I know you’ll absolutely love it too.

Why This Recipe Works
- Simple Ingredients: The main ingredients required are easily accessible at the local grocery stores (nothing fancy required!).
- Easy to Make: This gluten-free pumpkin bread recipe is incredibly simple to make,and it always results in a beautiful loaf.
- Moist and Firm: Full of pumpkin flavor, this gluten-free pumpkin loaf has a moist and firm crumb – everything that you would expect in classic pumpkin bread.
- Totally Gluten-Free, Dairy-Free & Vegan: The best thing about this gluten-free quick bread is that it’s totally gluten-free, egg-free, dairy-free, and vegan too, and that means that those with Celiac disease, are gluten or lactose intolerant, or are simply on a vegan diet can enjoy it as well!

Ingredients You’ll Need:
Here’s a visual overview of the ingredients you’ll need for this easy gluten-free vegan pumpkin bread recipe.
(For exact measurements, please scroll down to the printable recipe card at the bottom of the post.)

Ingredient Notes/Substitutions:
- Gluten-Free Flours/Starches: In this gluten-free pumpkin bread recipe, I’ve used a mixture of gluten-free flours including brown rice flour, sorghum flour, corn starch and tapioca starch because I like how the higher-fiber brown rice and sorghum flours balance out the other starches well. If you don’t have all these flours on hand, you may also use a pre-made gluten-free all-purpose flour blend.
- Xanthan Gum: Xanthan gum is the substitute for gluten in gluten-free flours and helps to better bind the ingredients together. If your gluten-free flour blend does not include it, make sure to add xanthan gum.
- Sugar: I used normal white sugar in this recipe, but feel free to use cane sugar, light brown sugar, dark brown sugar or coconut sugar if you prefer. If you are diabetic or insulin-resistant, I highly recommend using granulated monkfruit sweetener (a 1:1 sugar substitute with zero glycemic index).
- Spices: I used a mix of ground cinnamon and ground nutmeg for extra fall flavors, but you could substitute them for equal amounts of pumpkin pie spice instead.
- Baking Powder: Since this is a quick bread recipe, baking powder is required to help the batter rise, so make sure you add it in. If you are Celiac or gluten-intolerant, make sure you use certified gluten-free baking powder.
- Vanilla Extract: I like adding in a bit of vanilla extract for extra flavor, but feel free to leave it out if you prefer or if you don’t have it on hand.
- Pumpkin Puree: I personally prefer to use homemade fresh pumpkin puree because it doesn’t contain the additives and preservatives that come with the canned version. However, if you only have canned pumpkin on hand, it’ll work perfectly fine in the recipe.
- Almond Milk: I love using an unsweetened version of my 5-minute homemade almond milk but you can also use any other non-dairy milk such as this 5-minute cashew milk. If you can tolerate lactose or dairy, feel free to use normal dairy milk.
- Maple Syrup: Feel free to replace the maple syrup with equal quantities of agave nectar. Alternatively, if you are not vegan, you may use honey instead.
- Sunflower Oil: I like using sunflower oil because I always have a bottle of it on hand. Alternatively, you may also use other vegetable oils (such as canola oil, avocado oil, olive oil or even melted coconut oil) or vegan butter if you prefer.
- Pumpkin Seeds: I like topping the batter with crunchy pumpkin seeds for extra contrast in color and texture, but they are optional. You could also use chopped walnuts, pecans, or other nuts of choice.
")
Making Homemade Pumpkin Puree
If you’ve never tried making pure pumpkin puree before, then you’re in for a pleasant surprise, simply because of how simple it is.
I always recommending making your own (particularly during pumpkin season when pumpkins are in abundance).
Not only is it cheaper and fresher than the storebought version, homemade pumpkin puree is also free of the additives and preservatives that tend to come with canned pumpkin!
Here’s my easy tutorial for how to make pumpkin puree at home!

How to Make Gluten-Free Pumpkin Bread (Step by Step)
1. Preheat and Grease
Pre-heat oven to 350F (180C) and grease an 8″ x 4″ metal loaf pan.
")
2. Whisk Dry Ingredients
Whisk the brown rice flour, sorghum flour, cornstarch, tapioca starch, xanthan gum, sugar, cinnamon, nutmeg, salt and baking powder in a large mixing bowl.

3. Mix Wet Ingredients
In a separate bowl, mix pumpkin puree, vanilla, milk, maple syrup and oil until combined.
4. Combine Wet and Dry Ingredients to Form Batter
Pour the wet ingredients into the bowl with the flour mixture and stir well until you get a thick but homogeneous batter.
")
5. Transfer Batter to Loaf Pan and Top with Seeds
Transfer the batter to the prepared loaf pan and smooth it out with the back of a wet spoon. Top the batter generously with pumpkin seeds.

6. Bake Until Ready
Bake the batter for 40 to 45 minutes, until a toothpick inserted in the center of the loaf comes out clean.

7. Cool Completely Before Slicing
Allow the gluten-free pumpkin loaf to cool for at least 10 to 15 minutes before removing it from the loaf pan, and then let this healthy pumpkin bread cool for at least 30 minutes on a cooling rack before slicing.

Dish by Dish Tips and Tricks:
- Pan Size Determines Bread Height: I usually prefer to use an 8″ x 4″ metal loaf pan before it results in a higher loaf. Bear in mind that if you use a bigger pan (such as 9″ x 5″ or larger), the loaf will be wider and not as tall.
- Let Bread Cool Fully: Allow the bread to cool for at least 15 minutes in the pan before removing it and letting it finish cooling on a wire rack for at least 30 minutes. As with all gluten-free baked goods, it’s very important for the bread to fully cool so that it firms up and doesn’t fall apart when you handle it.
- Use a Serrated Knife: I recommend using a serrated bread knife (knife with ridged edges) for slicing this pumpkin bread so it cuts better and doesn’t flatten the bread in the process.
- No Pumpkin? Don’t Worry! If you don’t have pumpkin available, you could also swap out the pumpkin puree for butternut squash or sweet potato puree as well.
- Optional Add Ins: If you wish, feel free to mix in a handful of vegan chocolate chips or chopped nuts into the batter.
Recipe FAQs:
I generally prefer using fresh pumpkin puree because it doesn’t come with the nasty additives and preservatives that tend to come with canned pumpkin. Especially during fall and pumpkin season, when fresh pumpkins are plentiful, it’s really very simple to make your own! Here’s my recipe for easy homemade pumpkin puree. However, if you only have access to canned pumpkin puree (NOT the same as pumpkin pie filling), that’s perfectly fine too.
To store leftovers, place this pumpkin bread in an airtight container, or wrapped in plastic wrap or aluminum foil in the refrigerator for 5 to 7 days, but I honestly don’t think it will last that long! We usually eat up a loaf within 2 to 3 days max!
Yes, you can definitely freeze this gluten-free vegan pumpkin bread. Simply wrap it in freezer-safe plastic wrap and it will keep for up to 3 months in the freezer. Let it thaw overnight in the refrigerator before slicing into it and eating.
")
More Gluten-Free Pumpkin Recipes You’ll Love:
- Homemade Pumpkin Puree (Gluten-Free, Vegan)
- Easy Crustless Pumpkin Pie (Gluten-Free, Dairy-Free)
- Easy Gluten-Free Pumpkin Muffins (Dairy-free, Vegan)
- Pumpkin Yeast Bread (Gluten-Free, Dairy-Free)
- Gluten-Free Pumpkin Scones
- Gluten-Free Pumpkin Roll (Vegan)
- Gluten-Free Pumpkin Waffles (Dairy-Free)
- No-Bake Pumpkin Cheesecake (Gluten-Free, Vegan)
- Creamy Pumpkin Soup (Gluten-Free, Vegan)
- Pumpkin Risotto (Gluten-Free, Vegan)
- Easy Pumpkin Gnocchi (Gluten-Free, Dairy-Free)
Other Fall Recipes to Enjoy:


P.S. If you try this recipe, I’d love for you to leave a star rating below, and/or a review in the comment section further down the page. I always appreciate your feedback. Be sure to check out my entire Recipe Index for all the recipes on the blog. You can also follow me on Pinterest, Facebook or Instagram! Sign up for my Email List to get fresh recipes in your inbox each week!
Gluten-free Vegan Pumpkin Bread
- Total Time: 1 hour
- Yield: 12 servings 1x
- Diet: Gluten Free
Description
This gluten-free vegan pumpkin bread is super simple to make with a moist and firm crumb that you’ll love. The flavors of pumpkin, cinnamon and nutmeg in this easy quick bread are synonymous with fall, and the pumpkin seeds on top of the bread give a savory, crunchy contrast. It’s also dairy-free, egg-free and vegan too, but no one would know!
Ingredients
- 3/4 cup brown rice flour
- 3/4 cup sorghum flour
- 1/2 cup corn starch
- 1/4 cup tapioca starch
- 1 teaspoon xanthan gum
- 1/2 cup sugar
- 4 teaspoons ground cinnamon
- 1/2 teaspoon ground nutmeg
- 1/4 teaspoon salt
- 3 teaspoons baking powder
- 3/4 cup pumpkin puree (I used homemade pumpkin puree, but canned is fine as well)
- 2 teaspoons vanilla extract
- 1 cup unsweetened almond milk (or other non-dairy milk)
- 2 tablespoons maple syrup
- 1/4 cup sunflower oil
- 1/2 cup pumpkin seeds
Instructions
- Preheat and Grease: Pre-heat oven to 350F (180C) and grease an 8″ x 4″ metal loaf pan.
- Whisk Dry Ingredients: Whisk the brown rice flour, sorghum flour, cornstarch, tapioca starch, xantham gum, sugar, cinnamon, nutmeg, salt and baking powder in a large bowl.
- Mix Wet Ingredients: In a small bowl, mix pumpkin puree, vanilla, milk, maple syrup and oil until combined.
- Combine Wet and Dry Ingredients: Pour the wet ingredients into the bowl with the dry ingredients and stir well until you get a thick but homogeneous batter.
- Transfer Batter to Loaf Pan: Transfer the batter to the prepared loaf pan and smooth it out with the back of a wet spoon. Top the batter generously with pumpkin seeds.
- Bake Until Ready: Bake the batter for 40 to 45 minutes, until a toothpick inserted in the middle comes out clean.
- Cool Completely Before Slicing: Allow the pumpkin bread to cool for at least 10 to 15 minutes before removing it from the loaf pan, and then let it cool for at least 30 minutes on a cooling rack before slicing.
Notes
Gluten-Free Flours/Starches: In this gluten-free pumpkin bread recipe, I’ve used a mixture of gluten-free flours including brown rice flour, sorghum flour, corn starch and tapioca starch because I like how the higher-fiber brown rice and sorghum flours balance out the other starches well. If you don’t have all these flours on hand, you may also use a pre-made gluten-free all-purpose flour blend.
Xanthan Gum: Xanthan gum is the substitute for gluten in gluten-free flours and helps to better bind the ingredients together. If your gluten-free flour blend does not include it, make sure to add xanthan gum.
Sugar: I used normal white sugar in this recipe, but feel free to use cane sugar, light brown sugar, dark brown sugar or coconut sugar if you prefer. If you are diabetic or insulin-resistant, I highly recommend using granulated monkfruit sweetener (a 1:1 sugar substitute with zero glycemic index).
Spices: I used a mix of ground cinnamon and ground nutmeg for extra fall flavors, but you could substitute them for equal amounts of pumpkin pie spice instead.
Baking Powder: Since this is a quick bread recipe, baking powder is required to help the batter rise, so make sure you add it in. If you are Celiac or gluten-intolerant, make sure you use certified gluten-free baking powder.
Vanilla Extract: I like adding in a bit of vanilla extract for extra flavor, but feel free to leave it out if you prefer or if you don’t have it on hand.
Pumpkin Puree: I personally prefer to use homemade fresh pumpkin puree because it doesn’t contain the additives and preservatives that come with the canned version. However, if you only have canned pumpkin on hand, it’ll work perfectly fine in the recipe.
Almond Milk: I love using an unsweetened version of my 5-minute homemade almond milk but you can also use any other non-dairy milk such as this 5-minute cashew milk. If you can tolerate lactose or dairy, feel free to use normal dairy milk.
Maple Syrup: Feel free to replace the maple syrup with equal quantities of agave nectar. Alternatively, if you are not vegan, you may use honey instead.
Sunflower Oil: I like using sunflower oil because I always have a bottle of it on hand. Alternatively, you may also use other vegetable oils or even melted coconut oil if you prefer.
Pumpkin Seeds: I like topping the batter with crunchy pumpkin seeds for extra contrast in color and texture, but they are optional. You could also use chopped walnuts, pecans, or other nuts of choice.
Pan Size Determines Bread Height: I usually prefer to use an 8″ x 4″ metal loaf pan before it results in a higher loaf. Bear in mind that if you use a bigger pan (such as 9″ x 5″ or larger), the loaf will be wider and not as tall.
Let Bread Cool Fully: Allow the bread to cool for at least 15 minutes in the pan before removing it and letting it finish cooling on a wire rack for at least 30 minutes. As with all gluten-free baked goods, it’s very important for the bread to fully cool so that it firms up and doesn’t fall apart when you handle it.
Use a Serrated Knife: I recommend using a serrated bread knife (knife with ridged edges) for slicing this pumpkin bread so it cuts better and doesn’t flatten the bread in the process.
Note: This recipe was originally published in 2016, but has been republished with step-by-step process shots, ingredient notes and substitutes, as well as clearer instructions.
- Prep Time: 15 mins
- Cook Time: 45 mins
- Category: Dessert, Snacks
- Method: Baking
- Cuisine: American


Hi! Just came across this recipe and am excited to try! Question regarding the gluten free flour.. You mentioned that I could use a gluten free flour blend. How much would you recommend? 2 1/4 cups? My gluten free flour blend already has Xanthan Gum in it. Thank you so much!
Hi Stephanie, yes 2 1/4 cups of GF all purpose flour blend with the xanthan gum already included will work just fine! Hope you enjoy this bread!
Wow Felicia,
This modified recipe is so refreshing and educational in all respects.
I really loved the pictures of all the different types of ingredients that can be used in your recipe – I find this especially useful when I can see how the ingredients (listed in the recipe) look like when the name sounds unfamiliar to me. Thumbs up ! * * *
Well done !! The great stuff in your recipe modification makes me always want to come back for more.
I love and bless you greatly!
Mum
Hi Mummy! I’m so glad the recipe with the labeled ingredients is helpful! Yep, going forward I’m planning to add a photo the ingredients with the names of the ingredients so it is more helpful and easier to understand what ingredients are required! 🙂 Thanks for your support always, love you!!
Hi Felicia,
I agree fully that this bread is great tasting and can be eaten on its own . Moveover, it is so easy to prepare.
I simply love eating it with family and friends.
Looking forward to your homecoming soon 🙂
Until lthen, have a great time cooking and be blessed in all that you do.
Love,
Mum
Looking forward to going home too mummy!