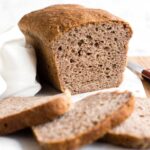
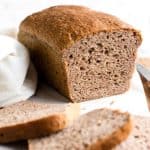
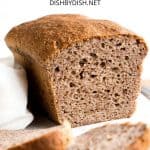
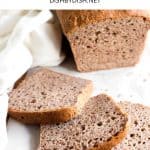
Soft, Fluffy Buckwheat Bread (Gluten-Free, Dairy-Free)
This super easy buckwheat bread is incredibly soft, fluffy and tender, and tastes delicious with a texture and look that’s uncannily similar to whole wheat bread! It’s the most popular bread recipe on the blog, and thousands of readers bake and love it! Totally gluten-free and dairy-free too, but you wouldn’t even know!
")
Want to save this recipe?
Enter your email & I’ll send it to your inbox. Plus, get great new recipes from me every week!
The Fluffiest Buckwheat Bread
Many buckwheat flour bread recipes tend to turn out dry and dense, and I was set on developing a gluten-free brown bread recipe that resembled whole wheat bread in appearance and taste. I also wanted to make sure that it was also soft and fluffy – everything a good loaf of gluten-free bread should be.
I am insanely happy that I’ve got this gorgeous buckwheat bread to share with you. With a beautifully brown crust, a perfect rise, and the coveted holes in the bread, this loaf is tender and moist, you would never guess that it’s both gluten-free and dairy-free!
I first published this post in 2021, and since then this buckwheat bread has consistently been our popular bread recipe on the blog!
")

Baking with Buckwheat Flour
If you’ve never cooked with buckwheat before, it’s basically a highly-nutritous grain-like seed that’s a psuedocereal and totally gluten-free, despite the word “wheat” in its name.
Making it at home is actually way simpler than it sounds and much cheaper than if you buy it pre-made. If you’re up to it, have 5 minutes to spare and a high-speed blender on hand, I’ve got a quick tutorial for homemade buckwheat flour to get your started!
")
Why This Recipe Works:
- Simple Ingredients: The main ingredients required for this buckwheat bread recipe are easily accessible at the local grocery store (look at the natural food section or gluten-free section).
- Easy to Make: I’ve never been a fan of complicated recipes, and this buckwheat bread recipe is no different from the other simple bread recipes on the blog. Just 5 minutes of hands-on time is all you need, and then let it rise for 30 minutes before baking.
- Soft and Fluffy: I’m not kidding when I say this recipe is tender. It’s a foolproof recipe that will always give you a soft, fluffy loaf!
- Totally Gluten-Free & Dairy-Free: The best part is that this recipe is 100% gluten-free and dairy-free, which means that even those with Celiac disease or gluten or lactose intolerances can enjoy without issues!
")

Ingredients You’ll Need:
Here’s a visual overview of the ingredients required for making this buckwheat bread recipe.
(For exact measurements, please scroll down to the printable recipe card at the bottom of this post.)
")
Ingredient Notes/Substitutions:
- Gluten-Free All-Purpose Flour: I highly recommend that you use a good quality gluten-free flour blend that is made of lighter flours and starches such as rice flour, corn starch, or tapioca starch and that includes xanthan gum. I do NOT recommend using flour blends that include heavier flours such as garbanzo bean flour which tend to result in a denser final texture.
- Xanthan Gum: Xanthan gum acts as a replacement for gluten in many gluten-free recipes, and is necessary for binding the ingredients together. If your gluten-free flour blend does not include it, make sure you add this in.
- Buckwheat Flour: Since this is a buckwheat bread recipe, buckwheat flour is essential. You can either make your own 5-minute homemade buckwheat flour, or buy it online. If you would like to make this bread with another type of whole grain flour such as millet flour, amaranth flour, or quinoa flour, feel free to replace the buckwheat flour in a 1:1 ratio of the flour you wish to replace it with.
- Psyllium Husk Powder: In this gluten-free brown bread recipe, the psyllium husk powder helps to better bind the ingredients as well as give the bread a whole wheat flavor. I do NOT recommend that you swap out the psyllium husk powder with any other ingredient.
- Apple Cider Vinegar: The apple cider vinegar reacts with the baking powder in this buckwheat bread recipe to help the bread rise even more. If you don’t have ACV on hand, you can also use white vinegar or wine vinegar in equal quantities.
- Warm Water: I use water in this case because I find it easiest. But you can also use warm non-dairy milk such as almond milk or cashew milk if you want to add more flavor. If you are not lactose-intolerant, go ahead and use warm dairy milk instead. Make sure that the temperature is between 105F to 110F (the yeast requires the warmth to be activated, but if the water or milk is too hot, it will kill the yeast).
- Eggs: Eggs give the bread more rise and taste. I personally haven’t tried making this bread with an egg-replacer, so I don’t know how that will go. However, if you do try it, I’d love to hear your thoughts!
")
How to Make Gluten-Free Buckwheat Bread:
")
Grease and Preheat: Grease a 9″x4″ nonstick metal loaf pan with oil and preheat the oven to 350F. Arrange the oven rack to the middle position.
")
Combine Dry Ingredients: In a large mixing bowl, whisk the gluten-free all-purpose flour, xanthan gum (if using), buckwheat flour, psyllium husk, baking powder, salt, instant yeast, and sugar together.

Add Wet Ingredients: Add the vegetable oil, apple cider vinegar, warm water, and mix well until combined. Add the beaten eggs and mix for another minute until you get a dough that resembles thick cake batter (the dough will be sticky and wet, but that’s perfectly fine).

Transfer Dough to Pan: Transfer the dough to the prepared loaf pan and smooth out the top with a wet spatula.

Let Dough Rise: Cover the pan with a kitchen towel and let it rise for the next 30 minutes in a warm, draft-free place until it has roughly doubled in size.

Cool Completely Before Slicing: Let the loaf cool for at least 10 minutes in the pan, before removing and cooling fully on a wire rack. Once cooled, Use a serrated knife to slice once the bread is totally cool and enjoy!
Dish by Dish Tips/Tricks:
- Cool Completely: Allow the gluten-free buckwheat bread to cool completely before slicing into it as the bread will continue cooking with the residual heat in the loaf even after you remove it from the oven. When the bread is just baked, the crust will be hard, but after cooling down, it will be soft and easy to slice into.
- Use a Serrated Knife: Make sure you use a serrated bread knife with ridged edges to slice the bread as a smooth-edged knife will cause the bread to be flattened.
- Storing: To store the bread, place the cooled loaf in an airtight container and store in the refrigerator for up to a week.
- Freezing: To freeze, let the gluten-free buckwheat flour bread cool completely and then wrap in plastic wrap and freeze for up to 3 months. Before using, let the loaf thaw completely overnight in the refrigerator before slicing and toasting.
")
Other Homemade Gluten-Free Bread Recipes You’ll Love:
- Soft Fluffy Gluten-Free Bread (Dairy-Free)
- Soft Fluffy Dinner Rolls (Gluten-Free, Dairy-Free)
- Rosemary Focaccia Bread (Gluten-Free, Dairy-Free)
- Easy Gluten-Free Pizza Crust (Dairy-Free)
- Gluten-Free No Knead Bread (Dairy-Free)
More Bread Recipes to Bake:


P.S. If you try this recipe, I’d love for you to leave a star rating below, and/or a review in the comment section further down the page. I always appreciate your feedback. Be sure to check out my entire Recipe Index for all the recipes on the blog. You can also follow me on Pinterest, Facebook or Instagram! Sign up for my Email List to get fresh recipes in your inbox each week!
Soft, Fluffy Buckwheat Bread (Gluten-Free, Dairy-Free)
- Total Time: 1 hour 20 minutes
- Yield: 1 loaf 1x
- Diet: Gluten Free
Description
This super easy buckwheat bread is incredibly soft, fluffy and tender, and tastes delicious with a texture and look that’s uncannily similar to whole wheat bread! Totally gluten-free and dairy-free too, but you wouldn’t even know! We love making avocado toast with it, or spreading plenty of jam or honey all over. No matter how you eat it, it’s sure to be a favorite!
Ingredients
- 1 3/4 cup gluten-free all-purpose flour
- 1 teaspoon xanthan gum (leave this out if your flour blend already includes it)
- 1/2 cup buckwheat flour
- 1/4 cup psyllium husk powder
- 1 teaspoon baking powder
- 2 1/4 teaspoons instant yeast
- 2 tablespoons sugar
- 1 teaspoon salt
- 1/3 cup vegetable oil
- 1 teaspoon apple cider vinegar
- 1 1/2 cups warm water (approx. 105 to 110F)
- 2 large eggs, beaten (room temperature)
Instructions
- Grease and Preheat: Grease a 9″x4″ nonstick metal loaf pan with oil and preheat the oven to 350F. Arrange the oven rack to the middle position.
- Combine Dry Ingredients: In a large mixing bowl, whisk the gluten-free all-purpose flour, xanthan gum (if using), buckwheat flour, psyllium husk, baking powder, salt, instant yeast, and sugar together.
- Add Wet Ingredients: Add the vegetable oil, apple cider vinegar, warm water, and mix well until combined. Add the beaten eggs and mix for another minute until you get a dough that resembles thick cake batter (the dough will be sticky and wet, but that’s perfectly fine).
- Transfer Dough to Pan: Transfer the dough to the prepared loaf pan and smooth out the top with a wet spatula.
- Let Dough Rise: Cover the pan with a kitchen towel and let it rise for the next 30 minutes in a warm, draft-free place until it has roughly doubled in size.
- Bake: Bake for 40 to 50 minutes until the bread is dark brown on top and sounds hollow when tapped.
- Cool Completely: Let the loaf cool for at least 10 minutes in the pan, before removing and cooling fully on a wire rack.
- Slice and Enjoy: Use a serrated knife to slice once the bread is totally cool and enjoy!
Notes
Gluten-Free All-Purpose Flour: I highly recommend that you use a good quality gluten-free all-purpose flour blend that is made of lighter flours and starches such as rice flour, corn starch, or tapioca starch and that includes xanthan gum. I do NOT recommend using flour blends that include heavier flours such as garbanzo bean flour which tend to result in a denser final texture.
Xanthan Gum: Xanthan gum acts as a replacement for gluten in many gluten-free recipes, and is necessary for binding the ingredients together. If your gluten-free flour blend does not include it, make sure you add this in.
Buckwheat Flour: Since this is a buckwheat bread recipe, buckwheat flour is essential. You can either make your own 5-minute homemade buckwheat flour, or buy it online. If you would like to make this bread with another type of whole grain flour such as millet flour, amaranth flour, or quinoa flour, feel free to replace the buckwheat flour in a 1:1 ratio of the flour you wish to replace it with.
Psyllium Husk Powder: In this recipe, the psyllium husk powder helps to better bind the ingredients as well as give the bread a whole wheat flavor. I do NOT recommend that you swap out the psyllium husk powder with any other ingredient.
Apple Cider Vinegar: The apple cider vinegar reacts with the baking powder in this recipe to help the bread rise even more. If you don’t have ACV on hand, you can also use white vinegar or wine vinegar in equal quantities.
Warm Water: I use water in this case because I find it easiest. But you can also use warm non-dairy milk such as almond milk or cashew milk if you want to add more flavor. If you are not lactose-intolerant, go ahead and use warm dairy milk instead. Make sure that the temperature is between 105 – 110F (the yeast requires the warmth to be activated, but if the liquid is too hot it may kill the yeast).
Eggs: Eggs give the bread more rise and taste. I personally haven’t tried making this bread with an egg-replacer, so I don’t know how that will go. However, if you do try it, I’d love to hear your thoughts!
Cool Completely: Allow the bread to cool completely before slicing into it as the bread will continue cooking with the residual heat in the loaf even after you remove it from the oven. When the bread is just baked, the crust will be hard, but after cooling down, it will be soft and easy to slice into.
Use a Serrated Knife: Make sure you use a serrated bread knife with ridged edges to slice the bread as a smooth-edged knife will cause the bread to be flattened.
Storing/Freezing: To store the bread, place the cooled loaf in an airtight container and store in the refrigerator for up to a week. To freeze, let the loaf cool completely and then wrap in plastic wrap and freeze for up to 3 months. Before using, let the loaf thaw completely overnight in the refrigerator before slicing and toasting.
- Prep Time: 35 mins
- Cook Time: 45 mins
- Category: Bread
- Method: Baking
- Cuisine: American
Hello. Your recipe looks fantastic. I am wondering if I can use this recipe in my breadmaker, putting the wet ingredients in first, the dry on top, and finally the yeast?
Thanks kindly, Chris
Hi Chris, I personally don’t own a breadmaker, but I would imagine that you can make it just that you would need to mix all the ingredients together before placing it in the machine on a gluten-free bread setting. Hope this helps!
Kim, so sorry, I did not see your answer to my question, so I reposted! You can ignore! But I do have another question. You said to reduce the liquid by 1/4 cup. Do you have a specific suggestion? Obviously, the liquids are oil and water.
Thanks, Terri
Hi Terri, no worries! You can reduce the amount of water by 3/8 cup and see how the dough is. If too dry, add 1 teaspoon of water at a time until you get a consistency similar to the dough in the photos in the post.
So sorry to keep bugging you, but I really want to get this next attempt right! So I’m a bit confused…the 1st email says to reduce liquids by 1/4 c. and then your last one says 3/8 c. (which is almost 1/2 c. which is almost twice as much! That’s a big difference!). So which one should I try? Thanks for being patient with me! Terri
Hi Terri, sorry for the confusion. Let’s do this: reduce the water by 1/4 cup, hopefully that helps with the issue. Hope your loaf comes out well this time!
Thank you so much! That gives me the clarity I need! I will let you know how it turns out! I am determined to get this right!!! Terri
You’re most welcome, fingers crossed your buckwheat loaf comes out great!
I am getting ready to make your bread for the 2nd time. The first time, although I could tell that the taste/texture would be great, and even though I baked it 55 minutes, when I sliced off a sliver of the outer edge, it had a wet spot in the center. I put it back into the oven and baked another 20-30 min. Unfortunately, it never fully baked. In the center slices, there was even more gooey, gummy wet spots, in various places. Also, when the bread came out of the oven, it did sink down in the middle! Please help!!! I truly want this bread to turn out perfectly, and I know it will be a superb recipe if I can just get it right! Thanks for your help!!!
Hi Terri, in this case it sounds like your dough might be too wet (this could be due to the GF flour blend used, humidity where you live, etc). So I would suggest reducing the amount of liquids by 1/4 the amount. Hope this helps 🙂
Thank you! I will try this and let you know what happens! 🙂
Thank you for this recipe!
Just recently started trying out different GF bread recipes and was never satisfied with how they turned out (very dense), but just when I was about to give up, this recipe gave us a wonderful surprise.
Great texture and flavor! You can’t tell it’s a gluten free loaf of bread. Amazing. Thank you so much.
Hi Kris, so happy to hear that you enjoyed this buckwheat bread! Thanks for letting me know how it went, and I hope your GF bread baking journey goes easier!
I am a long time sourdough baker, trying to convert to GF, making bread with yeast. I did as directed, but my yeast did not activate. I am thinking it would be best to activate the yeast in the warm (105F) water, and then add to the rest of the ingredients? I never got a rise.
This has been happening to me, and I am not sure what I am doing wrong. Yeast should be easier than sourdough, but it is proving to be the most frustrating challenge thus far. My yield was flat flat flat. One more thing. having ingredients in grams would so very helpful. This is what the rest of the world uses. Thanks!
Hi Tracy, regarding the yeast – did you use instant yeast? Instant yeast doesn’t require prior activation. Perhaps you used active dry yeast, which requires being activated with warm water and sugar and letting it sit till foamy (before using it with the rest of the ingredients). Also, make sure to check that the yeast is not expired by activating it with warm water and sugar and mixing it and letting it sit in a warm place – if it doesn’t turn foamy after a few minutes, then your yeast is probably expired and you need to throw it out and buy a new packet.
I used to have a really good recipe for buckwheat bread but I can’t find it anywhere. I’ve been looking for one and I ran across yours. I thought I would try it
I didn’t have any psyllium husks however did have flaxseed meal
since psyllium and flaxseed are generally exchangeable I did it. I
I do not recommend doing that.
the “dough” looked like a soupy mess. I put it in the pan anyhowand iit actually did rise.
I put it in the oven and it baked up. It was looking good however it did sink in during the cooking cycle. took it out and thought I’m going to give it the extra 10 minutes and I took it out and it was still sunk down but it didn’t look too bad so I pulled it out of the oven and waited for it to cool my kids love it I think it’s okay but it has a strong vinegar taste to it. Otherwise it turned out pretty good. I’m really surprised. I I took pictures but I don’t know if I can publish them. The bread is good, but next time I will use a psyllium husk powder and forgo the flaxseed.
Thanks for your feedback Annette! Hope you do make this bread again with psyllium husk powder and that you’ll love it even more then 🙂
I made your lovely bread today fantastic thank you so much for sharing 🌹😊🙏
Hi Lalita! YAY so happy you enjoyed this buckwheat bread! It’s our favorite too 😉 Hope to see you around the blog again soon!
xx,
Felicia
In the 5 years I have been G F , L F as well as sugar free I have tried many bread recipes – and all were terrible disappointments to me. Mostly because they were too dry and tough. I have made buckwheat bread 5 times now and every single one was successful and the taste is absolutely wonderful. The bread is soft, not scratchy on my throat, it toasts well, makes a lovely sandwich and I will now make and eat this bread until I can no longer do it. You are marvellous and I do appreciate your efforts on behalf of every G F person. I have tried other recipes you have sent me and they are all great, but this one is wonderful!! Thank you so much
Hi Lorraine, thank you so much for your sweet note, it made my day completely! I spent quite a while developing this buckwheat bread recipe, so I’m really happy that you love it as much as we do! Happy holidays to you and your fam, and hope to see you on the blog again sometime soon!
I am so happy with this bread! The texture is perfect. It is light and tastes good. My bread pan is a little big and I would like to try increasing the recipe by about a quarter so it will rise to be rounded on top instead of flat. Do you have any recommendations ?
Hi Francine, so happy you enjoy this buckwheat bread as much as we do! Regarding making a larger loaf, I believe you should be able to increase the amounts of the flours and liquids by approximately 1/4 keeping the rest the same and it should work 🙂
Hello! I’ve used this recipe twice and it’s so delicious. The loaf, though, has collapsed and has been very small both times. Do you have any tips on how to prevent the loaf from collapsing?
Hi Heather, you can try reducing liquid by 1/4 cup, so the dough will take a longer time to rise, but the dough will be less wet and have more structure and not collapse after baking. Hope this helps!
xx,
Felicia
We’ve hunted for a long time for a recipe that tastes like, smells like and has the texture of breads made with gluten flours. You’ve nailed it! My daughter and I can’t thank you enough for sharing this recipe. She has many food allergies and the store bought GF breads have either Ragi flour or soy which make her sick. This bread filled a huge hole in her diet! THANK YOU!
Hi Gina! Your comment makes me so happy! I’m so glad that your daughter can finally enjoy bread without making her sick, that’s what really gives me joy! There’s a whole section on bread on the blog that you can explore: https://www.dishbydish.net/category/bread/. Hope to see you around the blog sometime soon!
xx,
felicia
OMG
I have tried few recipes diferente types but gluten free and I was losing hope, until I found this one, sooo easy and perfect
I would definitely keep making it my daughter loves it
Thanks Thanks
Hi Carolina! So happy to hear that you and your daughter are enjoying this buckwheat bread! 🙂
Hope to see you around the blog again sometime soon!
xx,
Felicia
I just wanted to confirm that it is one 3/4 cup of gluten free flour not 1and 3/4 cups.
Thank you.
Brian.
Hi Brian, it’s actually 1 and 3/4 cups GF all-purpose flour. Thanks for checking in, and hope you enjoy this buckwheat bread!
Hi,
I have never baked a bread before and recently developed gluten sensitivity. I am hoping to give this a try. Can you only use buckwheat flour instead of the gluten-free flour?
Hi! I wouldn’t leave out the gluten-free all-purpose flour because it adds more fluffiness to the bread. If you only use buckwheat flour, the bread will turn out much denser and you definitely won’t get a fluffy texture.
Hi,
Thanks for developing this easy gluten free bread. Gluten free anything use to be sooooo hard to get something that was good and not dry and crumbly.
Just made this bread a couple days ago. We are are at altitude at just below 4995 feet. Hopefully this helps the other person asking about high altitude.
While we are not gluten free most of the time – hubby is diabetic so reducing carbs is necessary. This bread was a beautiful loaf in all ways. It baked up well – in a toaster oven – cause it’s too hot to turn on the large oven. Slicing was a dream. We’re excited that he can make sandwiches again!
The only things I did differently were to calculate the flour into grams according to my gluten free flour pkg instructions. And I only used half of the baking powder. I was lucky enough for a pastry chef to tell me years ago to just half the leaveners for baking at my altitude. Coming from sea level to altitude was a hard learning curve :).
Hi Kim! Thanks so much for sharing! So excited to hear that this loaf baked up well even at high altitude (indeed it’s such a learning curve isn’t it)? I’ve never baked at high altitude before, so until recently didn’t realize there was a difference until readers started asking.
Thanks for the tip on using half the baking powder, so useful.
Cheers to your hubby being able to enjoy sandwiches again!
Hope to see you around the blog again sometime soon.
xx,
Felicia