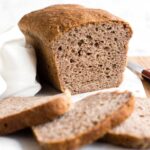
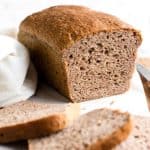
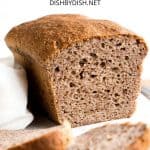
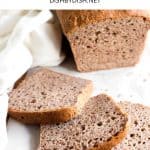
Soft, Fluffy Buckwheat Bread (Gluten-Free, Dairy-Free)
This super easy buckwheat bread is incredibly soft, fluffy and tender, and tastes delicious with a texture and look that’s uncannily similar to whole wheat bread! It’s the most popular bread recipe on the blog, and thousands of readers bake and love it! Totally gluten-free and dairy-free too, but you wouldn’t even know!
")
Want to save this recipe?
Enter your email & I’ll send it to your inbox. Plus, get great new recipes from me every week!
The Fluffiest Buckwheat Bread
Many buckwheat flour bread recipes tend to turn out dry and dense, and I was set on developing a gluten-free brown bread recipe that resembled whole wheat bread in appearance and taste. I also wanted to make sure that it was also soft and fluffy – everything a good loaf of gluten-free bread should be.
I am insanely happy that I’ve got this gorgeous buckwheat bread to share with you. With a beautifully brown crust, a perfect rise, and the coveted holes in the bread, this loaf is tender and moist, you would never guess that it’s both gluten-free and dairy-free!
I first published this post in 2021, and since then this buckwheat bread has consistently been our popular bread recipe on the blog!
")

Baking with Buckwheat Flour
If you’ve never cooked with buckwheat before, it’s basically a highly-nutritous grain-like seed that’s a psuedocereal and totally gluten-free, despite the word “wheat” in its name.
Making it at home is actually way simpler than it sounds and much cheaper than if you buy it pre-made. If you’re up to it, have 5 minutes to spare and a high-speed blender on hand, I’ve got a quick tutorial for homemade buckwheat flour to get your started!
")
Why This Recipe Works:
- Simple Ingredients: The main ingredients required for this buckwheat bread recipe are easily accessible at the local grocery store (look at the natural food section or gluten-free section).
- Easy to Make: I’ve never been a fan of complicated recipes, and this buckwheat bread recipe is no different from the other simple bread recipes on the blog. Just 5 minutes of hands-on time is all you need, and then let it rise for 30 minutes before baking.
- Soft and Fluffy: I’m not kidding when I say this recipe is tender. It’s a foolproof recipe that will always give you a soft, fluffy loaf!
- Totally Gluten-Free & Dairy-Free: The best part is that this recipe is 100% gluten-free and dairy-free, which means that even those with Celiac disease or gluten or lactose intolerances can enjoy without issues!
")

Ingredients You’ll Need:
Here’s a visual overview of the ingredients required for making this buckwheat bread recipe.
(For exact measurements, please scroll down to the printable recipe card at the bottom of this post.)
")
Ingredient Notes/Substitutions:
- Gluten-Free All-Purpose Flour: I highly recommend that you use a good quality gluten-free flour blend that is made of lighter flours and starches such as rice flour, corn starch, or tapioca starch and that includes xanthan gum. I do NOT recommend using flour blends that include heavier flours such as garbanzo bean flour which tend to result in a denser final texture.
- Xanthan Gum: Xanthan gum acts as a replacement for gluten in many gluten-free recipes, and is necessary for binding the ingredients together. If your gluten-free flour blend does not include it, make sure you add this in.
- Buckwheat Flour: Since this is a buckwheat bread recipe, buckwheat flour is essential. You can either make your own 5-minute homemade buckwheat flour, or buy it online. If you would like to make this bread with another type of whole grain flour such as millet flour, amaranth flour, or quinoa flour, feel free to replace the buckwheat flour in a 1:1 ratio of the flour you wish to replace it with.
- Psyllium Husk Powder: In this gluten-free brown bread recipe, the psyllium husk powder helps to better bind the ingredients as well as give the bread a whole wheat flavor. I do NOT recommend that you swap out the psyllium husk powder with any other ingredient.
- Apple Cider Vinegar: The apple cider vinegar reacts with the baking powder in this buckwheat bread recipe to help the bread rise even more. If you don’t have ACV on hand, you can also use white vinegar or wine vinegar in equal quantities.
- Warm Water: I use water in this case because I find it easiest. But you can also use warm non-dairy milk such as almond milk or cashew milk if you want to add more flavor. If you are not lactose-intolerant, go ahead and use warm dairy milk instead. Make sure that the temperature is between 105F to 110F (the yeast requires the warmth to be activated, but if the water or milk is too hot, it will kill the yeast).
- Eggs: Eggs give the bread more rise and taste. I personally haven’t tried making this bread with an egg-replacer, so I don’t know how that will go. However, if you do try it, I’d love to hear your thoughts!
")
How to Make Gluten-Free Buckwheat Bread:
")
Grease and Preheat: Grease a 9″x4″ nonstick metal loaf pan with oil and preheat the oven to 350F. Arrange the oven rack to the middle position.
")
Combine Dry Ingredients: In a large mixing bowl, whisk the gluten-free all-purpose flour, xanthan gum (if using), buckwheat flour, psyllium husk, baking powder, salt, instant yeast, and sugar together.

Add Wet Ingredients: Add the vegetable oil, apple cider vinegar, warm water, and mix well until combined. Add the beaten eggs and mix for another minute until you get a dough that resembles thick cake batter (the dough will be sticky and wet, but that’s perfectly fine).

Transfer Dough to Pan: Transfer the dough to the prepared loaf pan and smooth out the top with a wet spatula.

Let Dough Rise: Cover the pan with a kitchen towel and let it rise for the next 30 minutes in a warm, draft-free place until it has roughly doubled in size.

Cool Completely Before Slicing: Let the loaf cool for at least 10 minutes in the pan, before removing and cooling fully on a wire rack. Once cooled, Use a serrated knife to slice once the bread is totally cool and enjoy!
Dish by Dish Tips/Tricks:
- Cool Completely: Allow the gluten-free buckwheat bread to cool completely before slicing into it as the bread will continue cooking with the residual heat in the loaf even after you remove it from the oven. When the bread is just baked, the crust will be hard, but after cooling down, it will be soft and easy to slice into.
- Use a Serrated Knife: Make sure you use a serrated bread knife with ridged edges to slice the bread as a smooth-edged knife will cause the bread to be flattened.
- Storing: To store the bread, place the cooled loaf in an airtight container and store in the refrigerator for up to a week.
- Freezing: To freeze, let the gluten-free buckwheat flour bread cool completely and then wrap in plastic wrap and freeze for up to 3 months. Before using, let the loaf thaw completely overnight in the refrigerator before slicing and toasting.
")
Other Homemade Gluten-Free Bread Recipes You’ll Love:
- Soft Fluffy Gluten-Free Bread (Dairy-Free)
- Soft Fluffy Dinner Rolls (Gluten-Free, Dairy-Free)
- Rosemary Focaccia Bread (Gluten-Free, Dairy-Free)
- Easy Gluten-Free Pizza Crust (Dairy-Free)
- Gluten-Free No Knead Bread (Dairy-Free)
More Bread Recipes to Bake:


P.S. If you try this recipe, I’d love for you to leave a star rating below, and/or a review in the comment section further down the page. I always appreciate your feedback. Be sure to check out my entire Recipe Index for all the recipes on the blog. You can also follow me on Pinterest, Facebook or Instagram! Sign up for my Email List to get fresh recipes in your inbox each week!
Soft, Fluffy Buckwheat Bread (Gluten-Free, Dairy-Free)
- Total Time: 1 hour 20 minutes
- Yield: 1 loaf 1x
- Diet: Gluten Free
Description
This super easy buckwheat bread is incredibly soft, fluffy and tender, and tastes delicious with a texture and look that’s uncannily similar to whole wheat bread! Totally gluten-free and dairy-free too, but you wouldn’t even know! We love making avocado toast with it, or spreading plenty of jam or honey all over. No matter how you eat it, it’s sure to be a favorite!
Ingredients
- 1 3/4 cup gluten-free all-purpose flour
- 1 teaspoon xanthan gum (leave this out if your flour blend already includes it)
- 1/2 cup buckwheat flour
- 1/4 cup psyllium husk powder
- 1 teaspoon baking powder
- 2 1/4 teaspoons instant yeast
- 2 tablespoons sugar
- 1 teaspoon salt
- 1/3 cup vegetable oil
- 1 teaspoon apple cider vinegar
- 1 1/2 cups warm water (approx. 105 to 110F)
- 2 large eggs, beaten (room temperature)
Instructions
- Grease and Preheat: Grease a 9″x4″ nonstick metal loaf pan with oil and preheat the oven to 350F. Arrange the oven rack to the middle position.
- Combine Dry Ingredients: In a large mixing bowl, whisk the gluten-free all-purpose flour, xanthan gum (if using), buckwheat flour, psyllium husk, baking powder, salt, instant yeast, and sugar together.
- Add Wet Ingredients: Add the vegetable oil, apple cider vinegar, warm water, and mix well until combined. Add the beaten eggs and mix for another minute until you get a dough that resembles thick cake batter (the dough will be sticky and wet, but that’s perfectly fine).
- Transfer Dough to Pan: Transfer the dough to the prepared loaf pan and smooth out the top with a wet spatula.
- Let Dough Rise: Cover the pan with a kitchen towel and let it rise for the next 30 minutes in a warm, draft-free place until it has roughly doubled in size.
- Bake: Bake for 40 to 50 minutes until the bread is dark brown on top and sounds hollow when tapped.
- Cool Completely: Let the loaf cool for at least 10 minutes in the pan, before removing and cooling fully on a wire rack.
- Slice and Enjoy: Use a serrated knife to slice once the bread is totally cool and enjoy!
Notes
Gluten-Free All-Purpose Flour: I highly recommend that you use a good quality gluten-free all-purpose flour blend that is made of lighter flours and starches such as rice flour, corn starch, or tapioca starch and that includes xanthan gum. I do NOT recommend using flour blends that include heavier flours such as garbanzo bean flour which tend to result in a denser final texture.
Xanthan Gum: Xanthan gum acts as a replacement for gluten in many gluten-free recipes, and is necessary for binding the ingredients together. If your gluten-free flour blend does not include it, make sure you add this in.
Buckwheat Flour: Since this is a buckwheat bread recipe, buckwheat flour is essential. You can either make your own 5-minute homemade buckwheat flour, or buy it online. If you would like to make this bread with another type of whole grain flour such as millet flour, amaranth flour, or quinoa flour, feel free to replace the buckwheat flour in a 1:1 ratio of the flour you wish to replace it with.
Psyllium Husk Powder: In this recipe, the psyllium husk powder helps to better bind the ingredients as well as give the bread a whole wheat flavor. I do NOT recommend that you swap out the psyllium husk powder with any other ingredient.
Apple Cider Vinegar: The apple cider vinegar reacts with the baking powder in this recipe to help the bread rise even more. If you don’t have ACV on hand, you can also use white vinegar or wine vinegar in equal quantities.
Warm Water: I use water in this case because I find it easiest. But you can also use warm non-dairy milk such as almond milk or cashew milk if you want to add more flavor. If you are not lactose-intolerant, go ahead and use warm dairy milk instead. Make sure that the temperature is between 105 – 110F (the yeast requires the warmth to be activated, but if the liquid is too hot it may kill the yeast).
Eggs: Eggs give the bread more rise and taste. I personally haven’t tried making this bread with an egg-replacer, so I don’t know how that will go. However, if you do try it, I’d love to hear your thoughts!
Cool Completely: Allow the bread to cool completely before slicing into it as the bread will continue cooking with the residual heat in the loaf even after you remove it from the oven. When the bread is just baked, the crust will be hard, but after cooling down, it will be soft and easy to slice into.
Use a Serrated Knife: Make sure you use a serrated bread knife with ridged edges to slice the bread as a smooth-edged knife will cause the bread to be flattened.
Storing/Freezing: To store the bread, place the cooled loaf in an airtight container and store in the refrigerator for up to a week. To freeze, let the loaf cool completely and then wrap in plastic wrap and freeze for up to 3 months. Before using, let the loaf thaw completely overnight in the refrigerator before slicing and toasting.
- Prep Time: 35 mins
- Cook Time: 45 mins
- Category: Bread
- Method: Baking
- Cuisine: American
So delicious toasted or warmed, I can barely make it last a few days. Thank you!
Hi Lisa! So happy to hear that you love this buckwheat bread! It’s definitely a favorite of ours as well! Like you mentioned, a loaf disappears very quickly in our house too!
mine wasn’t what i call fluffy and it looked very insipid. however i was pleasantly surprised that it was quite pleasant to eat… not heavy but hard like other gf breads I’ve tried. if remake will add lots of my fave seeds etc too make our life exciting. good basic recipe tho. it kept well n in n and out of fridge
Hi, if your bread didn’t come out fluffy, it could be that the dough was too dry (this can depend on the type of GF all-purpose flour blend used, the humidity level where you live, the season you’re in etc.). If you bake this again, try adding a little bit more water/milk so the dough is a little more wet and can rise more before baking.
I saw that you told another commenter that 2 tablespoons is enough psyllium husk powder. How important is the psyllium husk powder important for binding? Would a quarter cup make the dough bind better that two table spoons? How important is it for flavor?
Hi Aaron, 2 tablespoons will be fine too. 1/4 cup will create more of a binding powder (and a slightly chewier texture). But 2 tablespoons is great if you don’t want too much chew.
I just baked this bread for the 3d time. It looked great when it was done baking, but it fell when I set it to cool. The last 2 times I followed your instructions closely and had the same result. This time I had to substitute a 1/2 cup of regular flour for the gluten free flour. Do you have any suggestions? I like this bread, even if it falls, but I want it to stay risen. It seems that it is moister in the middle than it should be. Do you think baking it at 375 degrees or 400 degrees might help? I will check my oven’s digital temperature against an oven thermometer. I’m going to keep trying. I’m about 20 meters higher altitude here in Rhode Island as Buenos Aires, but it’s summer and about 30 degrees fahrenheit warmer.
Hi Aaron, thanks for letting me know how your loaf went. Let’s troubleshoot, it sounds like your dough might be a little wet, so you can reduce the water by 1/4 cup to get a drier dough – basically it should be like thicker cake batter and shouldn’t jiggle too much (which means the dough will take longer to rise, but it shouldn’t fall once you’re done baking). Hope this helps, and happy baking!
Hi there. I have made this bread every weekend for about a year now. For quite some time I tweaked and perfected it for me. The bread was great my husband Loved it. I liked it too. but Now for the last 2 months something has been happening to it. The biggest cavernous holes in the top. It looks like the bread has baked quite high and looks amazing but then it shows true colours. Big hole in top. Bread doesn’t raise to full loaf. Sometimes small but other times esp today large gaping cavern. Basically the whole of the top of the bread a hole. I can’t explain why it’s doing this. The eggs are room temp. I proof the bread for half hour. I used less water cause that made a difference once. it’s been summer but now it cool again so I don’t know whether humidity is a factor. As I said I have made this every weekend for a year now in all climates. I bake it a little longer take it out of tin and put back in oven to crisp up sides. I allow it to cool completely. So I just don’t understand why the hole is there everytime. What am I doing wrong? Is it time to change my recipe. It’s hard once you get good at it to start again. Thanks
Hi Merissa, did you change the type of flour used? Or did you change any ingredients recently? Because if it worked for you for 1 year it’s weird that it suddenly doesn’t work as well. One thing I can say is that usually when there is a hole in the bread, it is likely that the dough was too wet (so you can reduce the water by 1/4 cup and add more as required). The dough should be shaggy and wet, but not too liquid (if dough is too liquid it will rise too quickly and then result in a hole in the loaf).
I tried this buckwheat bread recipe tonight and it turned out great! I used my bread machine to mix it- when the mixing stopped, I pulled the plug on the machine and poured the batter from the machine’s container into the prepared loaf pan to let it rise. I left it in the microwave with the door ajar and the light on to rise for 30 minutes, then baked it at 350F for 45 minutes– perfect results! Thank you for the recipe!
Hi Lynda! So happy to hear that you really enjoyed this buckwheat loaf! Also, such as smart trick to get the bread machine to mix the ingredients 😉 Happy baking, and hope to see you around the blog again sometime soon!
xx,
felicia
Hi Felicia (my half-Italian/half-Brazilian baby granddaughter is called Filizia 💕),
You have no idea how many gluten-free bread recipes I’ve been trying to make and none of them have really made me happy. All the ones I tried ended up being heavy, lumpy or dry. I was already thinking that I wasn’t capable of making bread, even though I can cook very well.
Then I came across your recipe. It was one of the easiest to make and with the most incredible result.
Fluffy, light, tall, beautiful, big and tasty bread. What a recipe!
I changed a few things:
1 – I preheated the oven with an empty not so tall form on the bottom, when I put the bread in, at the same time, I poured water into the form and closed the door, which brought a little steam.
2 – I preheated the oven with standard heat, but after 20 minutes, I switched to fan, because the crust on top was already formed.
3 – I put some of the dough in a very small form to bake together, because I couldn’t wait to taste it, so when it was all ready and out of the oven I disinformed the little guy still hot and cut it out, buttered it and ate it!!!! So delicious!!!
Thank you Felicia for this amazing recipe ❤️
Hi Zoe! So happy to hear you loved this buckwheat bread! It is definitely one of our favorites for sure and I’m glad you were able to make it without difficulties 🙂 Thank you for sharing how it went, so glad you enjoyed it and hope to see you around the blog again sometime soon!
Happy baking dear!
xx,
felicia
I made it and I called it my Volcano Bread, even though the taste and texture is more like a cake. It is delicious but I used the suggested size loaf pan, hence, the volcano. Next time I will use the next size loaf pan. My family said it was too sweet for them, so next time I make it I will use less sugar.
Glad you enjoyed this bread Janet! You can always reduce the amount of sugar according to how sweet/not sweet your family would like it! 🙂 Happy baking, and hope to see you around the blog again sometime soon!
xx,
felicia
hallo, wird das brot mit heißluft gebacken, weil nur 175 grad?
Hallo Natalie, es sind 175 Grad Celsius (350 Grad Fahrenhei)
Delicious! Great recipe. Very easy to make. It is everything you said it would be. Thank you!
You’re most welcome Terry! Glad you enjoyed this buckwheat bread!
Great recipe, so easy to make and very tasty too
Hi Barry! Happy to hear you enjoyed this buckwheat bread. Happy baking!
flavor wise it tasted good and was the same as the pancakes I make, but I couldn’t get it to proof enough to make a nice loaf.
Hi Susan! Glad you enjoyed the flavor! As for not rising enough, maybe the loaf might need a bit more warm water (and also depends on the temperature of your kitchen, it may rise more during a hot summer and less during a cold winter).
I have never tried making gluten free bread before. I love buckwheat, and I decided to give this recipe a shot. Oh. My. Goodness! I couldn’t’ve started at a better place! So SO soft, moist and flavorful! I HIGHLY recommend! Thank you Felicia!!
YAY!! So happy to hear that you enjoyed this buckwheat bread! Thanks for letting me know how it went, G! And happy baking!! See you around the blog again sometime soon!
Delicious!
YAY! So happy to hear that Teresa!
Hi Felicia-
I’m getting ready to try this recipe, but am wondering if the psyllium husk amount is a typo. Is it really 1/4 cup psyllium husk powder? Most of your other breads (except millet) with similar ingredients have 2 tablespoons psyllium husk powder. I guess I’ve usually seen 2 tablespoons in most other bread recipes. Anyway, if you get a chance to respond, I’d appreciate it. Thanks!
Hi Teresa, sorry for the late response! I’ve been traveling. 2 tablespoons will work, but if you want more fibre, you can go up to 1/4 cup too.
I’ve made and enjoyed your buckwheat bread recipe several times. Delicious taste and texture.
I just made a loaf substituting teff flour for buckwheat. The flavor is different, but the texture is much the same.
Many Thanks,
Eric
Hi Eric! So happy you enjoyed the buckwheat bread (and also the teff version!). You can easily substitute the buckwheat flour for other types of flour too (like amaranth flour, sorghum flour etc). Happy baking!