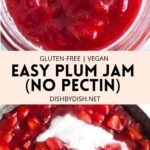
Easy Plum Jam Recipe (No Pectin!)
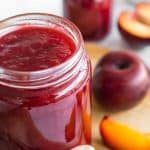
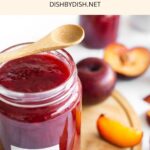
An easy plum jam recipe without pectin that only requires 4 simple ingredients, is ready in an hour, and is bursting with the flavor of sweet ripe plums. Perfect for spreading on toast, spooning over homemade yogurt, filling your pie crust, or even eating it by the spoonful! Totally gluten-free, dairy-free, vegan and pectin-free, but it’s so good no one would notice!
")
Want to save this recipe?
Enter your email & I’ll send it to your inbox. Plus, get great new recipes from me every week!
Summer Means Stone Fruit Season
The best part of summer, apart from the longer days of golden sunshine and warmth, is really stone fruit season.
From peaches, nectarines, apricots and plums, I’m a big fan of all kinds of delicious stone fruit. And during the summer time of year, I often buy many pounds of fruit so we’re never short of them.
In my house, we eat stone fruit every occasion we can – fresh if possible, or baked into a peach cobbler or pie. Another great way of using up the fresh fruit is making jams and marmalades of all kinds.
Make the Most of Summer’s Fresh Plums
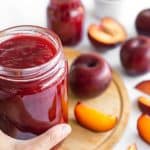
If you have a basket of ripe plums just begging to be used, this easy plum jam recipe is one of the best ways to preserve their sweet, juicy flavor.
Made without pectin, this homemade jam relies on simple ingredients and the natural pectin found in the fruit to create a delicious spread that’s bursting with fresh plum goodness.
Seasoned jam maker or making homemade preserves for the first time, you’ll love how easy this recipe is to make.
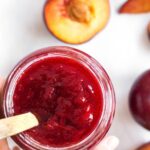
Spread it on toast, swirl it into yogurt, or enjoy it straight from the spoon, it doesn’t matter. Once you taste this homemade plum jam, you’ll want to make it every plum season.
")
")
Why This Recipe Works:
- Simple Ingredients: This easy plum jam recipe only requires 4 simple ingredients that are easily accessible at the local grocery stores (nothing fancy needed!).
- Easy to Make: Even if it’s your first time making homemade plum jam, don’t worry because it’s a foolproof recipe that’s so easy you’ll be enjoying this delicious jam in no time at all!
- No Pectin Required: While some jam recipes call for pectin to bind the jams and help them set properly so as to prevent them from having a runny texture, no pectin is required to make this easy recipe. In this case, the lemon juice is the secret ingredient and acts as a natural pectin in binding the ingredients and creating the perfect gel-like consistency we associate with jam.
- Totally Gluten-Free, Vegan: Best of all, this plum jam recipe is totally gluten-free, dairy-free and vegan too, which means even those with Celiac disease or gluten or lactose intolerances can enjoy it too!
")
Ingredients You’ll Need:
Here’s a visual overview of the ingredients required for this homemade plum jam recipe without pectin.
(For exact measurements, please scroll down to the printable recipe card at the bottom of this post.)
")
Ingredient Notes/Substitutions:
- Plums: You can use different types of plums for this recipe (whether red plums, black plums or yellow plums). I like cutting the plums into small pieces which helps the fruit to disintegrate better as they cook, as I prefer not to have large pieces of fruit in my jam. However, if you like having pieces of fruit in the jam, you can cut the plums into large pieces.
- Sugar: I used granulated white sugar, however you can also use light brown sugar or dark brown sugar if you prefer. If you are diabetic or insulin-resistant, I highly recommend that you use Lakanto monkfruit sweetener (a 1:1 sugar substitute that is zero glycemic index and will not raise your blood sugar). If you prefer your jam with less sugar, you can reduce the amount of sugar.
- Lemon Juice: I highly recommend using fresh lemon juice for the best flavor, but if you only have bottled lemon juice, that will work too. Don’t skip adding lemon juice because the acidity of the lemon juice helps to set the jam and prevents it from becoming runny.
How to Make Plum Jam (Step by Step):

Wash, Dry and Cut the Plums: Wash the plums well and dry them. Slice them in half to remove the stones before cutting the flesh into smaller pieces.

Combine Plums and Water: Place the cut plums and water in a large non-stick skillet, large saucepan or large pot.

Simmer: Bring the ingredients to boil before reducing to a simmer over medium heat, making sure to stir occasionally, until the plums are soft and are started to disintegrate (approximately 15 to 20 minutes).

Add Juice and Sugar: Add the fresh lemon juice and sugar, stirring continuously until the sugar has dissolved.

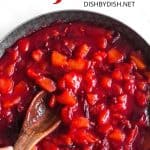
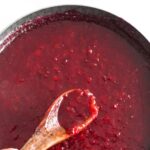
Bring to a Low Boil: Increase the heat and bring the mixture to a low boil for approximately 20 to 30 minutes, stirring often to prevent the jam from burning at the bottom of the skillet. Use a spatula or a back of a slotted spoon to mash any large pieces of fruit as it cooks. Once the jam coats the back of a spoon (or once temperature reaches 220F), the jam is ready.
Let Cool and Transfer to Jars: Allow the plum jam to stand for at least 10 minutes in the skillet until it has cooled before transferring the jam to sterilized glass jars and sealing tight.
Dish by Dish Tips:
- Don’t Skip the Lemon Juice: Since we are not using added pectin to set this plum jelly, make sure you don’t skip the lemon juice, which is required because the acidity of the lemon juice helps to bind the ingredients and create the gel-like consistency we love about jam.
- Add Extra Flavor: If you like, you may also add in a few cinnamon sticks to the skillet or pot as the jam cooks to add extra flavor.
- Extra Smooth Jam: If you want a smoother jam, you can either use an immersion blender to blend the final product to the consistency that you like.
- Use Sterilized Glass Jars: Make sure to sterilize your glass jars before storing your jam to prevent any bacteria or mold from growing (which will cause the jam to spoil).
- Swap Out the Plums for Other Stone Fruit: If you don’t have fresh plums on hand, but would like to make this jam recipe anyway, simply use the same amount of other stone fruits instead, such as apricots, peaches, or nectarines! Or better yet, you could use a mix of all the stone fruits available!
Recipe FAQs:
Store the jam jars for up to a year in a cool place away from direct light. Once opened, keep the plum jelly in the refrigerator for up to 3 months.
I personally like using fresh lemon juice because I almost always have a bunch of fresh lemons on hand. However, you may also use bottled lemon juice if that’s what you have.
Once the jam coats the back of a metal spoon (or use a candy thermometer to check that temperature has reached 220F), the jam is ready. Alternatively, you can use the cold plate test (place a small plate in the freezer at the start of the cooking process. Once the red plum jam has thickened, spoon a bit of the jam onto the plate and tilt it so the jam runs. If the jam runs slowly, it’s set! If not, cook a little longer and test again).
No, it is not necessary for you to remove the plum skins for this plum jelly. Just leave the on and cut the flesh into small pieces before cooking.
")
Favorite Breads to Eat This Jam with:
- Soft Fluffy Gluten-Free Bread (Dairy-Free)
- Fluffy Buckwheat Bread (Gluten-Free, Dairy-Free)
- Soft Brown Rice Bread (Gluten-Free, Dairy-Free)
- Sorghum Bread (Gluten-Free, Dairy-Free)
- Teff Bread (Gluten-Free, Dairy-Free)
- Quinoa Bread (Gluten-Free, Dairy-Free)
- Low Carb Coconut Flour Bread (Gluten-Free, Paleo, Keto)
- Low Carb Almond Flour Bread (Gluten-Free, Paleo, Keto)
- Easy Honey Oat Bread (Gluten-Free, Dairy-Free Option)
")
Other Homemade Jam Recipes You’ll Also Love:
- Easy Apricot Jam (Gluten-Free, Vegan)
- Mixed Berry Chia Seed Jam (Gluten-Free, Vegan)
- Easy Kumquat Marmalade (Gluten-Free, Vegan)
- Strawberry Chia Seed Jam (Gluten-Free, Vegan)
- Homemade Fig Jam (Gluten-Free, Vegan)
Dessert Recipes to Enjoy:


P.S. If you try this recipe, I’d love for you to leave a star rating below, and/or a review in the comment section further down the page. I always appreciate your feedback. Be sure to check out my entire Recipe Index for all the recipes on the blog. You can also follow me on Pinterest, Facebook or Instagram! Sign up for my Email List to get fresh recipes in your inbox each week!
Easy Plum Jam Recipe (No Pectin)
- Total Time: 1 hour
- Yield: 2 16oz jars 1x
- Diet: Gluten Free
Description
An easy plum jam recipe without pectin that only requires 4 simple ingredients, is ready in an hour, and is bursting with the flavor of sweet ripe plums. This red plum jam is perfect for spreading on toast, spooning over homemade yogurt, filling your pie crust, or even eating it by the spoonful! Totally gluten-free, dairy-free, vegan and pectin-free, but it’s so good no one would notice!
Ingredients
- 2 pounds fresh plums
- 1/4 cup water
- 2 cups granulated sugar
- 1 1/2 tablespoons fresh lemon juice
Instructions
- Wash, Dry and Cut the Plums: Wash the plums well and dry them. Slice them in half to remove the stones before cutting the flesh into smaller pieces.
- Combine Plums and Water: Place the cut plums and water in a large non-stick skillet, large saucepan or large pot.
- Simmer: Bring the ingredients to boil before reducing to a simmer over medium heat, making sure to stir occasionally, until the plums are soft and are started to disintegrate (approximately 15 to 20 minutes).
- Add Juice and Sugar: Add the fresh lemon juice and sugar, stirring continuously until the sugar has dissolved.
- Bring to a Low Boil: Increase the heat and bring the mixture to a low boil for approximately 20 to 30 minutes, stirring often to prevent the jam from burning at the bottom of the skillet. Use a spatula or a back of a slotted spoon to mash any large pieces of fruit as it cooks. Once the jam coats the back of a spoon (or once temperature reaches 220F), the jam is ready.
- Let Cool and Transfer to Jars: Allow the plum jam to stand for at least 10 minutes in the skillet until it has cooled before transferring the jam to sterilized glass jars and sealing tight.
Notes
Plums: I like cutting the plums into small pieces which helps the fruit to disintegrate better as they cook, as I prefer not to have large pieces of fruit in my jam. However, if you like having pieces of fruit in the jam, you can cut the plums into large pieces.
Sugar: I used granulated white sugar, however you can also use light brown sugar or dark brown sugar if you prefer. If you are diabetic or insulin-resistant, I highly recommend that you use Lakanto monkfruit sweetener (a 1:1 sugar substitute that is zero glycemic index and will not raise your blood sugar).
Lemon Juice: I recommend using fresh lemon juice for the best flavor. Don’t skip adding lemon juice because the acidity of the lemon juice helps to set the jam and prevents it from becoming runny.
Use Sterilized Glass Jars: Make sure to sterilize your glass jars before storing your jam to prevent any bacteria or mold from growing (which will cause the jam to spoil).
Storing: Store the jam jars for up to a year in a cool place away from direct light. Once opened, keep the jam in the refrigerator for up to 3 months.
- Prep Time: 10 mins
- Cook Time: 50 mins
- Category: Jams
- Method: Stovetop
- Cuisine: American

Does this require a water bath?
Nope, a water bath is not necessary
I made a half recipe and it turned out perfect! Very nice jam and not too sweet
Hi Lorraine, glad to hear you enjoyed this plum jam! Thanks for taking the time to let me know how it went 🙂
how many jars would I need for basic recipe you listed?
Hi Laurel! You would need 2 (16oz) jars. Happy canning!
How do we thicken the jam if it’s top watery?
Hi Karim, you can continue to cook the jam for a little longer until more of the water content evaporates to get thicken the consistency.
what i did is mix corn starch and water then mix it in plum jelly in large pan over low heat once mixed well jar it up. worked perfect made 10 jar a month ago and nothing left kids ate it all. making more today.
Espectacular esta receta de mermelada de ciruelas
Me encantan las mermeladas y con una bna rebanada de cualquiera de los
panes propuestos…
Ms. Gracias!!!!
Gracias!!! Si… las mermeladas caseras son lo mas!
Excellent recipe. Used apple juice instead of water, and one cup of granulated sugar. Turned out wonderfully, which I will use in my roasted Turkey breast recipe. Thank you.
So happy to hear that Yisroel! Glad you enjoyed this plum jam recipe 🙂
My jam got too hard. Did I cook it too long? Can I thin it out?
Hi Diane, yes, you can easily thin out your jam by combining it with 1/2 cup hot water over low heat and stir until it reaches the consistency you want. Hope this helps!
I find the skin just a bit too sour. Can the skin be removed? and what is the best way to remove it?
Hi Jacob, hmmm I’ve never tried removing the plum skins (I think that would take quite a bit of time and you might end up removing a lot of the flesh as well). If you wish to mitigate the sourness of the skins, maybe you can add a little bit more sugar to sweeten it out.
hey Jacob , I use a good mill on fine mesh and it removes any pits I missed also.
should have read, ‘food mill’
I wonder if it would work using a Victorio Strainer, like I do when I make applesauce. I think that’s what I did last year with our plums. Norpro has a sauce maker as well.
will this recipe work if I double the ingredients?
Hi Jodie, I don’t see why that should be a problem!
Made a double batch of plum and it is 5 star! It’s delicious, easy and that’s what I like! Thank You!
YAY! So happy to hear that Caroline!! Happy jamming and hope to see you around the blog again sometime soon!
xx,
felicia