Best Gluten Free Naan Bread (No-Yeast, No-Yogurt, Dairy-Free)
Soft and tender with a chewy interior, this super easy gluten free naan bread recipe is ready in just 30 minutes. Flavored with parsley and garlic for aroma and taste, it’s totally yeast-free, gluten-free, and dairy-free (no yogurt required!), but it’s so good no one would care! Make a fresh batch of this delicious naan and eat it as a side dish or appetizer (with this delicious slow cooker lentil curry, alongside our popular creamy hummus, baba ganoush, or even on its own)!
")
Want to save this recipe?
Enter your email & I’ll send it to your inbox. Plus, get great new recipes from me every week!
Jump to:
- What is Naan?
- Missing Naan Bread
- The Best Gluten-Free Naan Bread (Also Dairy-Free & Yeast-Free)
- Why This Recipe Works
- Ingredients You’ll Need:
- Ingredient Notes/Substitutions:
- How to Make Naan Bread (Step by Step):
- Tear into your naan and devour it!
- Dish by Dish Tips and Tricks
- Recipe FAQs:
- How to Serve Naan Bread:
- Other Gluten-Free Bread Recipes You’ll Love:
- Appetizer Recipes to Enjoy:
- Easy Gluten Free Naan Bread (No-Yeast, No-Yogurt, Dairy-Free)
What is Naan?
If you’ve never tried naan before, or if it’s the first time you’ve heard of it, naan is basically a soft, yeast-leavened flatbread eaten in south Asian cuisines (in particular Indian cuisine).
Traditionally cooked in an outdoor tandoor oven, naan looks very similar to pita bread, and traditionally uses wheat flour as the base and requires yeast for leavening.
I absolutely love Indian food, and one of my favorite versions of this Indian flatbread is garlic naan, in which fresh minced garlic is studded on the surface of this flatbread, and brings a burst of flavor so intense you can’t help but want to eat more of it.
Missing Naan Bread
Since we started cooking exclusively gluten-free at home 7 years ago (because my husband Juan is Celiac), one of the things I miss the most is dining out at Indian restaurants and tearing off a piece of garlic naan and eating it with curries of all kinds, such as this easy slow cooker lentil curry or this easy chickpea curry.
")
The Best Gluten-Free Naan Bread (Also Dairy-Free & Yeast-Free)
- Making Naan Gluten-Free: I love making homemade bread, and since I love naan, I was determined to make gluten-free version at home. I used a mix of gluten-free all-purpose flour and tapioca flour to replace normal wheat flour, and we’ve got wheat-free naan!
- Making Naan Yeast-Free: Naan is usually leavened with yeast, but that requires more time and makes it more complicated. Since I didn’t want to spend time waiting for the naan to rise, I wanted to make a recipe that was also yeast-free. In fact, using baking powder instead of yeast is a relatively quick fix that allows the dough to rise as you cook it, giving it the air pockets so characteristic of naan.
- Making Naan Dairy-Free (No-Yogurt or Butter): And since Juan has been reacting to dairy lately, I also aimed to make the naan dairy-free. Many recipes also include yogurt (but that’s not dairy-free), so I was wondering “What can I substitute for yogurt in naan?”. I decided to skip yogurt and use water instead, since we don’t always have dairy-free yogurt on hand. You could use unsweetened non-dairy milk (such as coconut milk, cashew milk or almond milk) in place of water too if you prefer. I just like to keep things as easy and simple as possible. In some recipes, butter is brushed on top of the naan for extra flavor, but we’re using extra virgin olive oil instead.
")
Why This Recipe Works
- Simple Ingredients: The few ingredients required for this stove top naan bread are easily accessible at the local grocery store (and you might even have most or all of them on hand!).
- Very Easy to Make: It turns out that making gluten-free naan bread is really not as difficult as you’d imagine. A batch of this easy gluten free naan is ready in just 30 minutes. Even if it’s the first time you’re making naan bread, you’ll still be able to pull off this recipe without difficulty!
- Perfect Texture and Taste: Soft, tender and slightly chewy the way authentic naan should be, you won’t miss traditional naan at all! Plus, the garlic and parsley brings amazing flavor to this flatbread.
- Totally Gluten-Free, Dairy-Free and Yeast-Free: The best part if that this pan fried naan bread is 100% gluten-free, dairy-free (no yogurt used) and requires no yeast (or rising time) at all! This means that even those with Celiac disease or gluten or lactose intolerances can enjoy this delicious garlic naan without worries!
I know you’re going to be making this homemade naan bread on repeat simply because of how easy it is to make, and most importantly, because of how absolutely delicious it tastes!
Ingredients You’ll Need:
Here’s a visual overview of the ingredients you’ll need to make gluten-free naan recipe.
(For exact measurements and quantities, please scroll down to the recipe card at the bottom of this post.)
")
Ingredient Notes/Substitutions:
- Gluten-Free All-Purpose Flour: For best results in making this gluten-free naan bread recipe, I recommend using a good-quality gluten-free all-purpose flour blend that is made of a mix of lighter flours/starches (such as rice flour, tapioca starch, corn starch or potato starch) to ensure a fluffier texture. I do NOT recommend using a flour blend with heavier flours such as garbanzo bean flour as that will result in a denser texture.
- Xanthan Gum: Xanthan gum is a replacement for gluten in gluten-free baked goods, and helps to bind the ingredients together. If your gluten-free flour blend does not include xanthan gum, make sure to add it in.
- Tapioca Starch: You can substitute tapioca starch for the same amount of cassava flour or arrowroot starch. Basically this starch is necessary to give the naan bread a chewy texture, so don’t skip it!
- Baking Powder: Since this naan recipe doesn’t use yeast, we’ll need baking powder for a leavening effect. I recommend using aluminium-free baking powder to prevent any “metallic” taste that may be present especially when making a recipe that requires baking powder in high quantities to give it the yeast-free rise. If you are Celiac or intolerant/allergic to gluten, make sure you use certified gluten-free baking powder.
- Egg: The egg in this recipe helps to bind the ingredients together. I personally haven’t tried making this gluten-free naan recipe without the egg, but if you are vegan or allergic to eggs, you can try using aquafaba or a flax egg.
- Water: You may substitute the warm water for the same amount of non-dairy milk (such as my 5-minute cashew milk or my easy homemade almond milk). Alternatively, if you’re not lactose-intolerant, feel free to go ahead and use normal dairy milk.
- Olive Oil: I like the taste that extra virgin olive oil imparts to the naan, but if you don’t have olive oil (or simply prefer not to use it), you can use other oils such as sunflower oil or avocado oil instead. Alternatively if you are not lactose-intolerant, feel free to use melted butter instead.
How to Make Naan Bread (Step by Step):
1. Combine Dry Ingredients:
In a large mixing bowl, combine all the dry ingredients (gluten-free all-purpose flour, xanthan gum (if using), tapioca starch, baking powder, and salt). Whisk well to combine.
")
2. Whisk Wet Ingredients
In a medium bowl, whisk the egg, warm water, and olive oil together until combined.
")
3. Mix Wet and Dry Ingredients to Get Dough
Pour the wet mixture bit by bit into the large bowl with the dry ingredients and mix with a spoon until you a soft dough forms. The dough should be pliable and easy to handle, and it shouldn’t break easily.
(TIP: If the dough is too dry, add a sprinkle of warm water at a time, and knead until pliable. If the dough is too wet, add a sprinkle of extra flour or tapioca starch until dough is no longer too sticky to handle).
")
4. Shape Dough into Round Disc and Cut into Portions
Use gluten-free floured hands to shape the naan dough ball into a round disc. Cut the round dough disc into 8 equal portions as you would a pizza.
(In my opinion this is the easiest and most logical way to get equal portions.)
")
5. Flatten Dough
Flatten each dough portion with either a rolling pin or your fingers on a floured surface until each piece is roughly 1/8-inch thick. You want the dough to be as thin as possible without breaking so the naan doesn’t get too thick.
(The dough doesn’t have to look perfect, in fact, the more rustic is looks, the better!)
")
6. Prepare Garlic-Parsley Mixture
If using garlic and parsley, mix the fresh garlic and parsley together in a small bowl.
")
7. Press Garlic-Parsley Mixture into Flattened Dough
Press around 1 teaspoon of garlic-parsley mix evenly on both sides of each piece of flattened dough.
")
7. Heat Cast Iron Skillet and Add Oil
Heat a cast iron skillet over high heat and once hot, brush the skillet with a little bit of olive oil.
8. Cook Naan Dough
Place a piece of flattened dough in the middle of the skillet and let it cook for approximately 40 seconds until air bubbles start to form at the surface of the dough and the bottom starts to char slightly.
Brush the top of the dough with olive oil, flip it over, and let it cook for another 40 seconds before removing it from the skillet and placing it on a plate and covering it with a kitchen towel.
")
9. Repeat Until All Dough is Used
Repeat until all the naan dough is cooked and serve warm.
")
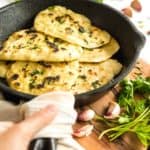
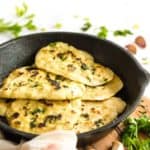
Tear into your naan and devour it!
Now what are you waiting for?
Start tearing into this delicious fragrant gluten-free naan bread and eat it real quick, because it won’t last very long (especially if you’re sharing it with a crowd!).
")
Dish by Dish Tips and Tricks
- Cast Iron Skillet: I believe using a cast iron skillet will yield the best results, as cast iron maintains high heat well and for a long time. You also want the parts of the naan bread that have puffed up to char slightly for the characteristic look that traditional yeast naan has. However, if you don’t own a cast iron pan, simply make sure to heat up your frying pan or nonstick skillet very well before cooking the naan.
- Make Plain Naan: If you prefer to have plain gluten-free naan bread instead of garlic naan, without any extra flavoring, feel free to leave out the garlic and parsley.
- Garlic and Parsley for Extra Flavor: While you may make this gluten-free naan recipe without the garlic and parsley, I highly recommend adding them for a burst of incredible flavor and taste. (If you love garlic and parsley (like I do!), press some fresh minced garlic and chopped parsley on both sides of each flattened piece of dough. In this case, the amount of garlic is completely discretionary – I personally am a huge fan of garlic, so I put quite a generous amount.)
")
Recipe FAQs:
Naan is traditionally made of wheat flour (which contains gluten). That means that regular naan is not gluten-free, and hence Celiacs and those with gluten-intolerances are not able to eat it. However, by swapping out the wheat flour for a gluten-free all-purpose flour blend, we’re making a gluten-free naan those on a gluten-free diet can enjoy!
Many traditional naan bread recipes also tend to include dairy yogurt, which means regular naan is not suitable for those with lactose intolerances.
To store, place the cooled gluten-free flatbread in an airtight container or wrap it in plastic wrap and store it in the refrigerator for up to 3 days.
Yes you can freeze this naan bread. To freeze, place the cooled naan in a freezer-safe container or ziplock bag and freeze for up to 2 months. Let frozen naan thaw completely overnight in the refrigerator before heating it up and serving.
Reheat naan in a cast iron pan or nonstick skillet over medium heat for a few minutes until warm. (If naan was previously frozen, make sure it’s completely thawed before reheating it.)
How to Serve Naan Bread:
- Curries of Any Kind: The best way to enjoy this fabulous naan bread is to eat it with curries, and these two curries are perfect for that:
- Our Favorite Dips: Alternatively, you can also eat this naan bread with either of these dips:
")
Other Gluten-Free Bread Recipes You’ll Love:
- Easy Gluten-Free No Knead Bread (Dairy-Free)
- Easy Gluten-Free Pizza Crust (No-Rise, Dairy-Free)
- Rosemary Focaccia Bread (Gluten-Free, Vegan)
- Soft, Fluffy Gluten-Free Bread (Dairy-Free)
- Soft, Fluffy Buckwheat Bread (Gluten-Free, Dairy-Free)
- Easy Gluten-Free Sandwich Bread (Vegan)
- Gluten-Free Flaxseed Coconut Bread (Paleo, Dairy-Free)
- Grain-free Multi-Seed Bread
- Gluten-Free Honey Oat Quick Bread
- 10 Easy Gluten-Free Bread Recipes to Make on Repeat
Appetizer Recipes to Enjoy:


P.S. If you try this recipe, I’d love for you to leave a star rating below, and/or a review in the comment section further down the page. I always appreciate your feedback. Be sure to check out my entire Recipe Index for all the recipes on the blog. You can also follow me on Pinterest, Facebook or Instagram! Sign up for my Email List to get fresh recipes in your inbox each week!
Easy Gluten Free Naan Bread (No-Yeast, No-Yogurt, Dairy-Free)
- Total Time: 30 minutes
- Yield: 8 pieces of naan 1x
- Diet: Gluten Free
Description
Soft and tender with a chewy interior, this super easy gluten-free naan bread recipe is ready in just 30 minutes. Flavored with parsley and garlic for aroma and taste, it’s totally yeast-free, gluten-free, and dairy-free (no yogurt required!), but it’s so good no one would care! Make a fresh batch of this delicious naan and eat it as a side dish or appetizer (with this delicious slow cooker lentil curry, alongside our popular creamy hummus, baba ganoush, or even on its own)!
Ingredients
- 1 cup gluten-free all-purpose flour
- 1/2 teaspoon xanthan gum (omit if your gluten-free flour blend already includes it)
- 1/2 cup tapioca starch, plus more as needed
- 2 teaspoons baking powder
- 1 teaspoon salt
- 1 egg
- 1/4 cup warm water, plus more as needed
- 1 tablespoon extra virgin olive oil, plus more for brushing
- 1/4 cup fresh minced garlic, optional
- 1/4 cup fresh chopped parsley, optional
Instructions
- Combine Dry Ingredients: Combine all the dry ingredients (gluten-free all-purpose flour, xanthan gum (if using), tapioca starch, baking powder, and salt) in a large mixing bowl.
- Whisk Wet Ingredients: In a medium bowl, whisk the egg, warm water, and olive oil together until combined.
- Mix Wet and Dry Ingredients to Get Dough: Pour the wet mixture bit by bit into the bowl with the dry ingredients and mix with a spoon until you get a soft, pliable dough ball. (If the dough is too dry, add a sprinkle of warm water at a time, and knead until pliable. If the dough is too wet, add a sprinkle of tapioca starch until dough is no longer too sticky to handle).
- Shape Dough into Round Disc: Use gluten-free floured hands to shape the dough ball into a round disc.
- Cut Dough into Portions: Cut the round dough disc into 8 equal portions as you would a pizza.
- Flatten Dough: Flatten each dough portion with your fingers or a rolling pin on a floured surfact until each piece of dough is roughly 1/8-inch thick. You want the dough to be as thin as possible without breaking so the naan doesn’t get too thick.
- Prepare Garlic-Parsley Mixture: If using garlic and parsley, mix the fresh garlic and parsley together in a small bowl, and press around 1 teaspoon of garlic-parsley mix evenly on both sides of each piece of flattened dough.
- Heat Cast Iron Skillet: Heat a cast iron skillet over high heat and once hot, brush the skillet with olive oil.
- Cook: Place a piece of flattened dough in the middle of the skillet and let it cook for approximately 40 seconds until air bubbles start to form at the surface of the dough and the bottom starts to char slightly. Brush the top of the dough with olive oil, flip it over, and let it cook for another 40 seconds before removing it from the skillet and placing it on a plate and covering it with a kitchen towel.
- Repeat Until All Dough is Used: Repeat until all the naan is cooked and serve warm.
Notes
Gluten-Free All-Purpose Flour: I recommend using a good-quality gluten-free all-purpose flour blend that is made of a mix of lighter flours/starches (such as rice flour, tapioca starch, corn starch or potato starch) to ensure a fluffier texture. I do NOT recommend using a flour blend with heavier flours such as garbanzo bean flour as that will result in a denser texture.
Xanthan Gum: Xanthan gum is a replacement for gluten in gluten-free baked goods, and helps to bind the ingredients together. If your gluten-free flour blend does not include xanthan gum, make sure to add it in.
Tapioca Starch: You can substitute tapioca starch for the same amount of cassava flour or arrowroot starch. Basically this starch is necessary to give the naan bread a chewy texture.
Baking Powder: I recommend using aluminium-free baking powder to prevent any “metallic” taste that may be present especially when making a recipe that requires baking powder in high quantities to give it the yeast-free rise. If you are Celiac or intolerant/allergic to gluten, make sure you use certified gluten-free baking powder.
Egg: The egg in this recipe helps to bind the ingredients together. I personally haven’t tried making this gluten-free naan recipe without the egg, but if you are vegan or allergic to eggs, you can try using aquafaba or a flax egg.
Water: You may substitute the water for the same amount of non-dairy milk (such as my 5-minute cashew milk or my easy homemade almond milk). Alternatively, if you’re not lactose-intolerant, feel free to go ahead and use normal dairy milk.
Olive Oil: I like the taste that extra virgin olive oil imparts to the naan, but if you don’t have olive oil (or simply prefer not to use it), you can use other oils such as sunflower oil or avocado oil instead.
Cast Iron Skillet: I believe using a cast iron skillet will yield the best results, as cast iron mains high heat well and for a long time. However, if you don’t own a cast iron skillet, simply make sure to heat up your skillet very well before cooking the naan.
Storing/Freezing: To store, place the cooled naan in an airtight container and store in the refrigerator for up to 3 days. To freeze, place the cooled naan in a freezer-safe container or ziplock bag and freeze for up to 2 months. Let frozen naan thaw completely overnight in the refrigerator before heating it up and serving.
This recipe was originally posted in May 2020 but has since been updated to include ingredient photos, ingredient notes and substitutions, as well as clearer step-by-step instructions.
Adapted from: Tea for Turmeric
- Prep Time: 15 mins
- Cook Time: 15 mins
- Category: Bread
- Method: Stovetop
- Cuisine: Asian


Can I add other flavors such as rosemary and sea salt?, instead of garlic and parsley? If so, would these be adding the same way just on top and not mixed into the dough?
Hi Nancy! Definitely, the best part of this naan/flatbread is that you can play around with the flavors as you like. I used garlic and parsley because that’s the way the restaurants I used to eat at would serve it. But rosemary and sea salt sounds delicious too. You could mix the dried rosemary and salt into the dough if you like, and also press it onto the top for garnishing.
This turned out perfect! Thank you. The texture was good and it was easy to make.
Hi Veronica! So happy that it turned out perfect and you enjoyed this naan! 🙂 YAY! Have a great week and hope to see you around the blog again soon!
Can I use almond flour or gluten free plain flour as substitute for tapioca starch? Would it be cup for cup replacement?
Hi Amanda, I would suggest using another starch such as corn starch or arrow root starch to replace the tapioca starch – basically the tapioca starch acts sort of like a “glue” so almond flour or normal GF plain flour will probably not work.
Was not impressed at all. Followed directions however subbed tap starch for corn starch. Came out horribly crumbly and dry. Waste of GF flour. 🙁
Hi, so sorry to hear that this recipe didn’t work out for you. Many readers have had success with it though. Which GF flour brand/blend did you use? Did it have xanthan gum?
Can you freeze the dough? If so, how long can it be kept in the freezer? Also what’s the recipe in grams?
Hi Anna! I haven’t tried freezing the dough, but I believe you should be able to keep it in plastic wrap for up to 2 months. Then let it thaw overnight in the refrigerator before dividing into pieces and rolling it out. I don’t have the measurements in grams, but I believe you should be able to convert it easily with a conversion calculator online!
This was a really good recipe! Very tasty. It worked on the first try, although I have to obtain some skills in how-to-handle-a-iron-skillet=pan. I used your nightshade free all-purpose flour, but used one cup arrowroot starch (instead of the 2/3 arrowroot & 1/3 tapioca) because I was missing out on tapioca starch. Worked as well 😀 Thank you for your website! A great read.
Hi Jen!!! YAY! so happy that it worked on the first try (and definitely agree that cooking with a cast iron skillet takes a couple of tries to get the hang of it, I had to learn to get used to it too). Thank YOU for reading and commenting, makes me day! Hope you’re having a good weekend and happy new year!
I enjoy reading through your website. Thanks!|
You are most welcome Kent!! Thank you for reading, and thanks for dropping the note! Look forward to seeing you on the blog again sometime soon 🙂
Can you put this is in an oven? If so what temperature would you recommend baking it and for how long?
Hi Kelsey! Hmm, I’m not sure whether it’ll work in the oven. I haven’t tried it in the oven so I can’t say. How about using a normal skillet if you don’t have a cast iron skillet?
After mixing I ended up with a batter; not a dough. I substituted cornstarch for the gum and egg replacer for the eggs. I don’t see this rising or even becoming denser if I leave it to sit.
Hi Jordi, that’s weird, what gluten-free flour blend did you use? In fact, you should be getting a rather thick and moldable dough, a batter seems like you might have too much liquid compared to flours. It shouldn’t rise because it doesn’t have yeast, but the dough will puff up slightly as you cook it in the pan due to the baking powder. I think you might need to add more gluten-free flour to it until you get a “play-doh” texture and consistency.
Tried this tonight and it was so tasty! I did sub Bob’s Redmill egg replacer for the egg and it worked great. Thanks for the recipe!
Hi Allison, yay! So happy you loved it – I am a big fan of garlic naan and this is super easy to make 🙂 Plus, thank you for letting me know that it works with the Bob’s Red Mill egg replacer! I’m sure many people who can’t have eggs will find this information useful! Happy weekend dear!
What is the gluten free flour brand that you recommend? Will any brand work?
Looks delicious, thanks!
Hi Janelle! Thanks so much for dropping by! You could use either the Cup4Cup gluten-free all-purpose flour (but it does have milk in it) or King Arthur All-Purpose gluten-free measure for measure (if you want it completely dairy-free). Hope you enjoy the naan! 🙂
Ok, great, thanks so much! : )
You’re most welcome Janelle! Let me know how it goes if you do make the naan 🙂 Have a great weekend!
Hi there I cannot wait to try this!!! Can I use cornstarch instead of tapioca or arrowroot starch? I am so happy to have found this recipe all the way in SA.
Hi Sonia!! So happy to have you here and so happy this recipe found you! Yes, you can definitely substitute the tapioca starch for the same amount of cornstarch. I believe it should work. Please let me know how it goes later 🙂 Excited and hope you enjoy this naan! Have a great week 🙂 F.
Thanks so much Felicia I will definitely let you know how it goes!!
Most welcome Sonia! x.
Thanks for sharing this, am a big fan of naan!! And I remember chat masala! It’s still around :]
Hi babe!! OMG chat masala is still around?? I remember the tagline is something like “Hot food, spicy gossip”?? Next time I’m back can we go there please? And gorge on naan and all the indian curries. And catch up in person!!
Hi Felicia, thanks for this recipe! Does your GF all purpose flour have xanthan gum in it? The ones I buy doesn’t (and I’m not keen to use xanthan gum if possible).
Hi Tina! That’s a great question – yes, my GF AP flour blend has xanthan gum in it. I do believe that even if you don’t use it though, since tapioca starch has some kind of binding gum properties, you should be fine without using Xanthan gum!
I’ll make sure to clarify in the recipe that my flour blend has XG, so thanks for checking in! Also, could you please let me know how it goes without Xanthan gum? Would love to hear how that goes so other readers can know too! Thanks again Tina!
Thanks for the reply! Okie dokie, I’ll update here once I’ve tried it! Just waiting for my GF AP flour to arrive. ^.^
P.S.: Btw, is it Xantham or Xanthan? I’ve always thought it was Xantham but when I google it, it comes out as Xanthan! So confused! LOL
Hey Tina!! OMG, I always thought it was xantham with an “m” and just googled it too! Amazing how I’m still learning new things everyday!
Finally tried it. I’ve posted on IG and tagged you in it. ???
Hi Tina!! 🙂 Thank you so much for sharing the results with me! 🙂 You might be right about the xanthan gum part – having xanthan gum in your GF flour mixture does make a big difference because it’s a replacement for gluten and without it the naan might not have the chewy texture of normal naan. But I’m so glad you tried it out and that it looks great !! Sending love!
Dear Felicia,
You would remember that we have a North Indian Restaurant just outside our place along Upper East Coast Road where I tried their naan with the different dips.
I have often thought that the naan meal must be quite difficult to prepare and therefore the easiest way to enjoy it will be at the appropriate restaurant.
Thank you for sharing how simple the meal could be prepared in a healthy and delicious way that can afford me to enjoy it at home too.
I have always loved your sense of simplicity in making what seemed difficult to actually be so simple 🙂
With lots of hugs and love,
Mum
Hi Mummy! Yes! Chat masala! Is it still there along Upper East coast?? I miss going to Indian restaurants (we haven’t gone in a longgg time) and mostly I miss eating garlic naan with Indian curries. When I tried this recipe (plus didn’t have to use yeast I was hooked!). No rise time, ready in 30 minutes – and so tasty with the bits of garlic 😉