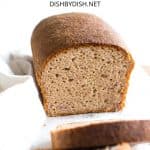
Soft, Fluffy Brown Rice Bread (Gluten-Free, Dairy-Free)
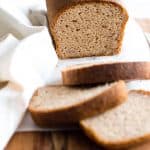
This soft and fluffy brown rice bread is simple to make, and is great for making sandwiches, or toasting and spreading with butter and jam. Made with brown rice flour for extra fiber, this easy yeast bread is totally gluten-free and dairy-free too.
")
Want to save this recipe?
Enter your email & I’ll send it to your inbox. Plus, get great new recipes from me every week!
Jump to:
- My Love for Homemade Bread
- Super Easy Brown Rice Bread
- Why This Recipe Works
- Make Your Own Brown Rice Flour
- Ingredients You’ll Need:
- Ingredient Notes/Substitutes:
- How to Make Brown Rice Bread (Step by Step)
- Dish by Dish Tips and Tricks
- Recipe FAQs:
- Other Bread Recipes You’ll Love:
- Soft, Fluffy Brown Rice Bread (Gluten-Free, Dairy-Free)
My Love for Homemade Bread
Of all the baked goods out there, homemade bread is definitely my favorite to bake.
While quick breads such as this wildly popular easy honey oat bread or this low-carb coconut flour bread are simpler to throw together and bake, baking yeast breads has become almost therapeutic for me, and watching the yeast work its magic to make the dough double in size has never ceased to amaze me.
I’ve baked plenty of yeast breads over the years. In particular, my husband Juan and I love enjoying toast with jam in the mornings, so I literally make a loaf of bread every week.
Sometimes it’s this foolproof soft, fluffy gluten-free bread, other times it’s a more fiber-rich buckwheat bread, and most recently, it’s been this easy brown rice bread.
")
Super Easy Brown Rice Bread
When I say this loaf of gluten-free bread is super easy to make, I’m really not kidding. It’s all a matter of mixing wet ingredient with dry ingredients and then letting the dough rise before baking.
This recipe is also completely gluten-free and dairy-free, which means that even those who are Celiac or have gluten or lactose intolerances can enjoy a large slice of homemade bread!
")
Why This Recipe Works
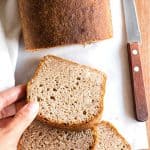
Unlike breads with gluten, in this gluten-free yeast bread recipe there’s no kneading involved, no double rise required, and trust me when I say that this bread always comes out great. Plus, it has a beautiful dome shape that I absolutely love!
Even if you don’t have access to affordable gluten-free flour blends, you can still make this recipe, because no flour blend is required! The only flour you’ll need in this recipe is brown rice flour.
")
Make Your Own Brown Rice Flour
One of the key ingredients in this recipe is brown rice flour, and it’s really simple to make your own in just minutes! All you need is brown rice, a high-speed blender, and a fine-mesh sieve.
Check out my easy tutorial on how to make brown rice flour and learn to make your own homemade rice flour today!
")
Ingredients You’ll Need:
This is a visual overview of the ingredients you’ll need. For the specific quantities and measurements, please refer to the recipe card at the bottom of this post.
")
Ingredient Notes/Substitutes:
- Brown Rice Flour: I like making my own 5-minute homemade brown rice flour, but you can easily buy it online instead. Since this recipe is specifically to make brown rice bread, I wouldn’t recommend swapping it with white rice flour, as the textures are different (white rice flour is starchier than brown rice flour). If you would like to make this with other gluten-free flours with a texture similar to brown rice flour, you can use millet flour or sorghum flour in equal quantities.
- Sunflower Oil: I used sunflower oil because that’s what I always have on hand. Alternatively, you can use any neutral vegetable oil.
- Psyllium Husk Powder: Psyllium husk powder is essential in the recipe for binding the ingredients and creating the beautiful dome-shape loaf, and I do NOT recommend substituting it with any other ingredient. If you have psyllium husks, you can grind very finely to get a fine psyllium husk powder.
- Sugar: Sugar is required as food for the yeast to feed on so the yeast will be activated and make the bread rise. Do not leave it out.
- Instant Yeast: I like using instant yeast because it doesn’t need to be activated beforehand.
- Xanthan Gum: Since this is a gluten-free recipe, xanthan gum is required as a replacement for gluten to help bind the ingredients together.
- Baking Powder: In addition to the yeast, baking powder helps to give the loaf a little more rise to make it fluffier.
- Eggs: I have not tested this recipe with an egg-replacer, so I don’t know how it will turn out. (If you do try it without eggs, please leave a comment letting me know how it goes, thank you!)
How to Make Brown Rice Bread (Step by Step)
1. Grease
Grease an 8″x4″ metal loaf pan.
")
2. Whisk Dry Ingredients
In a large mixing bowl, whisk the brown rice flour, psyllium husk powder, instant yeast, sugar, baking powder, xanthan gum, and salt together.
")
3. Add Liquid Ingredients to Form Dough
Add the warm water, sunflower oil, and eggs to the dry ingredients and mix well to get a wet and shaggy dough (the dough is supposed to be shaggy, so don’t worry).
")
4. Transfer to Pan
Transfer the dough to the greased loaf pan and smooth out the top with a wet spatula.
")
5. Let Dough Rise
Cover the dough pan with a kitchen towel and let the dough rise approximately 30 to 40 minutes in a warm, draft-free place until it has almost doubled in size. (Tip: I like to place the loaf pan in my microwave with the power off – it creates the perfect draft-free and warm environment for rising dough).
")
6. Preheat Oven
During the last 10 minutes of the dough rising, preheat oven to 350F and adjust the oven rack to the middle position.
7. Bake
Bake the dough for 40 to 50 minutes until bread has turned dark brown on top and the loaf sounds hollow when tapped. Remove loaf from the oven.
")
8. Cool Completely Before Slicing
Let the loaf cool for 10 minutes in the loaf pan, before removing and letting it cool completely on the wire rack. Slice only once the loaf has completely cooled.
")
Dish by Dish Tips and Tricks
- Use a Metal Pan: I highly recommend using a metal loaf pan as it will ensure that the bottom and sides of your loaf will be uniformly brown, and that the bottom of the bread is fully-cooked does not stick to the pan (which may happen if you use a glass loaf pan).
- Use a Serrated Knife to Slice: Make sure to use a serrated bread knife (a knife with ridges) to slice the loaf to prevent the loaf from being squashed (which will happen if you use a knife with smooth edges).
- Slice and Freeze: A tip to ensure you have sliced bread ready always is to slice the bread and then wrap it in plastic wrap and freeze. Whenever the craving strikes for homemade bread, simply remove a slice or two and toast!
Recipe FAQs:
Since this recipe is specifically to make brown rice bread, I wouldn’t recommend swapping it with white rice flour, as the textures are different (white rice flour is starchier than brown rice flour). If you would like to make this with other gluten-free flours with a texture similar to brown rice flour, you can use millet flour or sorghum flour in equal quantities.
To store this bread, simply place the bread in an airtight container and store in the refrigerator for up to 5 days.
Yes, of course you can freeze this gluten-free rice bread. Simple wrap the cooled loaf in plastic wrap and then freeze for up to 3 months. Let the bread thaw completely overnight in the refrigerator before slicing.
")
Other Bread Recipes You’ll Love:


P.S. If you try this recipe, I’d love for you to leave a star rating below, and/or a review in the comment section further down the page. I always appreciate your feedback. Be sure to check out my entire Recipe Index for all the recipes on the blog. You can also follow me on Pinterest, Facebook or Instagram! Sign up for my Email List to get fresh recipes in your inbox each week!
Soft, Fluffy Brown Rice Bread (Gluten-Free, Dairy-Free)
- Total Time: 1 hour 40 minutes
- Yield: 12 servings 1x
- Diet: Gluten Free
Description
This soft and fluffy brown rice bread is simple to make, and is great for making sandwiches, or toasting and spreading with butter and jam. Made with brown rice flour for extra fiber, this easy yeast bread is totally gluten-free and dairy-free too.
Ingredients
- 2 cups brown rice flour
- 1 3/4 cups warm water (approximately 105F – 115F)
- 1/4 cup sunflower oil
- 1/4 cup psyllium husk powder
- 1 tablespoon instant yeast
- 2 tablespoons sugar
- 3/4 teaspoons xanthan gum
- 2 eggs, room temperature
- 1 teaspoon baking powder
- 1/2 teaspoon salt
Instructions
- Grease: Grease an 8″x4″ metal loaf pan.
- Whisk Dry Ingredients: In a large mixing bowl, whisk the brown rice flour, psyllium husk powder, instant yeast, sugar, baking powder, xanthan gum, and salt together.
- Add Liquid Ingredients: Add the warm water, sunflower oil, and eggs to the dry ingredients and mix well to get a wet and shaggy dough (the dough is supposed to be shaggy, so don’t worry).
- Transfer to Pan: Transfer the dough to the greased loaf pan and smooth out the top with a spatula.
- Let Dough Rise: Cover the dough pan with a kitchen towel and let the dough rise approximately 30 to 40 minutes in a warm, draft-free place until it has almost doubled in size. (Tip: I like to place the loaf pan in my microwave with the power off – it creates the perfect draft-free and warm environment for rising dough).
- Preheat Oven: During the last 10 minutes of the dough rising, preheat oven to 350F and adjust the oven rack to the middle position.
- Bake: Bake the dough for 40 to 50 minutes until bread has turned dark brown on top and the loaf sounds hollow when tapped. Remove loaf from the oven.
- Cool Completely: Let the loaf cool for 10 minutes in the loaf pan, before removing and letting it cool completely on the wire rack. Use a serrated bread knife to slice once the loaf has completely cooled.
Notes
- Brown Rice Flour: I like making my own 5-minute homemade brown rice flour, but you can easily buy it online instead. Since this recipe is specifically to make brown rice bread, I wouldn’t recommend swapping it with white rice flours, as the textures are different (white rice flour is starchier than brown rice flour). If you would like to make this with other gluten-free flours with a texture similar to brown rice flour, you can use millet flour or sorghum flour in equal quantities.
- Warm Water: Make sure your water is between 105F – 115F. The water needs to be warm enough to activate the yeast, but not so hot that it kills the yeast.
- Sunflower Oil: I used sunflower oil because that’s what I always have on hand. Alternatively, you can use any neutral vegetable oil.
- Psyllium Husk Powder: Psyllium husk powder is essential in the recipe for binding the ingredients and creating the beautiful dome-shape loaf, and I do NOT recommend substituting it with any other ingredient. If you have psyllium husks, you can grind very finely to get a fine psyllium husk powder.
- Sugar: Sugar is required as food for the yeast to feed on so the yeast will be activated and make the bread rise. Do not leave it out.
- Instant Yeast: I like using instant yeast because it doesn’t need to be activated beforehand.
- Xanthan Gum: Since this is a gluten-free recipe, xanthan gum is required as a replacement for gluten to help bind the ingredients together.
- Baking Powder: In addition to the yeast, baking powder helps to give the loaf a little more rise to make it fluffier.
- Eggs: I have not tested this recipe with an egg-replacer, so I don’t know how it will turn out. (If you do try it without eggs, please leave a comment letting me know how it goes, thank you!)
- Use a Serrated Knife to Slice: Make sure to use a serrated bread knife (a knife with ridges) to slice the loaf to prevent the loaf from being squashed (which will happen if you use a knife with smooth edges).
- Storing/Freezing: To store, place the loaf in an airtight container and store in the refrigerator for up to 5 days. To freeze, wrap the cooled loaf in plastic wrap and freeze for up to 3 months. Let frozen loaf thaw completely in the refrigerator overnight before slicing.
- Adapted from: Eat Beautiful
- Prep Time: 10 mins
- Rising Time: 40 mins
- Cook Time: 50 mins
- Category: Bread
- Method: Baking
- Cuisine: American
Hey, is there a good gf xanthan gum replacement please? I don’t always process it easily.
Hi Rai! If you can’t take xanthan gum, you can use twice the amount of psyllium husk powder to replace it. Hope this helps and that you enjoy the bread!
Just wondering if I can make this in my bread maker. If so, which setting would I use?
Hi Nan!
I believe you should be able to make it in your bread maker if you have a “Gluten-Free Bread” setting.
Hope this helps!
Felicia,
I made this recipe as specified, even adding the apple cider vinegar from the update in the comments. Two things: my bread was purple/blue, and was pretty gummy. The sides and bottom of the dough were also “wet,” a layer of wet dough dough. The bread cooked to 210 degrees F. I rested I it until fully cool before I sliced it. Any suggestions? Thanks! John
Hi John! Thanks for letting me know how the bread went for you. Regarding the purple/blue color – depending on the psyllium husk/powder used, that may result. The color doesn’t affect the taste/properties of the bread, but you may want to experiment with different brands of psyllium husk powder. In my experience, psyllium husk powder that looks quite white/cream color is better for bread baking (in terms of not making the bread turn purple) as opposed to psyllium husk powder that is darker in color.
As for the sides being wet – did you use a metal pan? Using a metal pan tends to ensure that the sides are evenly cooked, if not, what I sometimes do is remove the already cooked bread out from the pan, and place it upside down on a wire rack and let it bake for another 5-10 minutes until the sides and bottom are fully cooked too.
Hope you enjoy this brown rice bread as much as we do! 🙂
Felicia, you responded so quickly! Thank you. A couple follow up questions.
I baked the bread in a metal pan, but it was a basic, not heavy pan. I baked it to 210 as I mentioned, but the bread was pretty gummy, not fit to eat, so I did something wrong :-). Could the psyllium powder I used be a cause? Any other ideas?
As to baking out of the pan, good idea!
Hi John, you’re most welcome!
I would say that depending on the humidity of where you live, and how wet the dough is, and how your oven works, you might have to bake it more time – sometimes even up to 50 mins or 1 hour. Regarding the gummy consistency, you can try to reduce the psyllium husk power a little. Also, what GF flour blend did you use (what ingredients does it have?) Too much tapioca starch may make it gummier. Also, as with all GF baked goods, make sure you let the bread cool completely before slicing – as the bread continues to cook with the residual heat even after it’s out of the oven. So for best results, always let the bread cool to room temp before slicing 🙂
Hope this helps! 🙂
Thanks again! You asked what GF Flour I used, but other than the Brown Rice flour, there was no additional GF flour. Should there be? Thanks!
Hi John, you’re right, it’s just the brown rice flour (so you’re good!). I asked because sometimes I’ve had readers swap/add different flours and that might cause a difference in textures.
I made this loaf today and it came out great! I have a condition and I am unable to have gluten, dairy, potato, yeast etc. (I read the comment section and replaced the yeast with the additional baking powder). I react to almost all flours except brown rice flour and I haven’t been able to find any bakery selling bread using brown rice + eliminating everything I can’t have… ie I stopped eating bread! 🙁 This recipe is a life saver! Thank you for sharing it!
Hi Eunice!
So happy to hear that you can eat this bread and that you enjoy it! So sorry to hear that you can’t have most flours except brown rice flour, but I’m glad that this bread works for you!!
Thanks for sharing your feedback on replacing yeast with baking powder.
Hope to see you on the blog again sometime soon!
xx,
Felicia
Hi,
Can you use olive oil in this recipe?
Hi Julie! Yes you can definitely use olive oil 🙂
Have tried making this bread about five times. It hardly raises at all! I still like it, but it’s certainly not fluffy. Don’t know what I might be doing wrong.
Hi Christine, so sorry to hear that!
Let’s try to troubleshoot – did you check if your yeast works (and is not expired)? If it’s not rising at all (pre-bake) that’s likely it. Also could be that your water is either not warm enough (it should be between 105-115F) so the yeast doesn’t get activated, or the water is too hot and kills the yeast. Also, did you make sure to add the sugar? Sugar is essential as food for the yeast to activate – and not to make the bread sweet. Did you add in the baking powder, as well as the apple cider vinegar? All this helps to create more lift for the bread.
Hopefully this helps, and hope to see you around the blog again sometime soon!
Cheers,
Felicia
Apple cider vinegar is not in the recipe I have. How much should be added?
I recently purchased the yeast so assume it is OK. It does rise a little initially.
Thanks for responding.
Hi Christine,
You can add 1 teaspoon of apple cider vinegar to the wet ingredients. Also, to check that the yeast works, do this test: mix 1 tablespoon of the yeast you just bought with 2 tablespoons of sugar and 1 3/4 cup warm water (let it sit for 5 minutes).
If the yeast works, it should start forming tiny bubbles and foaming up. If that’s the case, then the bread should rise (make sure to cover the dough with a kitchen towel and let it sit in a warm, draft-free area while it rises. The yeast needs the warmth to work.
Hi thanks for the recipe but may I ask what oven setting should I use to bake this bread eg conventional,convectional/fan forced?Your answer will be greatly appreciated. Thank you!
Hi Hannah! You should use the conventional oven (the one with the top and bottom heating element on).
Hope you enjoy the bread!
Finally a yeast bread using brown rice flour! Tried it and we love it. Thank you!
So happy to hear that Marg!! Thanks for letting me know how it went, and I hope to see you around the blog again sometime soon!
Hi there,
I can’t have yeast. Just wondering if there is a way to modify this recipe so that I can make it?
Thanks!
Eva
Hi Eva! Sorry to hear that you can’t have yeast. Yes, I believe that you can make this without yeast, simply leave out the sugar and the yeast, and instead of 1 teaspoon of baking powder, use 3 teaspoons of baking powder instead (to help the bread to rise since you won’t be using yeast). I hope it works and that you enjoy it!
Hello from the Red Dot,
To all the people reading this, if I could make this I’m sure all of you will be able to make this recipe which is very easy to follow and make. The best part is, IT IS DELICIOUS.
Don’t believe me try it yourself and be left in awe. Most GF breads tend to be dry or pasty in flavor but not the bread by Felicia.
Look forward to trying some of your other recipes.
Hi VC, nice to meet a fellow Singaporean too! So glad you enjoyed this brown rice bread and that it turned out great! 🙂 Looking forward to seeing you on the blog again soon!
Hello Felicia
You have the best recipe ever for this bread. I’ve tried it frost time it came out perfectly. I am very happy and it’s soft taste very very nice . At last I can also eat bread and a healthy one. Making it was easy as well. I only baked it’s for 37 minutes because of my tin and possibly the climate where I live counts and my oven but with 37 minutes it was just perfect timing.
Thank you again for sharing
Hi Mrs T! I’m so happy to hear that you enjoyed this bread! Thank you for sharing how it went, and hopefully you’ll try some of the other bread recipes on the blog!
Take care!
Felicia
Can you double this recipe for a larger loaf??
Hi Deborah, I believe you could, but your would have to use a larger loaf pan (then let the dough rise for as long as required to double in size), and baking time would also increase by at least 50% more. Hope you enjoy the bread!!
Thanks for the recipe. I’ll give it a try. But I have a question please. Can I use honey in place of sugar. I am duabet and cannot use sugar
Hi Valentina! Yes, I believe you should be able to use honey instead of sugar. Basically the sugar is the “food” to feed the yeast so that the yeast activates and creates the air bubbles that make the dough rise.
Let me know how it goes!
Enjoy!
This looks so wonderful but you lost me with the sugar requirement. Sugar is worse for me than gluten. Is it at all possible to sub it with erythritol or palm sugar? I don’t bake normally, so I don’t know. I’m trying to figure it out, because GF breads are not easily found here here I live, and a lot of the online ones have potato starch, which is also not allowed for me.
Hi Deb!
Very nice to meet you, and thanks for writing! I totally understand how difficult it is to find storebought GF breads that you actually want to eat (and isn’t rock hard and dense LOL)!
Regarding the sugar, it’s basically “food” for the yeast to feed on so the yeast gets activated and creates the gases required for the bread to rise. The sugar actually gets consumed by the yeast during the rising process. You can definitely substitute it with palm sugar (since it’s sugar that they yeasts needs).
Hope this helps, and I hope you’ll just this brown rice bread as much as my husband and I do!
xx,
Felicia
Thank you very much for these great recipe!
Thank you! I’m glad you enjoyed it!
Good Morning Felicia,
I simply love following all your bread recipes because I love to eat freshly baked bread any time any where.
Have a blessed day!
Mum
Hi mummy! So happy you enjoy this bread recipe (and all the others)!?
Love you too!